
A few days ago, I found myself among a group of wedding photographers discussing how far behind they are with their editing. Answers varied, as did attitudes. Some felt they were only eight weeks behind, which was fine. Other photographers seemed anxious, with 17 or 18 weddings in a backlog lasting months. When it was my turn, I gulped. I said: "Two weeks. The wedding I'm delivering today was shot two weeks ago".
Now, I almost feel guilty saying that. I was asked why I was not so far behind; I didn't know the answer. One person suggested I must only be shooting a few weddings, and I informed them I'd be shooting over 60 this year. What's my secret? The truth is that I don't have a single bombshell to drop. I just plow through my editing pile like everyone else, but I do certain things differently from some photographers to make my workflow more efficient.
And so, the wonderful readers of Fstoppers, an article was born! Initially, I wanted to write a complete run-through of my culling, editing, and delivery process to give an in-depth explanation as to why I do each step that specific way. However, this workflow has been tailored to me over the years and is fantastic for how I work at weddings. Many people may shoot differently.
And so, the answer was to split the article into some tips that may save you time with your workflow. You may agree or disagree with each one and implement changes to your workflow wherever you see fit.
Full Wedding Workflow Timeline
I did edit a wedding as I was writing this article and decided to share the time taken to deliver the entire gallery.
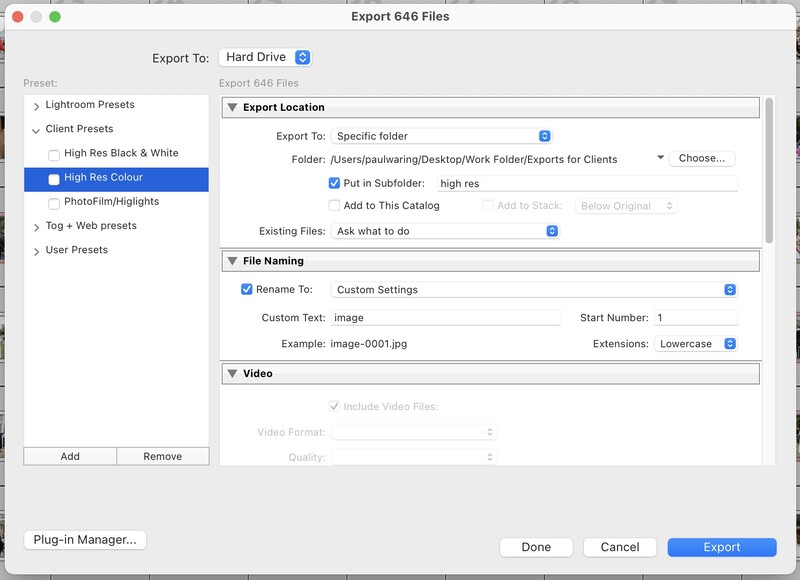
- I began at 1:35 pm. This was when I opened up my culling software and selected the folder containing 3,130 raw images.
- I was done culling at 2:38 pm, down to 646 photographs.
- I left my computer to import the photographs. I played with my cat and ate some lunch.
- At 3:35 pm, I arrived back at my computer, and the images were ready for me with a preset applied.
- By 4:34 pm, all photographs were edited, and I hit export.
- I like to choose my highlight photos while the export is happening and export those in high resolution and web resolution. My computer hates me for this, as I make it work hard.
- After around 40 minutes and more time playing with the cat, my photographs are ready. The highlight images are also ready for a client slideshow. A separate export for my website is also made if I am publicizing the wedding.
- The entire gallery is uploaded to Pic-Time, the slideshow is built using their fantastic platform, and the gallery is sent to the client.
The client has their gallery by 6:10 pm. This entire process has taken approximately 4.5 hours. Some days, I will sit at my computer and complete two entire weddings.
I also put this wedding and the slideshow on my website. The images were already chosen and exported, ready to go. My blog posts follow a template, so the process takes 15-20 mins. You can see this exact wedding here!
This timeline highlights that efficient editing is possible. Weddings don't need to be a chore.
1. Shoot Thoughtfully
My first tip has nothing to do with editing, computers, or fancy software. We can easily assume we'll fix things in post. Heck, most of the time, we can. But does that mean we should? Those little changes can be amplified when we have hundreds of photographs to edit.
Cropping 200 photographs might take around 10 seconds per photo. That is 2,000 seconds or just over half an hour.
Overshooting can also be an issue. Culling twice as many photographs means twice the time taken to do so. Do yourself a favour and change that 12 fps burst mode to 5 fps. I can't imagine needing more than that.
Consciously thinking of these things when we are taking photographs will significantly help when it comes to batch-editing photographs later. Most of it will also become second nature. You can read more about the way I like to shoot in this article.
2. Cull Before Importing
I like to cull my photographs before I import them into my editing software for several reasons.
The main one is speed. Although many photographers will argue that Lightroom can be set up to flick through images quickly, those images still need to be imported at the start. Building all those previews takes time I'd rather spend working on the photos. We can set Lightroom up in many different ways, and I've tried many of them, but I've not found anything faster than culling externally.
I won't go through every program here, but there is the popular choice and the one I like to use. For many wedding photographers, the tried and tested program is Photo Mechanic. This has been the industry standard for culling thousands of photographs for many years. It works by using the embedded preview (even for raw files) on the screen, meaning it can make easy work of sifting through thousands of photos.
The program I use is slightly different, with some added features: Narrative Select. Almost everybody I've recommended this to has converted. Unless you use a PC (Select is Mac only), this may just be the fastest way to cull photos. The software uses a similar approach to Photo Mechanic, using embedded previews. However, we also see a few more tools which help out, including face and eye assessments and details panels. It will even give you a discreet warning icon when an image is the worst of the bunch.
We only need to ship the chosen photographs to our editing software, making this process far quicker.
3. Optimize Lightroom
I follow a few guides to get Lightroom acting the way I want it to. You should ensure that you work from your fastest computer drive. My MacBook's internal SSD is snappy, so this is where I keep my images and catalogs when I'm editing them. Everything is then moved to slower drives for long-term storage.
4. Presets for Everything
I like to save any repeatable settings as a preset. This starts when I import the images to Lightroom, where I can set an import preset. At a glance, I know my preferred settings and preview sizes will be applied by Lightroom.
I've been through many develop presets in the past and bought packs from other photographers. My current main preset has been made over time to work for most images. I then have indoor and nighttime versions with slightly different tweaks. Applying this base preset to all the photographs as they are imported will get images close to where I want them. They usually need a minor exposure tweak and possibly a white balance adjustment. Some need neither, and I can smugly skip to the next photo.
Settings can also be saved when exporting our photographs, and I find this much faster than going through the individual tick-boxes each time I want to publish some photographs.
Whenever I need to change settings, I ask myself if I will use those new settings in the future and make a relevant preset.
5. Use a Loupedeck
Shamelessly, Loupedeck products have sped up my workflow more than anything I can think of. I started using a Loupedeck + Photo & Video Editing Console before upgrading to the Loupedeck Live Console. I'm also aware of the Loupedeck CT, but I didn't need the extra functionality it brought. I love how small and neat the Loupedeck Live is.
If you're not clued up on the functionality, the various Loupedeck consoles allow you to control a computer more tactilely, using dials and buttons. I find this a very intuitive way of working.
I have mine set up simply and probably only use a portion of the functionality. Still, this allows me to quickly make the necessary adjustments without taking my eye off the image or messing around with fiddly Lightroom sliders. I can also load my develop presets into this and quickly apply them when needed.

6. AI Is Your Friend
I almost didn't include this tip, as I didn't use the program for this particular wedding. However, I have no issues using Imagen AI when I want a set of photographs out even faster. It's reasonably quick and easy to set up, providing you can supply at least 5,000 photographs you have edited. It learns how you edit and builds a profile for you.
I quite like editing my work. I enjoy zoning out and getting lost in the project for a while. However, ImagenAI works wonders when you're against the clock. I probably use it with around 20% of my weddings.
7. Blog Immediately
This tip won't apply to everybody, and it doesn't even apply to all my weddings. But, if you put your photographs in a post on your website, I recommend doing this as soon as you deliver the photos to the client. The project will be fresh in your mind, and your energy is currently invested in those photographs.
This shouldn't be a task that takes all day, either. I have a simple template (a nod back to my love of presets) and can put a post together in no time. The images have already been selected when choosing the client highlights, and I use the client slideshow on the page.
If I don't post the wedding immediately, there's a strong chance I won't get around to it.
8. Don't Overthink it
Finally, I find that when we start overthinking, we slow down. Every time an image pops up on my screen, there is potentially something I can edit, change, manipulate, or correct. The trick is to make changes quickly and naturally without consciously thinking about them. As soon as your gut feeling is good, move on. It's probably no less perfect than if we spent an hour on it, especially for the average client's eye.
And that's it, my tips for quicker and more efficient editing. I feel everybody could find a different way to improve their workflow. There isn't one big secret to making you faster, but lots of small changes will eventually see you speed things up.
My wedding photography work is never heavily manipulated. Your work may be different, so my workflow might not work for you. However, most of us can improve our efficiency slightly, thus giving more time for our families, days off, and probably more weddings.


Join the Fstoppers community for free
-
Post comments and join in the discussions
-
Browse the site ad-free
-
Share your work and get featured in the community
-
Compete in the photo contests for fun and prizes
15 Comments
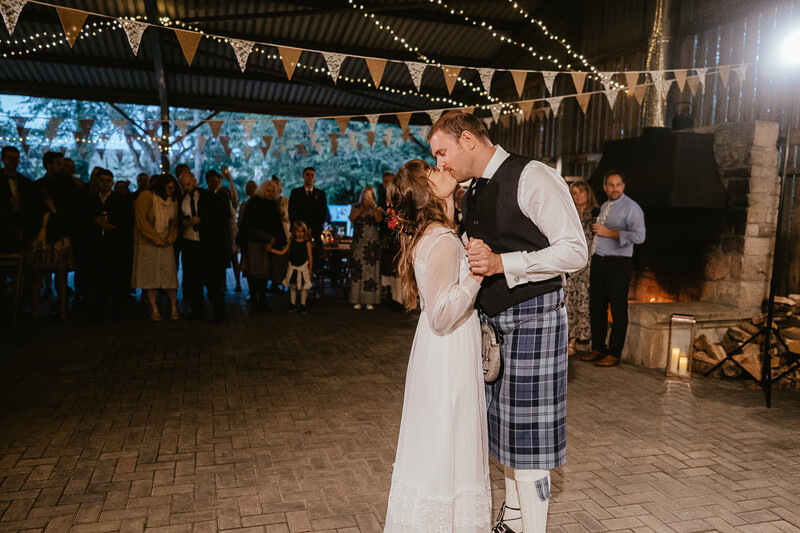
59 minutes to edit 649 images. That's 11 images a minute. Client work deserves more attention than this.
Looking at the gallery, it shows too
Thanks for your comment. yes, 11 images per minute. Naturally, I understand this is fast, but the article points to why this is so... My preset does the heavy lifting for me, providing I get it right in camera. I don't like a heavily edited 'look'. As i said in the article, this works for me and may not work for everybody else. If you wish to spend more time editing, that's the photographer's prerogative.
As for the gallery showing it. Again, it's an opinion that I can respect, but I thought I would just respond with the opinion of the client, which is the one that really matters.
"Thank you, thank you, thank you for the photographs. They are absolutely gorgeous and even better than I could have hoped for. I cried when I saw them"
"You were an absolute pleasure to work with and the photographs are genuinely now up there with one of the favourite things I own"
For me, that's the most important thing.
"Getting it right in camera" for this type of work limits you in the main to getting an exposure within 1/3 stop of correct. And with only that 1/3 stop accuracy, you're rarely going to get the exposure spot on.
Location photography with little control on ambient requires so much more adjustment than simple exposure. It is why we have localised dodging / burning / colour correction available. Shadows need lifting, local highlights need controlling, a little "life" needs adding and colour casts need management.
And with only that 1/3 stop accuracy, you're rarely going to get even the exposure spot on.
Cameras don't "see" how we see. So quite some adjustment is needed to combat that. I wager that any photographer who isn't doing localised adjustments is either very lucky or cheating the client.
Most of my party images (I don't shoot weddings) may have 10+ adjustment layers. And my work doesn't have a highly stylised look. I'd need to do all of that before I even consider applying any preset.
Clients often don't know what they are missing, so the argument of "the client is happy" is much like I thought a Big Mac was great, until I tasted a Five Guys.
If I ever find I'm able to hit 11 shots per minute, I'm going to quit. Because my clients deserve more than that.
We have a very different way of working, Lee. Thanks for your input... I couldn't imagine having 10 adjustment layers on a wedding photograph, that's really not for me. To each, their own, as the saying goes. Thanks for reading.
That's about the speed I edit too. 11 seconds is average. Ever since I went to mirrorless I have a lot less exposure errors so less of that to fix. A lot of images come out of the camera with no work needed if you aren't into filters and unnatural colors. Some images need 2-3 seconds or can be fixed in a batch of 4-5. Some need 30-40 seconds.
If your customers love it, and you have lots of customers, and charge decently, your on to a winner.
I too use PM, but use C1 to edit with, I don't use presets, but. do have a few minor tweaks set up to speed things along.
I hand finish images removing distractions and blemishes. Where I shoot, I'm dealing with stray tourists in bikinis, harsh sun, dark shadows, sunburn, melting makeup, signage, sweat, etc. So I have a lot of hand finishing, that no presets going to help me with.
For me, timeless doesn't mean isolated, I'm a real time shooter, I shoot the real thing as it happens. I move a lot, and one shot is quite different to the next shot. So while I can copy settings between shots, it rarely helps, as for example I'm shooting into the sun, then not. While my sets have a consistent overall feel, shot to shot there are differences
That brings me onto the whole preset thing. you can almost date wedding photography by the colour pallete. As a industry we have had the "I shoot film" green look, the orange brown earthy look, and the muted green look. Underpinning that there is the ISO is the same as lighting look.
I still can't get over the fact that you edit a wedding faster than we QC a finished one. For us, at the QC stage we absorb each image fully, expressions, distractions, composition, technical issues, noise, sharpness, dust, etc.
His gallery is fine. Looking at a handful of yours, you really shouldn't be judging.
You're working here with extremely simple and consistent lighting conditions, which means very little intervention related to contrast, highlights & shadows, or white balance. Events shot indoors, especially with available light, require far more tweaking, even with a well-crafted preset. My corporate event work, which I increasingly shoot with available light indoors, requires roughly 1/2 hour of tweaking per hour of shooting, and I don't spray & pray.
Things that speed up my workflow:
1) Upon arrival at my home office, I download and import into Lightroom Classic from three cards (I use three cameras) simultaneously. While waiting for previews, I unpack my gear if I'm not immediately going to bed.
2) After culling, I send selects to DxO PhotoLab for editing, automatically applying a custom preset in the process. This gets me 80% of the way to final. With highly variable and contrasty available light, though, I still have to tweak WB for consistency, and I lift a lot of shadows.
3) I replaced my cylinder Mac Pro with an M1 Mac mini. Snappier with LRC and EIGHT TIMES faster at processing DeepPRIME noise reduction in DxO PhotoLab. Typical batch export went from overnight to during dinner.
I sure do miss Aperture's 3-up view when culling. LRC's culling tools are much more cumbersome when selecting the best from a 3- or 5-frame burst (gotta get speakers with eyes open and mouth closed).
P.S.: Thanks for the mention of Narrative Select. I hate culling in LRC, so I'll check this out.
P.P.S: Whoa! Select is FREE for up to 6 projects per month. Awesome. Looking very promising...
thanks for your response and input. And you are right, not every wedding is as fast as this one. However, I would like to think that no wedding takes me more than a working day, eight hours, to complete.
On Narrative Select, also. It's a fantastic program. I don't think I could go back to culling any other way. Their free version will be as much as many people need, too.
"no wedding takes me more than a working day, eight hours, to complete"
That seems consistent with my corporate event work, if maybe a bit faster. A multi-day conference can take me more than a day to deliver.
I'll add to my list of speed-ups:
4) I have export presets in LRC that, with one click, produce both web-rez and print-rez JPEGs for delivery.
5) When working in multiple conference rooms and ballrooms at a conference, I arrive early so I can shoot an X-Rite ColorChecker Passport in each, which allows me to later generate a custom camera profile and WB setting for each room. This helps unify the color, as the lighting in various rooms can be very, or subtly, different, and it reduces, but doesn't eliminate, my WB tweaking.
downloading native select as I type to try it out. love the other tips too. great framework to work too!!
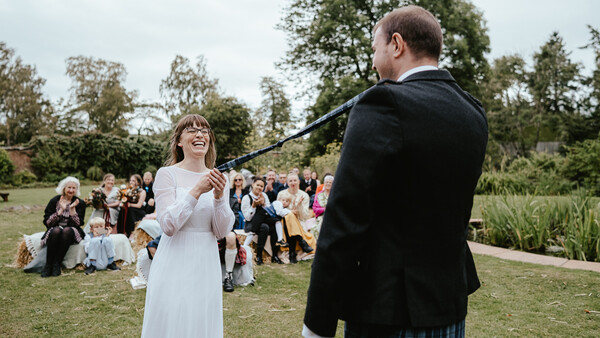
Not everyone is into that SOOC look. I'm pretty sure the couple didn't hire him sight unseen. They chose to pass up the so-called “normal”- clean, natural, timeless look.
I would brighten this image, remove the magenta from the blue suit, and add (or not remove) a bit of vignetting. The couple's heads are so close to the corner that my eye tends to wander out of the frame.
Hi Ryan.
Again, I want just to point you back to the part of the article where I wrote, "this workflow has been tailored to me over the years and is fantastic for how I work at weddings. Many people may shoot differently".
As artists, we are allowed to do things our way and clients will book the best photographer for them.
And the way I like to do things, I prefer to leave most things in the shot. I don't remove my couples and take them to a quiet area to get a 'clean background', I would much prefer a shot with context, with unfiltered emotion, which might mean there is 'stuff' in the background. But I won't be editing that out.
And my clients hire me knowing this. It's kind of 'my thing', and I'm happy it's mine. I promise you this; There is no shortage of clients who want to be left alone on their wedding day. They are just wanting it to unfold, with the photographs being an honest depiction of that day. clean, they'll come to you, and you can rock it!
As much as the photograph that you have posted is lovely... Where you see a clean image, I see no context. This is because we all look at photographs differently. And isn't that wonderful?