
After eight months of work I finally finished this project: an aerial tilt-shift hyperlapse of Miami. The idea was to produce something different. Time-lapse videos are very common these days and most drone operators can make a decent hyperlapse with their drones. In this video I wanted to replicate the out-of-focus look normally associated with macro photography to give a miniature effect of the city of Miami. Here is how I filmed this video and what I learned during the process.
The City of Samba
The inspiration to create this video came from the masterpiece work of the Brazilian Composer Jarbas Agnelli and Australian Photographer Keith Loutit. In 2012 they released a video called “The City of Samba” showing Rio de Janeiro during the famous carnival. Loutit, also known as the god of tilt-shift time-lapse, produced this epic video with a Nikon D3S camera and modified large format lenses while Agnelli composed the perfect soundtrack to match the visuals. The video won the Vimeo’s Top 12 of 2012 award. In my case, I enlisted the service of Ben Laver, a talented British music composer who designed the perfect song for the Miami video.
The Tilt-Shift and Miniature Effect
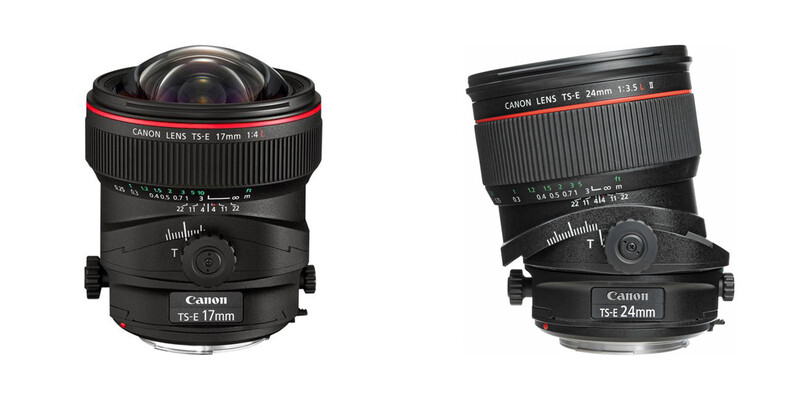
The tilt-shift lenses are normally used to correct perspectives and play with the selective focus feature (PoF and DoF). Another common usage is to create a miniature look by blurring part of the image, usually the top and bottom, to simulate the filming of a tiny, fake world. But adding some blur to the image is not enough to convey the toy-like feel. A few others elements are required. The first one is to film from above because macro photography is rarely done at or below the level of the subject, especially in studio. The other important point is to give a rich look by saturating the colors as if you were filming a LEGO city.
Hardware and Battery Life Issue
The drone is an ideal platform to film from above and simulate the miniature look. The key is to be positioned not too low or too high to respect the fake world perspective. A camera pointing straight down would not work.
I mainly used a DJI Phantom 3 Pro and a custom-built TeamBlack Sheep Discovery drone with a GoPro 4 Black to film the video. For the tilt-shift effect I generated the out-of-focus blur in postproduction (more on that later) for the Phantom video and natively with the GoPro. I repurposed one of my damaged GoPros as an improvised tilt-shift camera by changing the lens position to generate the out-of-focus effect. I installed a lens with a longer focal without distortion and secured it with a tad of hot glue after controlling the blur on a monitor via the micro-HDMI output of the camera.
Unfortunately, the minimum interval time in DNG (raw) on the Phantom 3 is five seconds which is too long due to the short battery life. Even though the drone can fly for up to 15 or 18 minutes, I had to use at least 20-30 percent of the battery to reach the initial position and fly back for landing which only gave me 10-12 minutes to capture a time-lapse sequence. Thus, 10 minutes of filming at five second intervals means only four seconds of recorded time-lapse video when rendered at 30 fps. But the main issue is to keep a short interval, otherwise the scenery seems to move too fast to look like a miniature world. Therefore, I selected the JPEG format to lower the interval time at 0.5-2 seconds. However, JPEG is not the best format for color correction especially when pushing the saturation and color density.
Beside the drones, a few sequences were filmed from a helicopter and a small C-172 airplane with a DJI Osmo and Panasonic GH5.
Production Challenges
I programmed the flights with waypoints. I used the Litchi App on the Phantom and Mission Planner via a Pixhawk flight controller installed on the TBS Discovery drone. Both applications allow to program autonomous flight trajectory, heading, and camera motion during the flight. The pilot can regain manual control at any time if necessary in order to respect the see and avoid rule. Another solution for simple sequence is to film with the Tripod Flight Mode on the compatible DJI drones.
The first challenge was to program the right flight plan with the correct heading and framing. I had to come back on site many times and re-shoot the sequence because the previous flight plan did not look good. There was always a difference between what I programmed on my tablet and how it looked in real life. Either the altitude, framing, or motion was wrong which meant that I had to burn one or two batteries for test shots before recording the final video. But even at this point, I was not absolutely sure to secure a good video sequence. Once the drone is flying, there is no way to control the gimbal and aircraft movement. A slight turbulence or gimbal drift can lead to a video that will be impossible to stabilize in post-production. Back to square one, I often had to come back and shoot again. Sometimes I had to re-shoot up to five or six times to secure the perfect take.
In this regard, the weather played a critical role in this video. I did not bother to go film if the wind was blowing at more than 10-12 mph. This limit can be raised when flying a larger drone such as the DJI Inspire 2. Since I was recording in JPEG I had to pick the right day to fly the drone. The light had to be perfect as clouds can ruin a sequence and haze dull the colors. I also tried to avoid having the sun in front of the camera because it hurts the contrast and dynamic of the image. Of course, all the settings must be locked in manual mode (exposure, white balance, focus, etc.) before starting the time-lapse capture.
To manage the shutter speed and reduce the reflection on the water I used a combination of neutral density and polarized filters from Polar Pro.
Post-Production Technique
Besides color correction and grading, the main challenge was to stabilize the sequence. This can be done with the Warp Stabilizer effect in Adobe After Effects. Use moderate smoothness value (5-10 percent) and check the “Detail Analysis” box in the advanced option if the regular stabilization fails. If the automatic stabilization cannot get rid of the unwanted motion, you may have to perform a manual stabilization first with the tracker before applying the Warp Stabilizer effect. The process is very tedious and must be done frame by frame but produces good results.
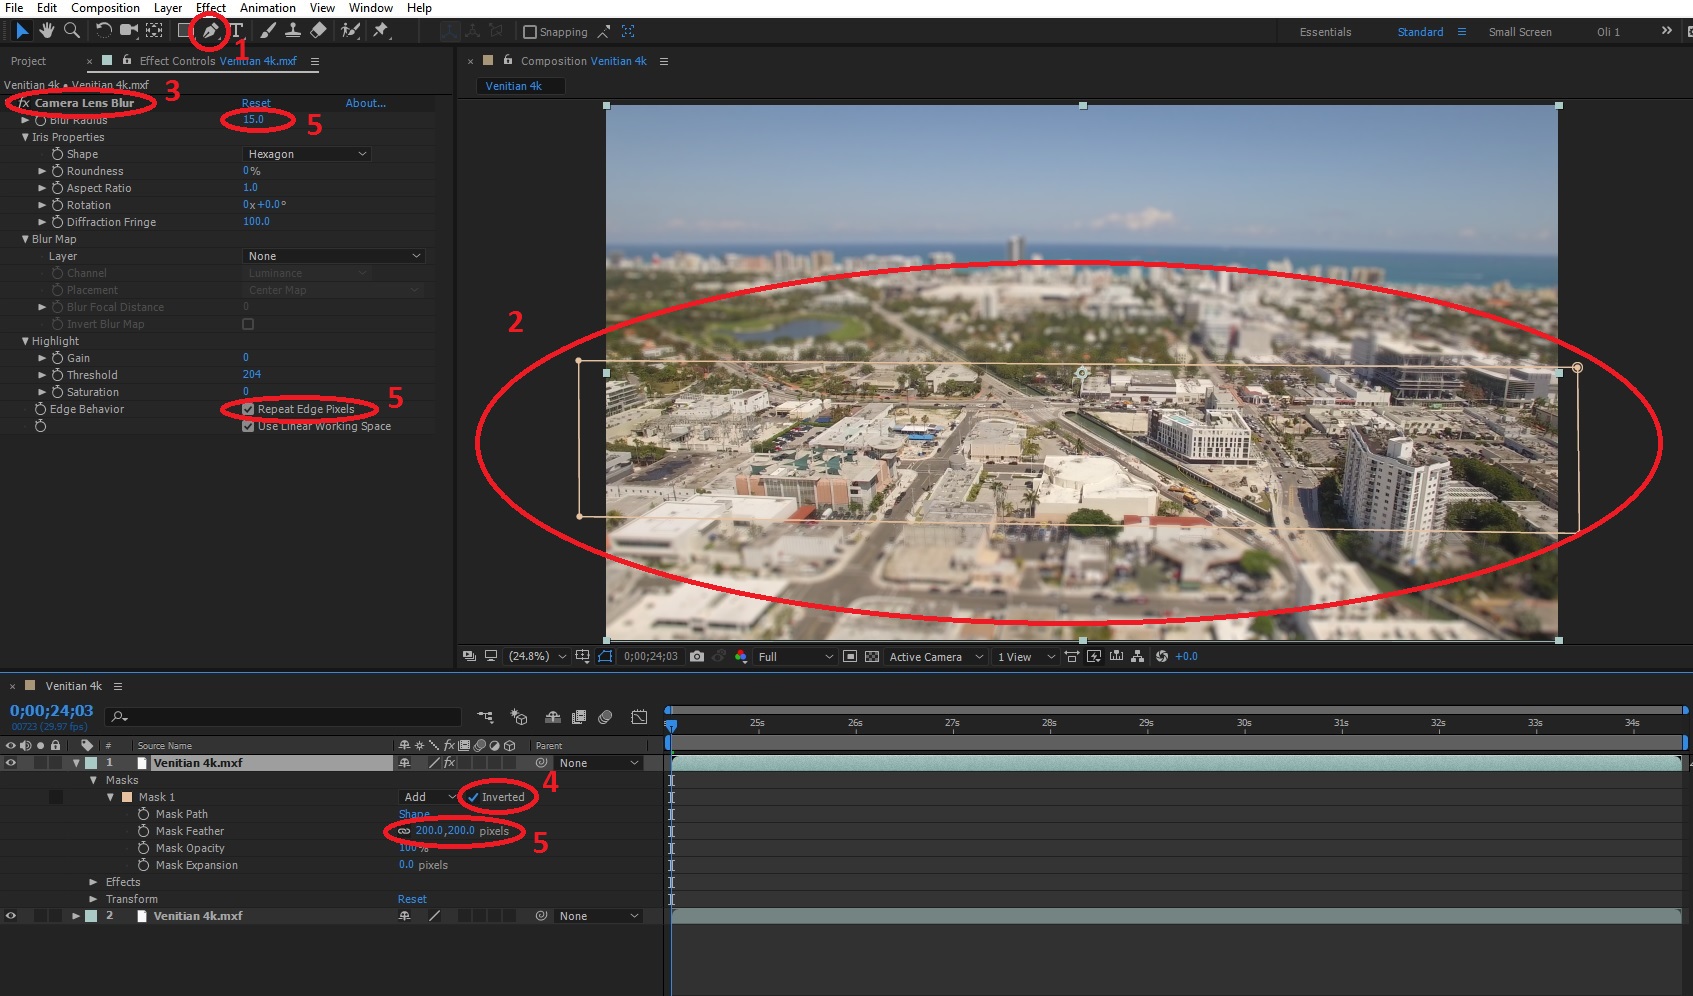
The next step is to add the out-of-focus blur which is simple. Duplicate (copy/paste) the video track and draw a mask on the top track. Then apply the “Camera Lens Blur” effect on this top track and select "inverted" in the mask settings if necessary. Dial a value between 10 and 30 for the “Blur Radius.” This value defines the strength of the blur. Also check the “Repeat Edge Pixels” box to obtain a uniform blur distribution otherwise the blur near the edges of the image won’t be visible. Finally, adjust the blur transition with the “Feather” and “Expansion” digits in the mask menu of the video track. Be aware that the Camera Lens Blur effect is very demanding for the computer.
Conclusion
In the end, the dronelapse technique is all about trial and error. Start small and proceed step by step with modest goals. You will fail a lot but the result is very rewarding when you finally manage to capture the right sequence.


Join the Fstoppers community for free
-
Post comments and join in the discussions
-
Browse the site ad-free
-
Share your work and get featured in the community
-
Compete in the photo contests for fun and prizes
15 Comments
I stopped watching because I couldn't see anything well focused and in frame
Well, that's the principle of miniature tilt-shift but I can understand that you don't like it. People either love it or hate it.
I loved it. Very creative. It's inspired me to try some new stuff with my phantom 4.
Thanks Michael. Actually the Phantom 4 works even better for dronelapse because of the shorter focal length (24mm equivalent).
I have to disagree with you there, the reason why tilt shift works as miniature effect is because it simulates shallow depth of field on large scale frames, but things on the same focal plane are not supposed to show bokeh, that is why it only works for some scenes and there are many in the video where it doesn't, so concept yes, but as far as execution goes it has its flaws.
Fake Tilt-Shift on small sensors ;)
Like, the shot going around the island, it looked cool. The shots where it jsut blurred out the hotels it looked terrible. I think doing certain shots it works, but trying to shoot a whole video with it, it just doesn't work in enough places.
Yes agreed. Certain parts just looked too fake. I couldn't finish the video. But I do appreciate drone time lapse.
Amazing job! bravo
Thanks
Fantastic concept. Great way to incorporate the drone into the hyperlapse movement and still keep it fresh. Well done!
Tks Rob.
great work, very creative, the cruse ship shot is superb, greetings fromShanghai
Thanks
Oliver this is a great video. This looks like sped up video vs Interval shots stabilized; not that there is anything wrong with that as it is still time lapsing. The only reason I say this is because the gimbals on DJI drones when in interval mode move images all over the place when they are in a resting position and it gets worse when you are actually flying. If this is truly interval shots stabilized that is the most incredible job I have ever seen. Guys like Rufus Blackwell use the sped up technique and his videos are amazing just like this one. Anyway, most drone video time lapses that you see have the dancing buildings or other dancing objects created by Warp Stabilizer or other stabilization software. All I can say is this is very remarkable and great pain staking work done here.