

What if you could control perspective distortion and focus with pinpoint accuracy at any aperture? Dive into the world of tilt/shift lenses and learn how pros use the Scheimpflug Principle to create stunning images.
There are several notable advantages to using a tilt/shift lens, hereinafter referred to as a T/S lens, or a view camera. These advantages include the ability to correct image distortion caused by perspective and the ability to take advantage of the "Scheimpflug Principle." This principle allows us to change the plane of critical focus so that we achieve critical focus at literally any aperture.
I have been using large format cameras for many years, and while they are large, inconvenient, heavy, and slow, there are significant advantages to using them. One of these advantages is that, when using a view camera, it is possible to correct for perspective distortion caused by lens proximity to the subject and perspective. For instance, when I am using a view camera and photographing a subject like a building, the shapes of the building will be distorted from what one would expect to see because of perspective. Necessarily, when using a fixed lens camera like a 35 mm, full frame or crop sensor digital camera, or medium format camera, the camera will usually be tilted up, a little or a lot, depending on the height of the camera from the ground and its proximity to the object being portrayed. Using a view camera, or some cameras with a tilt/shift lens, it is often possible to correct that distortion in the camera.

It’s important to note that there will be times when it isn’t possible to make everything in the image have a correct vertical orientation. For instance, in this portrayal of a church at Las Trampas, New Mexico, I could correct for the perspective of the building using my view camera (it could also be done using a T/S lens), but the small memorial in the foreground—the cross and its fence containment—was not squared up with the earth. It could have been corrected, but then the building in the background, also a part of the story being told, would have been distorted beyond any useful amount.
When we are creating a photograph of a building with a known shape, we know from experience that any well-made building will have verticals that are perpendicular to the ground—at least, they should be. Occasionally, there will be a structure where something has gone amiss and its walls are not perpendicular to the ground. The Leaning Tower of Pisa is one such example. When that happens, the building is often condemned for occupancy. On those occasions, the building is often destroyed, so it is disturbing for us to see a photograph of a building where it is narrower at the top than at the base, giving us the feeling that it might fall over backward. That effect is called “keystoning,” though I do not know how it got that name.
This phenomenon, “keystoning,” occurs when the axis of the lens is not parallel to the plane of the object being portrayed. Oftentimes, it is a very simple problem to overcome. We can solve it by bringing the axis of the lens into a parallel relationship with whatever it is we are portraying, whether it’s the Empire State Building, a grove of aspen trees, or El Capitan in Yosemite National Park. The ability to do this has almost unlimited applications, including the purposeful distortion of the shape of the object.
What must be done to create an architecturally correct image is to bring the front element of the lens into a parallel orientation with the object being photographed. Sometimes this can be done by using a very tall ladder or photographing the subject from an adjacent building. However, this is often impractical. When using a camera with a bellows, like a 4x5 view camera, or one with a T/S lens, simply leaning the front standard forward can often correct this type of problem.
Now, some will argue, with validity, that they can achieve the same result on their computer by using tools in Photoshop to correct a badly distorted image. They can. However, I prefer to make my adjustments in the camera. This is simply a matter of choice and preference. I enjoy making the adjustments needed in the field, as it adds to my personal feeling of getting what I wanted in the camera. Some will argue this point, and that’s okay—I don’t want to argue with anyone.
Dr. Scheimpflug Strikes!
Another huge advantage of using a camera like a view camera is that we can take advantage of the Scheimpflug Principle. Scheimpflug, and a very similar concept called the “Hinge Principle,” simply states that if you draw a ray passing through the front element of a lens and another ray through the camera’s focal plane, when those two rays intersect at the ground—or any other horizontal plane—the plane of critical sharpness will change from horizontal to vertical.
In simple terms, the Scheimpflug Principle involves the rotation of a lens around either its vertical axis (where the movements are called swings) or its horizontal axis (called a tilt) to change the plane of critical focus. On large format view cameras, these controls are found on both the front (lens) and rear (film) standards. In my experience, either the front or rear standard may be used to take advantage of this principle. Conventional knowledge says you should use the front standard only; however, I always use the rear standard when working in the landscape. This method will not work correctly for architectural work, as using the rear standard will also change the shape of the object being portrayed.
Using the rear standard not only changes the depth of field from a vertical plane to a horizontal one, but it also makes objects nearer to the camera have more presence or prominence in the image. When I am photographing in the landscape, my goal is always an artistic presentation and result. I am hardly ever concerned with a literal interpretation of the scene. If I change size relationships in the image, it is often to my advantage, and I will take advantage of this whenever I can.
An Illustration of the Scheimpflug Principle
Here is an example of an image I made many years ago. I was very aware of the Scheimpflug Principle at the time and thought this would be a good opportunity to use it, as I wanted to emphasize the texture and form of the ferns against the vertical shape of the aspens. What I forgot to take into account was that when I changed the plane of critical focus to run, in this case, down a very steep mountain grade—which I was able to do—the depth of field then ran in a vertical direction. While the ferns are in razor-sharp focus from directly in front of the camera to infinity, the depth of field diminishes as the image rises up the aspen trunks, and they become progressively more out of focus. Lesson learned.
(It is difficult to see how the upper parts of the nearby aspens are out of focus here due to the image size. However, at a 16x20 enlargement—which is about as small as I print—the upper parts are noticeably out of focus. Nothing I can’t live with at that size, but as the image gets larger, the out-of-focus area is magnified.)
Incidentally, I returned to the spot the next spring, thinking I could rephotograph the scene and correct my earlier mistake. However, a herd of Roosevelt elk had bedded down there the night before, so the ferns were beaten into the ground! It was still very cool, though. I think the elk hadn’t been gone long when I arrived, as I could smell them very strongly. They have a scent similar to sweaty horses, in case anyone is wondering.

So, what are the practical applications? Principally, this: In the photograph shown here, the ferns were literally chest-deep. In fact, I still have chlorophyll stains on the light blue Levi’s shirt I was wearing that morning—above the shirt pockets, even. So you know they were deep.
Additionally, it was a very cool, crisp mountain morning at about 9,000 feet, and as the sun started to peak over the mountain ridge across from me, there would be occasional gusts of wind. Even a very slight breeze could spoil the image by making the ferns blurry. I needed to maintain good depth of field while also achieving an exposure time that was as brief as possible. I think the exposure was something like 12 seconds at f/22. At f/22, using large cameras, depth of field is pretty limited.
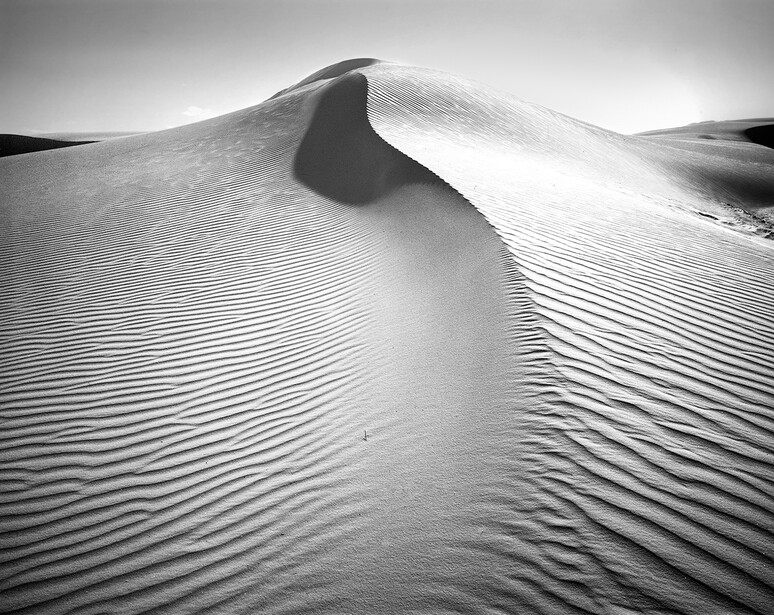
Of course, the classic landscape image using this principle would be a landscape. Here’s an example that worked nicely for me many years ago in White Sands National Park, New Mexico. Because of the subject matter, I wanted every grain of gypsum to be as sharp as the lens and film were capable of resolving.
My Procedure for Landscape Photography
For those who are interested, here is my procedure when working in the landscape:
- After zeroing out the tripod and attaching the camera—also in a zeroed-out configuration—I focus on the object furthest away, usually at infinity, and lock the camera controls, including tilts and swings, into position.
- Then, I tilt the top of the camera back toward me until the foreground nearest the camera comes into sharp focus at the top of the focusing screen.
- I lock the camera’s back standard into that position and refocus the camera for the furthest object.
This procedure can be repeated as often as needed. However, the more you nitpick, the more problems you may create for yourself. I usually stop after one cycle of adjustments. After that is done, I set the lens aperture, calculate the exposure time, and make the exposure.
It should be noted that this procedure is not available when using a T/S lens, as only the front element can be semi-rotated on the lens’s axis.
If you’re brave and think you’d like to try your hand at large format photography, there is a plethora of information available. Old hands like me would love to help you!
Tilt-shift shift lenses may be had at B&H in many different brand names. Also, I get almost all of my film and darkroom expendable supplies from B&H. I am a very long time user of their services.


Join the Fstoppers community for free
-
Post comments and join in the discussions
-
Browse the site ad-free
-
Share your work and get featured in the community
-
Compete in the photo contests for fun and prizes
17 Comments
https://www.merriam-webster.com/dictionary/keystone#:~:text=stone%20%CB…
Ask anyone in Pennsylvania.
Also a term used in photography to describe the top of a building diminishing in size on the camera focus screen, and in the image due to perspective.
Or you can focus stack with any lens you currently have and call it a day (for the second part of the article).
Focus stacking has its own inherent problems. Specifically in the use cases mentioned by the author, wind blowing trees and grasses around make any multiple exposure techniques problematic.
In step 2 above you say you "tilt the top of the camera back toward me" to bring the foreground into focus... on the Toyo 45a camera (which I assume you are referring to) why don't you use the tilt in the front standard? Am I missing something?
Nope, not missing anything. Leave the front standard alone in a perpendicular to the camera frame position. Tilt the back toward you, and it only takes a little, until the foreground, which is at the top of the ground glass, comes into focus. Lock it in place. Refocus the camera for the furthest distance, lock it in place and you're done. A caveat; using the rear standard like this will not correct keystone effect. The front and rear standard need to be used for that. Using the rear standard will emphasize perspective exaggeration, making foreground objects larger and giving them more "presence".
Ok, It took a minute but I see where you are coming form on this... I just always used the front standard on my Tachihara. And you're right this would do nothing to correct any keystoning...
https://en.wikipedia.org/wiki/Keystone_(architecture) :-)
Keystoning comes from the central stone or keystone on an arched bridge. It's tapered to fit the arch and distribute the load to the adjoining stonework. On digital projectors the keystone adjustment corrects vertical perspective the same as on a TS lens on a camera.
Thank you for the article, it's quite inspiring. I don't think many people appreciate the art of getting it in camera these days.
Nathan, this was a fantastic deep dive into the power of tilt/shift lenses and the Scheimpflug Principle. Your real-world experiences, especially with large-format cameras, add so much depth to the discussion. The ability to control perspective and depth of field at any aperture is an invaluable tool, particularly in architectural and landscape photography.
I appreciate your emphasis on getting things right in-camera rather than relying on digital corrections. While post-processing tools like Photoshop’s perspective correction can be useful, they don’t always maintain the same level of detail and clarity as an optical adjustment. That hands-on approach is something I deeply resonate with in my fashion and editorial work—setting the scene, controlling perspective, and crafting the final image as intentionally as possible.
One additional thought: beyond architecture and landscapes, I’ve seen creative applications of tilt/shift in portraiture, using selective focus for dreamlike effects or drawing the eye to a specific facial feature. Have you explored or experimented with tilt/shift techniques outside of traditional applications?
Paul Tocatlian
Kisau Photography
www.kisau.com
"This phenomenon, “keystoning,” occurs when the axis of the lens is not parallel to the plane of the object being portrayed." You mean perpendicular, not parallel.
"This phenomenon, “keystoning,” occurs when the axis of the lens is not parallel to the plane of the object being portrayed" is correct. Perpendicular would mean that the lens is at a 90 degree angle to the object being portrayed. Parallel means that they have the same angle of degrees to the ground. The meaning of PARALLEL is extending in the same direction, everywhere equidistant, and not meeting.
I was a bit obtuse in my explanation. Here is the precise definition of perpendicular... "two geometric objects are perpendicular if they intersect at right angles, i.e. at an angle of 90 degrees or π/2 radians."
What you're missing is the axis of the lens part. The axis of the lens goes through the center of the lens from back to front. It is perpendicular to the subject and the imaging plane when no movements are used.
Nathan, Nathan, Nathan... Ph.D. in physics here and experienced photographer. Maybe we a not speaka the same language? The "axis of the lens" is an imaginary line that runs through the center of the lens and extends to the vicinity of the object. The lens has rotational symmetry about its axis. The plane of the object is essentially the focal plane (but to be more specific, I think you mean a vertical plane at the object?). The axis of the lens
should be perpendicular to this plane to minimize distortion. On the other hand, you can specify a plane by its "normal vector" (in which case you would want the axis on the lens to be parallel to this vector).
Actually there are two lens axis(es). One through the lens horizontally, whereof you speak. There is also a vertical one that runs through the vertical center of the lens. Not PhD in physics here, but an avid reader of it. After your original reply I thought that maybe I should look it up. I did, and there are two.