It’s the time for many of us to see and photograph the auroras. Sadly, that generates a lot of invalid arguments about how the images should or should not look. But here's how you can capture them in all their glory.
An interesting discussion developed in the comments section of a previous article I wrote. I was about whether my use of in-camera and post-production digital effects could still be called photography. It’s an old argument, but it got me wondering where we draw the line, especially when photographing the aurora.
I’ve spoken before about the rift that lies between reality and a photograph; our eyes only pick up a fraction of all the information that makes up reality. Some physicists are struggling with the nature of reality and claim that our universe is just a “product of quantum machinations in a lower dimensional setting.” In plain English, they are theorizing that reality is an illusion.
However, if, as The Beatles’ song Strawberry Fields Forever suggests, nothing is real, and the world around us is an illusion, does anything matter? That idea doesn’t help us in our day-to-day lives. We must rely on naïve realism and believe that the world we see around us is real and as it is, otherwise we can neither function in our daily lives nor in society.
Nevertheless, a photograph is one more step away from actuality. So, although we adopt a naïve realistic approach to what we see about us, with photos it still isn’t as simple as some would have you believe. This is illustrated best when we come to photographing the aurora. Why? Because our cameras reveal what our eyes cannot see.
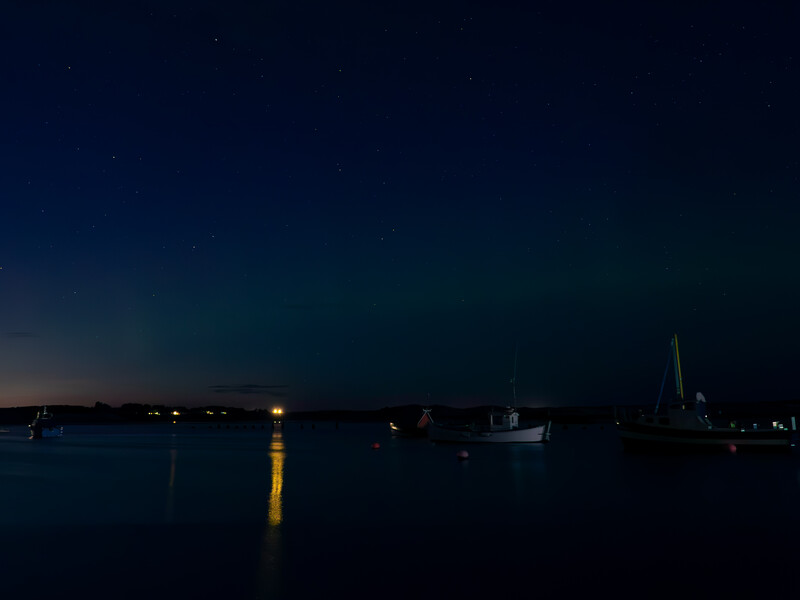
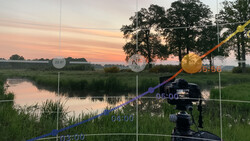
Shot at 0.5 seconds, ISO 1,600, simulates what I could see with my eyes. There was just a hint of color visible as I first arrived on location.
What Is the Aurora?
We are fast approaching Solar Maximum. It’s the time when the 11-year cycle of the sun’s magnetic poles' flipping occurs. Large numbers of sunspots appear, and the sun’s irradiance increases by 0.07%. There are solar storms with Coronal Mass Ejections (CMEs) spewing enormous amounts of plasma and extending magnetic fields far into space, including at the Earth.
CMEs take 15-18 hours to reach us. They vary in speed from 250 kilometers per second (km/s) to nearly 3,000 km/s. In comparison, the fastest manmade object was the Parker Solar Probe, which reached speeds of a sluggish 147.5 km/s. Putting that into context, the maximum speed limit on an Interstate Highway in the USA is 0.033 km/s.
When these high-speed energized particles slam into our planet’s upper atmosphere, they are deflected by our magnetic poles. They then interact with the molecules of mainly oxygen in our upper atmosphere. Consequently, those impacted molecules produce energy that they release as photons, i.e. light.
What Causes the Different Colors in an Aurora?
When hitting the oxygen molecules at altitudes of around 60 to 190 miles (100 to 300 km) up, the aurora produces green light. Less frequent are red auroras as those are associated with more intense solar activity. They happen when scarcer oxygen molecules at higher altitudes, 180 to 250 miles (300 to 400 km), are excited by the solar radiation.
You may get blue and purple auroras if there is even more intense solar activity. Even more rare, they happen when the solar radiation penetrates to 60 miles or less. Sometimes, all those colors may mix and you will see pink and yellow auroras.
Don’t worry about that talk of radiation and high-energy particles. You are quite safe, protected by our atmosphere. However, solar storms can play havoc with artificial satellites. If you lose your GPS signal or your satellite TV at night, take a look at the sky. There may be an aurora.
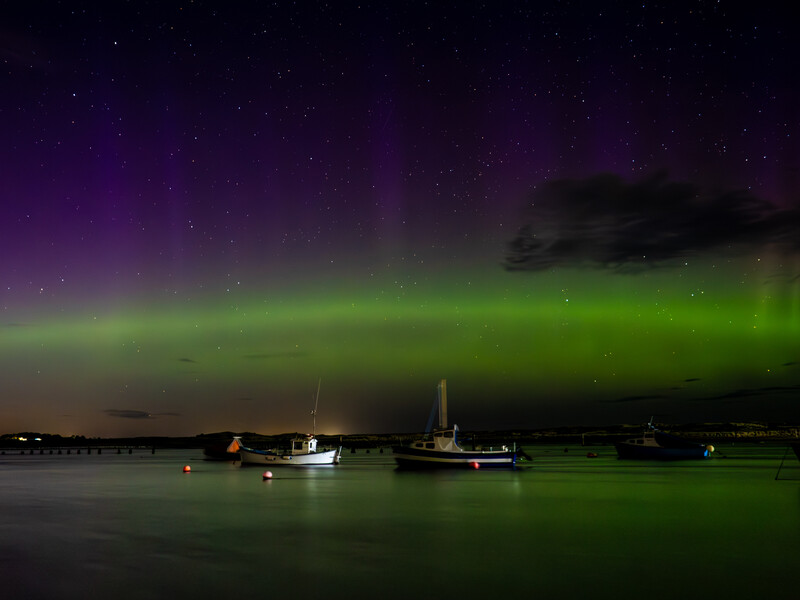
Increasing the exposure to 9.5 seconds brought out the greens and the purples; it was a big solar storm that caused this. Because I was shooting over water, some movement can be seen in the boats. I could see the green but not the purple with my naked eye.
How Do We Predict an Aurora?
Like on Earth, solar weather is somewhat unpredictable. The 11-year cycle was supposed to peak in 2025. Scientists are now predicting it to reach its zenith next year. However, we are getting some great displays already.
Astronomers are constantly monitoring the sun and know if there is a solar flare sending plasma our way. Consequently, news sites often mention beforehand that it is going to happen. However, I rely on an app called AuroraWatch UK. There are plenty more that you will find if you search your Play Store or App Store.
Often, if you see an aurora, there will be another seven days later. I have no idea why.
Where Can You See the Auroras and What Do They Look Like?
The nearer you are to the Earth’s poles, the more likely you are to see the aurora.
Here, in the North of England, above the 55-degree parallel, we occasionally see them. I live just about on the same latitude as Pikwitonei in Manitoba – a place so remote that the Google Street View car hasn’t been there, but it looks like a fantastic place to avoid light pollution and see them even better. The aurora isn’t very bright, so escaping from the city will help you see it. Even moonlight can hide it from view.
The Aurora Borealis (Northern Lights) and Aurora Australis (Southern Lights) are impressive to observe. However, you won’t necessarily see the colors. Our eyes’ retinas detect light and comprise rods and cones. Cones detect color and don’t work well in low light. Therefore, the aurora is likely to appear as white light in the sky.
If you can see color, it is most likely going to be green. That’s because of the three primary colors: red, green, and blue. We have as many green-detecting cones as red and blue added together. That’s why those color proportions are used in the Bayer pattern of camera sensors; they mimic our retinas.
Our camera sensors can collect more light if the shutter is left open. Also, the objective lenses of our cameras are far larger than our eyes’ pupils. Therefore, they gather a greater amount of light too. This is why astronomers favor telescopes with large objective lenses over more powerful magnifications.
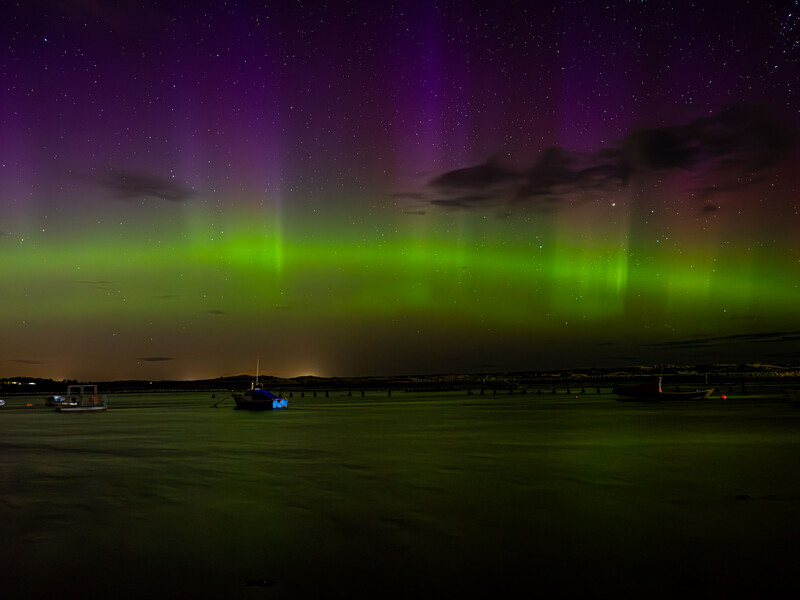
ISO 1600, 12mm, f/2.8, 13 seconds. The yellow on the horizon is from a village about a mile from where I shot this. I wished I had used my 7mm lens for this. The ark is due to the curvature of the earth and it would have made a complete circle around the North Pole. I focused on the blue boat.
How to Set Your Camera to Photograph the Aurora
You will need a tripod to keep the camera steady. If your camera or lens has in-built image stabilization, the usual advice is to turn that off when on a tripod, although on my camera, I never find it necessary and leave it on auto. It's also a good idea to use a remote trigger or set the self-timer and use the camera in silent mode (the electronic shutter) to prevent any camera movement.
Choosing and Setting the Lens
Ideally, you want a fast lens set with its widest aperture. It should have the biggest objective lens possible. I used the OM System M.Zuiko 12-40mm F2.8 PRO lens, shooting wide open at 12mm. My M.Zuiko 7-14mm F/2.8 PRO lens would have sufficed equally well. A short f/1.4 prime lens would have been even better.
Where to Focus
As with everything in photography, there is a compromise to be made. That wide aperture means a shallower depth of field. Therefore, the closest hyperfocal distance, the point at which you get the maximum field of sharpness is further away than it would be with a small aperture. So, if you want to combine foreground interest with the aurora, your focus point mustn’t be too close to your camera or the aurora and the stars will be unsharp, unless you employ focus stacking, that is.
Conversely, if you are using a wide angle lens, that gives you more depth of field, which works to your benefit.
An app like PhotoPills will help you to calculate the hyperfocal distance. You can, of course, focus beyond that distance, and even on the aurora or stars, but more of the foreground will be blurred as a result.
I generally use manual focus, relying on the focus assistance that highlights the in-focus area. When it's very dark, I use a torch to illuminate something at or beyond the hyperfocal distance.
Setting the Shutter Speed and ISO
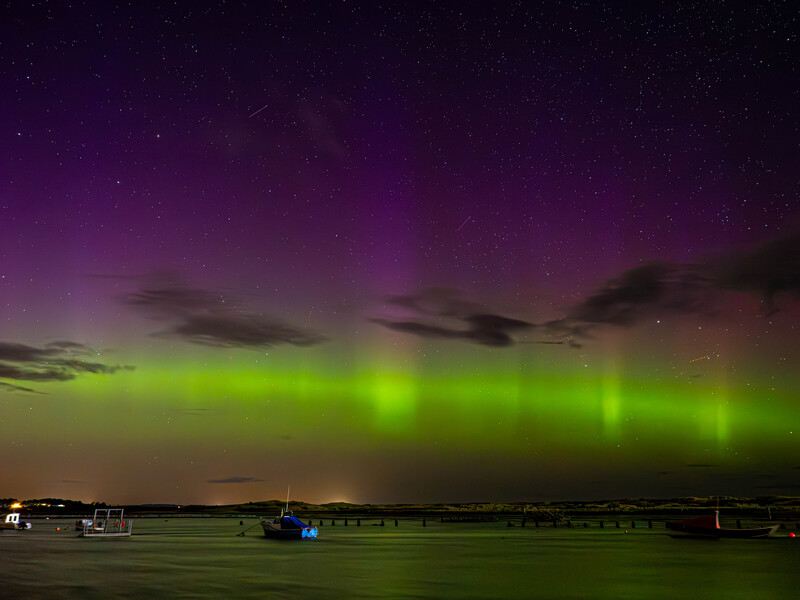
Shot soon after the previous picture at ISO 3,200 and an 8-second exposure. I used the OM-1's Live Time setting, which allows me to watch the image develop on the Live View screen and see the histogram move to the right. Two satellites and an airplane are visible making trails in the sky.
The aurora moves. Fortunately, it does not appear to be moving that quickly where I am because I am farther south. So, a shutter speed of 8-10 seconds using a wide angle lens gives me a good resolution of it. If you are closer to the aurora, i.e. closer to one of the Earth’s poles, it will appear to be moving faster. Therefore, you may need a faster shutter. Fortunately, it will also be brighter too.
Either way, the shutter and aperture combination may not be enough to expose the image correctly, so increasing the ISO may be necessary.
This highlights the importance of reducing ambient light, which can overexpose all or parts of your picture. As I mentioned, a moonless night and shooting well away from streetlights is ideal.
Also, it’s worth noting that if your shutter is open for too long then stars in your picture will start to elongate because of the rotation of the earth, although you probably won’t have to worry about it.
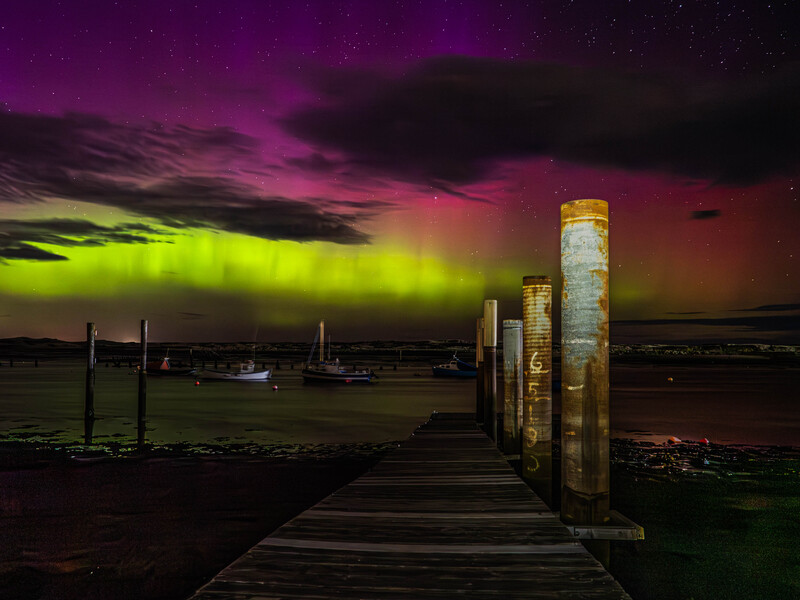
At ISO 800, the shutter speed for this shot was 13 seconds, and I started to lose the definition of the aurora. I illuminated the jetty and posys with my head torch.
As a rule of thumb, you can apply the 500 rule to ensure stars remain as points and not lines in your photo. For a 35mm sensor camera, divide 500 by the focal length of the lens. So, for a 25mm lens, you would have a maximum exposure of 20 seconds. That may be too long for shooting the aurora anyway and you will want a shorter shutter speed to stop movement blur.
With a Micro Four Thirds camera using a 25mm lens, you would halve that time to 10 seconds. That would be about the right shutter length for me to capture the aurora, anyway, although I used a 12mm focal length, so in theory, I can have the shutter open for over 20 seconds without elongating the stars. But, that is far longer than I would want for the aurora because it would show movement blur.
Of course, increasing the ISO will increase noise, especially with longer exposures. Fortunately, newer sensor technology in contemporary digital cameras helps keep noise levels to a minimum, and modern noise reduction such as those found in DxO PhotoLab, ON1, Topaz AI, and Lightroom is incredible for giving clean sharp images.
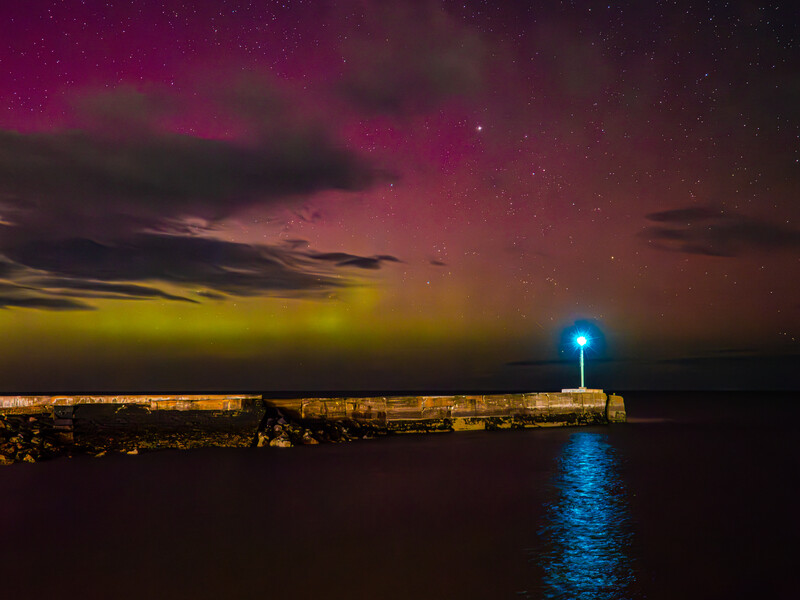
Yellows and pinks were caused by the colors mixing. Someone shooting at the same time but using an f/4 lens could not capture this without creating star trails. Far more colors were recorded in this and the following image.
How About Developing the Images?
This comes back to where I started. The sensor has collected a lot of raw data, that is, if you are shooting raw, and I advise that you do. That data, when it is turned into a picture you can view in your camera, has been processed. The clever technicians behind your camera’s software decide what your picture should look like. However, the technicians who work for your camera company are not the same as the people who work for Adobe, nor are they the same people who work for DxO, Capture One, ON1, and so forth. They will all interpret your photo differently.
Which of them is right?
I preferred the results I got from DxO Photolab, but developing this image in Lightroom: Exposure +0.61, Contrast +47, Texture +25, Clarity +12. I used two masks, one to increase the exposure of the foreground +0.51, Highlights +16, Shadows +35. The sky: Exposure 0.38, Contrast +47, Shadows +21.
All of them and none of them are. Similarly, if you want to adjust the photo to appear how you want it to be, it’s entirely up to you. If you want to increase the saturation of the colors or turn it to black and white, or if you want to rely on those camera technicians’ interpretation of reality, it’s entirely up to you. Any variation of how the raw data is displayed is equally valid. Develop it how you like. Anyone who criticizes your choice – and I have seen some ill-natured criticisms about others' photos on Facebook – then they are just showing their own lack of understanding.
If someone else likes it, great. If they don’t, then that’s only their subjective viewpoint being different from yours. What is invalid is saying that your interpretation of the raw data is wrong, unless they accept that every other photo is equally wrong.
Personally, I find the nighttime landscape and aurora images straight out of all cameras look too flat for my taste. Therefore, some adjustments, especially to the tonal contrasts, are needed. I also increase the brightness of shadows in the foreground and reduce the brightness of the highlights. Then, I like to increase the brightness (not the saturation) of the aurora’s colors to make them stand out. Nighttime photos can also stand a lot more mid-tone contrast than daytime shots.
This article is very good because it told me a lot of things that I had not known before - thanks, Ivor!
I have never seen an aurora, and always assumed that it looked like the photos that I have seen. Now that I know the aurora does not look at all like those photos, I honestly have no interest in it anymore. It's kinda sad, actually. I guess I feel the way a child feels when they find out that Santa Claus is not real.
Do you think there are any places on earth where the aurora actually does look as vivid and bright and wildly colorful as it looks in so many photos? If so, then that is the aurora that I would like to experience.
I have no problem with other people using technology and software to make an image of a scene look so drastically different than it looked to the human eye, but I myself have no interest in such things, inasmuch as the aurora is concerned. If I want a photo of a wildly colorful aurora then the only way I want to do it is to find an aurora that actually appears wildly colorful to my naked eyes, and then take a photo that shows it just the way my eyes saw it.
But again I have no problem with those who feel like using technology to make something look far different than it looked in real life. Their images, their right to decide how to make them look.
I can tell you that with certain auroral storms, one just a week ago, a variety of colors are visible and vivid. Dont categorize all the colorful images you see as faked or over saturated. Some, yes, not all. I recall a surprise aurora a number of years back that was totally red. The sky crimson. I noticed it at 8:30 in the evening, Alaska time, through a window in my house, all the lights on inside. Obviously, a very brilliant display. 0n St. Patty’s Day 2013, an all night aurora was extremely colorful, reds to purples to greens. Yes, the predominant color is green. Yes, sensors pick up colors the naked eye doesn’t, like purple aurora, but a powerful solar storm can produce vivid colors.
PS a good starting point for WB is 3400K. And upward from there.
Well that's great to know that not all aurora photos are faked or "enhanced". Anything that beautiful should be real, and not just the product of someone's whimsical post processing (or in-camera processing).
It sounds like you live in Alaska. If I were to fly up to Barrow sometime in the winter, do you think there's a fair chance that I could see an aurora that was truly colorful? I think Barrow is the furthest north I can go without a passport, right? I was in Barrow before, but it was in mid-June when there was no night time.
For a variety of reasons, I would not recommend Barrow. The best places, I think, weather permitting, would be. COldfoot, via the Dalton Highway, and Yellowknife, NWT. North of Fairbanks can be good but last couple of winters we have had minimal clear nights. March best time. But, again, it depends on the solar storm for colors.
Go to the high Arctic, like Iceland, Norway, and Finland and you WILL experience the full-color show you see in most photos. Of course, the weather may not permit or the sun doesn't cooperate, but the potential is there. I grew up in Iceland and lived there for 35 years. I have seen the sky ablaze with all kinds of different colors and you will not have ANY problem seeing them without using a camera! :)
However, regarding fake or real. I really dislike that argument in photography in general. What is reality? What is "real" color? I have no clue. You see, I'm born with eyes that see extremely well (I'm almost 62 and I have around 20/15 vision and it's crap compared to what it used to be!) But those two eyes cannot agree on color! My right eye shows my brain a distinctly cooler color than my left eye! So which is correct? I pretty much reject the concept of "real" in photography, because I don't think it exists or is extremely rare. Let's say you take a photo of running water. How can it show reality? Fast exposure freezing the water, or slow exposure making it blurry, or somewhere in between? Where is the reality? I have seen people scream "FAKE" on social media over photos posted that I KNOW are real, just because they can't comprehend the possibility of the colors that nature can produce. That exclamation is very popular these days along with "Photoshopped"
Hi Tom, The colors become more vivid if you go a long way north. You are getting closer to them and the light gets brighter. Because it's brighter, your eyes can detect the colors. However, your camera can "see" the colors your eyes can't.
The reason why is due to the inverse square law. If you shine a torch at a wall a meter away, then double that distance the light becomes four times dimmer. Or, if you had stood three meters away, the beam would have become nine times dimmer. When light becomes too dim, you can no longer see colors.
That doesn't make the photograph any less real or mean the colors were not there. They were, your eyes were just not good enough to see them. If you look at a red car at night, you can no longer see that it is red, but it's still red, nonetheless.
Similarly, if you take a high-resolution shot using a telephoto lens on an animal, your camera will detect details that your eye cannot because your eyes' resolution is not good enough. If you use a macro lens, your camera can also see details you cannot.
Just one point that hasn't been discussed: How do you set the colour temperature?
When doing night photography this is a critical point, as there are different light source with different colour characteristics and you probably have to choose a certain temperature with an object of neutral grey when available. I tend to have this problem when taking images in churches where you have warm candle light, blueish spots and other lamps at the same time resulting in unpleasant parts of images. (excuse my bad english).
Do you leave it to the camera to decide, do rely on your eye or is there a trick to be applied?
I'm also interested in knowing how Ivor sets color temperature.
Personally, I use the Kelvin setting for everything, and set the WB to whatever number of degrees most accurately represents the scene before me.
But in this type of photography, where the photographer isn't necessarily trying to most accurately record what the eye sees, I wonder if WB is used to "enhance the illusion", so to speak, with a tendency to use a cooler Kelvin temperature if one is shooting blues and greens and a warmer Kelvin setting if one is shooting reds, oranges, and yellows.
That's a really good question. You are right, I didn't address it here and it deserves a whole new article. (Watch this space.) It's complicated. Especially so because these images were mixed lighting: that from the sky, which was about 4000K, and the mixed light pollution from the small town where I live, which was averaging about 5300K.
It doesn't matter how you set your camera's WB when shooting raw, as you will adjust it in development. Just be aware that if you set WB to Auto, then your camera may try to compensate for the blueness.
I use a grey card and color chart. However, there is a degree of subjectivity involved because if I adjust the white balance in processing to the true color temperature of the night, then the image looks much too blue to my taste. Although it would be scientifically correct, the result is far bluer than my brain processed the light to be; our brains have auto-white balance, too. So it's not how I observed it.
"Just be aware that if you set WB to Auto, then your camera may try to compensate for the blueness."
Very true.
But another HUGE problem with auto WB is that it can vary quite a bit from frame to frame. Even when shooting frames in rapid succession, the white balance can be very different from one frame to the next. This creates a lot of hassle when editing a series of photos that were all taken of the same thing in the same place at close to the same time.
I have tried to stitch images together to make a panorama but because I used AWB and the color balance was so different from frame to frame, it was a real hassle to get the frames to all look the same. After that happened I started using the Kelvin setting all the time and developed an actual hatred for auto white balance.
If you shoot raw, then it isn't difficult to synchronize the WB, is it? To be honest, changes in WB for Panos isn't something I have noticed when shooting panos. Although metering can change a lot, of course. But you are right, setting it to a fixed temperature is a good idea,
It is difficult for me with the very basic editing software / raw converter that I use. For those who have been able to figure out how to download and use Lightroom and Photoshop, it is probably rather easy if they have a modicum of general computer literacy. But for me, with virtually zero computer literacy, I can not figure out how to do such things, even after watching tutorials and trying to follow along step by step. For folks like me who use the free editing software that comes on all Apple computers, trying to adjust white balance in extremely difficult and time consuming. Hence my preference for shooting all images in a series at the same white balance, by setting the Kelvin temperature to remain at a fixed value.
Very much enjoyed your article on aurora photography. The images are spectacular. My wife and I have just returned from a trip to Iceland during which we were fortunate to see the aurora on 4 nights. Our approach to shooting is slightly different that your method. We opted for the shortest possible exposure time so as to capture as much detail in the aurora as possible without recording movement that is seen with multi second exposures. Our D850 shows very little dark noise at 6400 ISO. This allowed us to shoot 2.5 second at f:2.8. The histogram was shifted to the left but not blocked allowing for easy development. I have attached a couple of images to illustrate our results. Shot with 17mm and 28mm lens.
That is a particularly dramatic and beautifully shaped aurora display!
Looks like an insane amount of noise grain in the dark parts of the sky. Is that something that you are okay with, or are you going to find a way to clean that up?
These are great. Thanks for posting them, Jeffrey. It shows how different they look when you are further north and your camera is turned upwards to look at them from below.
Yes, you would need a faster shutter when further north because they will appear to be moving faster as you are closer to them. I hope you had a good trip there.
"However, you won’t necessarily see the colors. Our eyes’ retinas detect light and comprise rods and cones. Cones detect color and don’t work well in low light. Therefore, the aurora is likely to appear as white light in the sky.
If you can see color, it is most likely going to be green. That’s because of the three primary colors: red, green, and blue. We have as many green-detecting cones as red and blue added together. That’s why those color proportions are used in the Bayer pattern of camera sensors; they mimic our retinas."
I'm originally from Iceland and I have NEVER seen white auroras in the Arctic!!! I have seen whitish Aurora here in Wisconsin when it was very, very faint, but not up north! It makes me think that the author has never been in the high Arctic or Antarctic. From my perspective, this information is just plain wrong.
I have seen green, red, and purple and so have friends and family in Iceland. Even down here in Wisconsin, I saw a very distinct green color back in March when we had a strong storm, and I have seen posts from many people down here stating the same. It is true that at night we do not see colors easily, but we still see the different colors of light, like car lights and signs and whatnot. The Auroras are no different, they display as a light source. Of course, if you take a photo with several seconds exposure time it is going to show a lot stronger color than we detect and the same holds true for all photography.
Yes, perhaps I should have clarified that in the article. Please note I said "not necessarily." I didn't say you wouldn't ever be able to. The vast majority of the readership are based in the USA,and mostly further south than where I am. So if there are able to see the Northern Lights, then the colors will be less. So, your perspective won't apply to the majority.
Furthemore, the article is already over 2300 words long and that is far longer than the 1000-1600 word target for most articles on the internet. I could have written much more and included many exceptions, such as photographing from a plane or a moving boat, or indeed, creating 360-degree panoramics from the North Pole.
If you are one of the lucky few who live much further north (less than a 7000th of the world's population live on or above the Arctic Circle) you will see colors in the aurora borealis. However, far more people live much further south than that and so the inverse square law comes into effect, making the light much dimmer and colors may not be discernable by the naked eye. Especially so for the majority of us who live a long way south and also suffer light pollution.
Luckily my in-laws family live in Finland. Hopefully, I'll get to visit there again this or next year when the aurora is in full bloom. We actually had a display when we got married there, on that occasion it was only showing white in the sky, no colors were visible to the naked eye. But, as it was with this display, colors can be visible even this far south when there is a good solar storm.
I've photographed the Northern Lights on many occassions: it's not that complicated and while the post processing is different, I've never made more extreme adjustments than any landscape photos. What this article does remind me of, though, is people who take photos of faint displays and then go inside a yurt to drink coffee while others wait hours for the real show.
Only coffee? When visiting my in-laws In Finland, at night it's usually something much more warming than that! Have you any photos worth sharing? It would be good to see them.
I have no idea what people drink and only assumed coffee. I don't drink coffee or alcohol. Without good reason, I only share my photos with friends and relatives.
"What this article does remind me of, though, is people who take photos of faint displays and then go inside a yurt to drink coffee while others wait hours for the real show."
Hahaha!
What I take away from this article and all of the subsequent comments is that for me, I think aurora photography is something I would enjoy if I took a trip just to photograph the aurora in a far northern destination that would be ideal for it, and that I would NOT enjoy trying to "make do" with the pale weak displays that can be seen in areas that are convenient to where I live in northern Washington state.
I will save my aurora attempts for when I take a winter flight way up into the arctic just for aurora photos. Just like I won't bother photographing the deer that live in my area because their antlers aren't very huge or majestic, so I wait until I take a trip to Colorado or Montana or Tennessee during the November deer rut when the most impressive bucks are at their very best.
You really don't have to go to the Arctic Circle. I usually go to Fairbanks where at least one of the nearby ski resorts doubles as a viewing location and Chena Hotsprings Resort, 60 miles East of Fairbanks (if you like that sort of thing, which my Japanese wife LOVES) has SUSVs to take you into the mountains. The latter has darker skies, but both are great!
Well if the Aurora there is just as colorful and intense as it is in Barrow, then yes I would much rather go to Fairbanks. It will be much less expensive than flying to Barrow. I would never be able to afford the SUV thing that you suggest, but if I wasn't hard up for money it certainly sounds like a great idea. Thanks!
It isn't that expensive relative to the cost of flying, renting a car, staying in motels, etc., but I understand being hard up for money VERY well! As for seeing a great display, no matter where it is, that depends entirely on the capriciousness of mother nature. :-)
I would try to find a Fairbanks resident who is offering a spare bedroom on Craigslist. That's what I do when I travel everywhere else and it works great and is 1/4 the cost of a motel room. And I would figure out a way to avoid renting a car. And I cook my own meals in the kitchen of whatever house I stay at. Really cheap travel works for everything else, so it should also work for the Aurora in Fairbanks.
When I went to Barrow for 8 days, the only things I paid for were the flight, two tanks of gasoline, snacks, and one meal a day at Sam Lee's restaurant. Hoping Fairbanks could be just as cheap, but with an even less expensive flight.
The major outbreak of auroras this April taught me to not always use 15+ second exposures. It was dancing around so quickly that it was significantly blurred at times.
Yes, it does depend on your location, the sensor size and the focal length. As a rule, I keep it to exposure times less than 10 seconds. If you are closer to the poles, that would need to be much shorter. I am just above the 55th Parallel. As you travel further north the more bright they will be and the faster they will appear to move, because you are closer to them.
"When hitting the oxygen molecules at altitudes of around 60 to 190 miles..." Except atomic oxygen rather than molecular oxygen is mostly what is involved.


35 Comments
This article is very good because it told me a lot of things that I had not known before - thanks, Ivor!
I have never seen an aurora, and always assumed that it looked like the photos that I have seen. Now that I know the aurora does not look at all like those photos, I honestly have no interest in it anymore. It's kinda sad, actually. I guess I feel the way a child feels when they find out that Santa Claus is not real.
Do you think there are any places on earth where the aurora actually does look as vivid and bright and wildly colorful as it looks in so many photos? If so, then that is the aurora that I would like to experience.
I have no problem with other people using technology and software to make an image of a scene look so drastically different than it looked to the human eye, but I myself have no interest in such things, inasmuch as the aurora is concerned. If I want a photo of a wildly colorful aurora then the only way I want to do it is to find an aurora that actually appears wildly colorful to my naked eyes, and then take a photo that shows it just the way my eyes saw it.
But again I have no problem with those who feel like using technology to make something look far different than it looked in real life. Their images, their right to decide how to make them look.
I can tell you that with certain auroral storms, one just a week ago, a variety of colors are visible and vivid. Dont categorize all the colorful images you see as faked or over saturated. Some, yes, not all. I recall a surprise aurora a number of years back that was totally red. The sky crimson. I noticed it at 8:30 in the evening, Alaska time, through a window in my house, all the lights on inside. Obviously, a very brilliant display. 0n St. Patty’s Day 2013, an all night aurora was extremely colorful, reds to purples to greens. Yes, the predominant color is green. Yes, sensors pick up colors the naked eye doesn’t, like purple aurora, but a powerful solar storm can produce vivid colors.
PS a good starting point for WB is 3400K. And upward from there.
Well that's great to know that not all aurora photos are faked or "enhanced". Anything that beautiful should be real, and not just the product of someone's whimsical post processing (or in-camera processing).
It sounds like you live in Alaska. If I were to fly up to Barrow sometime in the winter, do you think there's a fair chance that I could see an aurora that was truly colorful? I think Barrow is the furthest north I can go without a passport, right? I was in Barrow before, but it was in mid-June when there was no night time.
For a variety of reasons, I would not recommend Barrow. The best places, I think, weather permitting, would be. COldfoot, via the Dalton Highway, and Yellowknife, NWT. North of Fairbanks can be good but last couple of winters we have had minimal clear nights. March best time. But, again, it depends on the solar storm for colors.
Go to the high Arctic, like Iceland, Norway, and Finland and you WILL experience the full-color show you see in most photos. Of course, the weather may not permit or the sun doesn't cooperate, but the potential is there. I grew up in Iceland and lived there for 35 years. I have seen the sky ablaze with all kinds of different colors and you will not have ANY problem seeing them without using a camera! :)
However, regarding fake or real. I really dislike that argument in photography in general. What is reality? What is "real" color? I have no clue. You see, I'm born with eyes that see extremely well (I'm almost 62 and I have around 20/15 vision and it's crap compared to what it used to be!) But those two eyes cannot agree on color! My right eye shows my brain a distinctly cooler color than my left eye! So which is correct? I pretty much reject the concept of "real" in photography, because I don't think it exists or is extremely rare. Let's say you take a photo of running water. How can it show reality? Fast exposure freezing the water, or slow exposure making it blurry, or somewhere in between? Where is the reality? I have seen people scream "FAKE" on social media over photos posted that I KNOW are real, just because they can't comprehend the possibility of the colors that nature can produce. That exclamation is very popular these days along with "Photoshopped"
Hi Tom, The colors become more vivid if you go a long way north. You are getting closer to them and the light gets brighter. Because it's brighter, your eyes can detect the colors. However, your camera can "see" the colors your eyes can't.
The reason why is due to the inverse square law. If you shine a torch at a wall a meter away, then double that distance the light becomes four times dimmer. Or, if you had stood three meters away, the beam would have become nine times dimmer. When light becomes too dim, you can no longer see colors.
That doesn't make the photograph any less real or mean the colors were not there. They were, your eyes were just not good enough to see them. If you look at a red car at night, you can no longer see that it is red, but it's still red, nonetheless.
Similarly, if you take a high-resolution shot using a telephoto lens on an animal, your camera will detect details that your eye cannot because your eyes' resolution is not good enough. If you use a macro lens, your camera can also see details you cannot.
Just one point that hasn't been discussed: How do you set the colour temperature?
When doing night photography this is a critical point, as there are different light source with different colour characteristics and you probably have to choose a certain temperature with an object of neutral grey when available. I tend to have this problem when taking images in churches where you have warm candle light, blueish spots and other lamps at the same time resulting in unpleasant parts of images. (excuse my bad english).
Do you leave it to the camera to decide, do rely on your eye or is there a trick to be applied?
I'm also interested in knowing how Ivor sets color temperature.
Personally, I use the Kelvin setting for everything, and set the WB to whatever number of degrees most accurately represents the scene before me.
But in this type of photography, where the photographer isn't necessarily trying to most accurately record what the eye sees, I wonder if WB is used to "enhance the illusion", so to speak, with a tendency to use a cooler Kelvin temperature if one is shooting blues and greens and a warmer Kelvin setting if one is shooting reds, oranges, and yellows.
That's a really good question. You are right, I didn't address it here and it deserves a whole new article. (Watch this space.) It's complicated. Especially so because these images were mixed lighting: that from the sky, which was about 4000K, and the mixed light pollution from the small town where I live, which was averaging about 5300K.
It doesn't matter how you set your camera's WB when shooting raw, as you will adjust it in development. Just be aware that if you set WB to Auto, then your camera may try to compensate for the blueness.
I use a grey card and color chart. However, there is a degree of subjectivity involved because if I adjust the white balance in processing to the true color temperature of the night, then the image looks much too blue to my taste. Although it would be scientifically correct, the result is far bluer than my brain processed the light to be; our brains have auto-white balance, too. So it's not how I observed it.
Ivor Rackham wrote:
"Just be aware that if you set WB to Auto, then your camera may try to compensate for the blueness."
Very true.
But another HUGE problem with auto WB is that it can vary quite a bit from frame to frame. Even when shooting frames in rapid succession, the white balance can be very different from one frame to the next. This creates a lot of hassle when editing a series of photos that were all taken of the same thing in the same place at close to the same time.
I have tried to stitch images together to make a panorama but because I used AWB and the color balance was so different from frame to frame, it was a real hassle to get the frames to all look the same. After that happened I started using the Kelvin setting all the time and developed an actual hatred for auto white balance.
If you shoot raw, then it isn't difficult to synchronize the WB, is it? To be honest, changes in WB for Panos isn't something I have noticed when shooting panos. Although metering can change a lot, of course. But you are right, setting it to a fixed temperature is a good idea,
It is difficult for me with the very basic editing software / raw converter that I use. For those who have been able to figure out how to download and use Lightroom and Photoshop, it is probably rather easy if they have a modicum of general computer literacy. But for me, with virtually zero computer literacy, I can not figure out how to do such things, even after watching tutorials and trying to follow along step by step. For folks like me who use the free editing software that comes on all Apple computers, trying to adjust white balance in extremely difficult and time consuming. Hence my preference for shooting all images in a series at the same white balance, by setting the Kelvin temperature to remain at a fixed value.
Very much enjoyed your article on aurora photography. The images are spectacular. My wife and I have just returned from a trip to Iceland during which we were fortunate to see the aurora on 4 nights. Our approach to shooting is slightly different that your method. We opted for the shortest possible exposure time so as to capture as much detail in the aurora as possible without recording movement that is seen with multi second exposures. Our D850 shows very little dark noise at 6400 ISO. This allowed us to shoot 2.5 second at f:2.8. The histogram was shifted to the left but not blocked allowing for easy development. I have attached a couple of images to illustrate our results. Shot with 17mm and 28mm lens.
That is a particularly dramatic and beautifully shaped aurora display!
Looks like an insane amount of noise grain in the dark parts of the sky. Is that something that you are okay with, or are you going to find a way to clean that up?
These are great. Thanks for posting them, Jeffrey. It shows how different they look when you are further north and your camera is turned upwards to look at them from below.
Yes, you would need a faster shutter when further north because they will appear to be moving faster as you are closer to them. I hope you had a good trip there.
Thanks. We were very fortunate to have visible aurora displays on 4 of the 15 nights in iceland. The country is a landscape photographers paradise.
In this article the author states:
"However, you won’t necessarily see the colors. Our eyes’ retinas detect light and comprise rods and cones. Cones detect color and don’t work well in low light. Therefore, the aurora is likely to appear as white light in the sky.
If you can see color, it is most likely going to be green. That’s because of the three primary colors: red, green, and blue. We have as many green-detecting cones as red and blue added together. That’s why those color proportions are used in the Bayer pattern of camera sensors; they mimic our retinas."
I'm originally from Iceland and I have NEVER seen white auroras in the Arctic!!! I have seen whitish Aurora here in Wisconsin when it was very, very faint, but not up north! It makes me think that the author has never been in the high Arctic or Antarctic. From my perspective, this information is just plain wrong.
I have seen green, red, and purple and so have friends and family in Iceland. Even down here in Wisconsin, I saw a very distinct green color back in March when we had a strong storm, and I have seen posts from many people down here stating the same. It is true that at night we do not see colors easily, but we still see the different colors of light, like car lights and signs and whatnot. The Auroras are no different, they display as a light source. Of course, if you take a photo with several seconds exposure time it is going to show a lot stronger color than we detect and the same holds true for all photography.
Yes, perhaps I should have clarified that in the article. Please note I said "not necessarily." I didn't say you wouldn't ever be able to. The vast majority of the readership are based in the USA,and mostly further south than where I am. So if there are able to see the Northern Lights, then the colors will be less. So, your perspective won't apply to the majority.
Furthemore, the article is already over 2300 words long and that is far longer than the 1000-1600 word target for most articles on the internet. I could have written much more and included many exceptions, such as photographing from a plane or a moving boat, or indeed, creating 360-degree panoramics from the North Pole.
If you are one of the lucky few who live much further north (less than a 7000th of the world's population live on or above the Arctic Circle) you will see colors in the aurora borealis. However, far more people live much further south than that and so the inverse square law comes into effect, making the light much dimmer and colors may not be discernable by the naked eye. Especially so for the majority of us who live a long way south and also suffer light pollution.
Luckily my in-laws family live in Finland. Hopefully, I'll get to visit there again this or next year when the aurora is in full bloom. We actually had a display when we got married there, on that occasion it was only showing white in the sky, no colors were visible to the naked eye. But, as it was with this display, colors can be visible even this far south when there is a good solar storm.
I've photographed the Northern Lights on many occassions: it's not that complicated and while the post processing is different, I've never made more extreme adjustments than any landscape photos. What this article does remind me of, though, is people who take photos of faint displays and then go inside a yurt to drink coffee while others wait hours for the real show.
Only coffee? When visiting my in-laws In Finland, at night it's usually something much more warming than that! Have you any photos worth sharing? It would be good to see them.
I have no idea what people drink and only assumed coffee. I don't drink coffee or alcohol. Without good reason, I only share my photos with friends and relatives.
John Williams wrote:
"What this article does remind me of, though, is people who take photos of faint displays and then go inside a yurt to drink coffee while others wait hours for the real show."
Hahaha!
What I take away from this article and all of the subsequent comments is that for me, I think aurora photography is something I would enjoy if I took a trip just to photograph the aurora in a far northern destination that would be ideal for it, and that I would NOT enjoy trying to "make do" with the pale weak displays that can be seen in areas that are convenient to where I live in northern Washington state.
I will save my aurora attempts for when I take a winter flight way up into the arctic just for aurora photos. Just like I won't bother photographing the deer that live in my area because their antlers aren't very huge or majestic, so I wait until I take a trip to Colorado or Montana or Tennessee during the November deer rut when the most impressive bucks are at their very best.
There are due to be some very good displays over the next 12 months. Get your flight booked!
You really don't have to go to the Arctic Circle. I usually go to Fairbanks where at least one of the nearby ski resorts doubles as a viewing location and Chena Hotsprings Resort, 60 miles East of Fairbanks (if you like that sort of thing, which my Japanese wife LOVES) has SUSVs to take you into the mountains. The latter has darker skies, but both are great!
Well if the Aurora there is just as colorful and intense as it is in Barrow, then yes I would much rather go to Fairbanks. It will be much less expensive than flying to Barrow. I would never be able to afford the SUV thing that you suggest, but if I wasn't hard up for money it certainly sounds like a great idea. Thanks!
It isn't that expensive relative to the cost of flying, renting a car, staying in motels, etc., but I understand being hard up for money VERY well! As for seeing a great display, no matter where it is, that depends entirely on the capriciousness of mother nature. :-)
I would try to find a Fairbanks resident who is offering a spare bedroom on Craigslist. That's what I do when I travel everywhere else and it works great and is 1/4 the cost of a motel room. And I would figure out a way to avoid renting a car. And I cook my own meals in the kitchen of whatever house I stay at. Really cheap travel works for everything else, so it should also work for the Aurora in Fairbanks.
When I went to Barrow for 8 days, the only things I paid for were the flight, two tanks of gasoline, snacks, and one meal a day at Sam Lee's restaurant. Hoping Fairbanks could be just as cheap, but with an even less expensive flight.
Wow! That's impressive. :-)
The major outbreak of auroras this April taught me to not always use 15+ second exposures. It was dancing around so quickly that it was significantly blurred at times.
Yes, it does depend on your location, the sensor size and the focal length. As a rule, I keep it to exposure times less than 10 seconds. If you are closer to the poles, that would need to be much shorter. I am just above the 55th Parallel. As you travel further north the more bright they will be and the faster they will appear to move, because you are closer to them.
Even though it presented some difficulties for you trying to photograph it, I think it is cool that the aurora was so dynamic for you!
"When hitting the oxygen molecules at altitudes of around 60 to 190 miles..." Except atomic oxygen rather than molecular oxygen is mostly what is involved.
Okay, thanks
Such a great article, Ivor. It's the little nuggets of information that you share that make all the difference. Thanks.
Thank you Susheel.