
We’ve all been there; the studio is set, the model is awkwardly waiting, but the light isn’t quite right and the stress begins to build. With every test shot, the light quality increases and the anxiety level decreases. Finally, like a blast of cool breeze on a hot day, everything clicks into place. The light is perfect.I can’t help but smile with pride when I see a shot on my studio monitor where the light is just right. Once all the technicalities are locked in, that’s where the fun begins and the pressure ends. I can focus on the subject and bridge that invisible connection which a strong portrait image fundamentally requires. With time, practice, and analysis, a light setup is built from intuition and mood over measurements and watt seconds. Nevertheless, intuition is always evolving and I never turn down the opportunity to fail, as the key to success lies in failure.
With many of my commercial projects, we have an precise creative brief and shot list to follow. With all my creative projects, I often prefer to walk in blind, with just an idea in my head or a tear sheet to inspire from. In this case, I wanted to play with a blend of soft light, hard light, and color effects. Color effects are often overlooked, yet can be extremely powerful to establishing mood, which is the foundational element to any photograph.
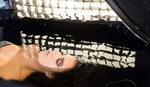
Our male model, Cam Sturgeon, would be dressed in a long black overcoat with his hair slicked back, which exuded a simple, yet expensive tone. Black is the color of authority and power. It is popular in fashion because it is stylish and timeless. I loved the dramatic feel of the look and wanted that to be represented in the overall mood of the photograph. Therefore, I landed on a matte black seamless paper background. But, with black clothing and a black background, I needed the perfect amount of contrast and color tonality to separate the model and the overcoat from the dark background.
KEY
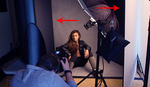
I begin every setup with a clear idea of the key light then build upon that element. The key offers the majority of light, and in this case a very dramatic and soft light. I often use the most chimerical cyan color in the softest and largest source of light, which is also usually my key light or fill light.
The key consisted of a Profoto D1 modified with a 65” Deep White Extra Large Umbrella then diffused with a 1.5 stop diffusion cover. The light was placed over the models head and feathered to the floor, so that spill landed on the face, rather then the actual light source.
As the color of the sky and ocean, blue is peaceful, tranquil, and causes the body to produce calming chemicals. As the color in nature, green is the easiest color on the eye and excuses a calming, refreshing aura. Both colors cause an opposite reaction to red.

KICK CAMERA LEFT
I wanted a hard kick light to provide plenty of contrast and interest to the overall color range. I did not want flare or harsh highlights, so I had to maintain control. Therefore, I shaped the light with a modifier with more specularity than an umbrella, but softer than bare bulb. As the kick light would be placed opposite of the key, the color needed to shine opposite of the key light color. So, I used a pop of color: dark red.
The kick light, camera left, was a Profoto D1 modified with a Profoto 20.5” White Softlight “Beauty Dish" Reflector controlled with a 25º Grid and placed nearly eight feet behind the model, near the background.
Red is the most emotionally intense color, red stimulates speed and rapid breathing.

KICK CAMERA RIGHT
Normally, I’d stick to a double light setup with fill and call it a day, but I wanted to explore beyond complacency and attempt a new technique. With the cyan key and the red kick, I wanted the kick, camera right, to be as subtle as possible and a color that was completely neutral to avoid distraction. Therefore, I adhered to the standard white light.
The kick light, camera right, was a Profoto D1 modified with a Profoto 2x3’ RFi Softbox bounced directly into a white foam board which was tilted 45 degrees down toward the subject. That light was flagged with a Matthews 18x24” Flag to avoid spill on the black background.
White can symbolize innocence and purity. It is also the most neutral color.

FILL
I believe one of the most underused, underrated aspect of artificial lighting is fill. Although, my light setup was constructed and the puzzled was solved, fill was the missing piece to lock in the light. Just like the kick camera right, I wanted to keep the fill subtle and neutral.
The fill, behind camera, was a Profoto D1 at it’s lowest setting, pointed and bounced directly into a white V-Flat then modified with a 2-Stop silk.

FOG
Last but not least, we added haze from a fog machine behind the model, which significantly reduced the hard highlights from the kick, camera right, and increased the density of the black background. We made sure to spread the fog with a small sheet of foamcore for more haze and less billowy fog. Believe it or not, haze can dramatically change the mood of the photograph.

Once the light was in place and the pressure was off, we knocked out a series of poses and within a few minutes had our shot. It was a complex light scenario that was clear-cut and decisive, but offered a learning experience I won’t soon forget. If you’re on edge and the light isn’t right, try something new such as try color effects. You never know what you may capture.
If you’re interested in learning this exact technique step-by step, be sure to check out my brand new Fstoppers tutorial on "Fashion and Editorial Portrait Photography" which dives into the world of lighting, retouching and shooting for magazines. I've spent years building instinct and now I want to share it all to you; packed into 18 lessons, 12 hours of video content, and a lifetime private mentorship. Buy the tutorial, you won't regret it.


Killer post. Very thorough
Thanks man!
Most excellent! So in depth, thank you for this.
Thank you my man! Happy to help.
Very cool!
Thanks Will!
I just did my first shoot with gels last weekend, and while I may have gone a touch overboard here (it was definitely fun playing around!), I was curious if anyone out there had a solution to a problem I'm having. The banding in the background (which looks best here, but bad on IG and absolutely horrid on FB) is so distracting when uploading to social media. I've done a surface blur to the background, and then added noise but it still doesn't seem to fix the problem. Any help or tips would be greatly appreciated! https://fstoppers.com/photo/175478
I recommend the mixer brush tool - I figure it out when I watched the FS tutorial at fx-ray.com/tutorials/skinretouching/ - You can turn on the check layer and use the mixer brush tool. Sorry for bad english .
No problem with your english! Thanks for the tip!
Great article!
Thanks Edgar!
Haven't read a Clay Cook article on FStoppers in a long time! So glad to see this!
I did something similar as an experiment a few months ago but man, it was hard isolating the colors on the face so they would fall exactly where I wanted them too. I feel like with one color(usually white) it is way more forgiving!
In any event, I loved the completely different look it gave our model with the crazy hair.
Wow, I never really thought of focusing on a spill to create such a soft kiss of light and color. Stellar article!
Why are the BTS photos extremely low quality?.... disgracefully low quality! Doesn't help.
Somewhat confused. How did you color gel your lights/beauty dish? Great pics by the way.