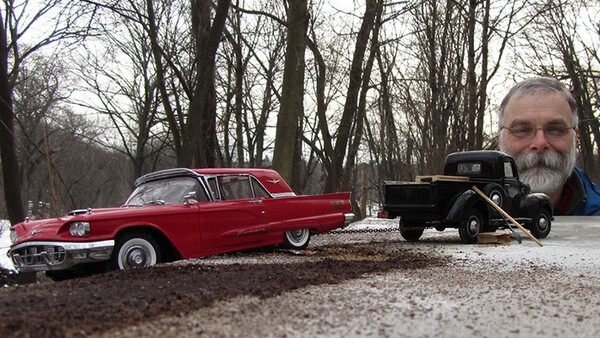
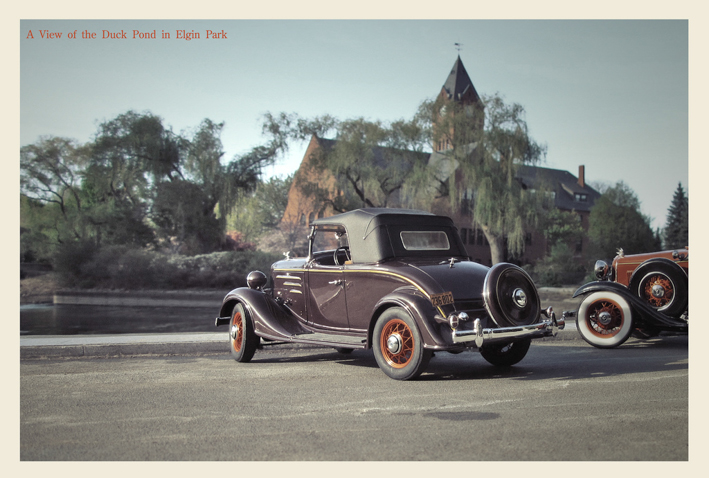
For the last 25 years, Michael Paul Smith has been building detailed scale models for an imaginary world he calls "Elgin Park." Michael builds eerily identical scaled models of cars 1/24th the size. He carefully picks out real world environments for these cars and builds whatever else is needed to sell the shot. He then uses backgrounds of real environments to make the shot as realistic as possible. Here's the kicker: he's doing all of this on a $200 point and shoot.

About Michael Paul Smith
Michael has been building to scale models for over 25 years. He took model building one step further and created a way to mix real buildings, trees, structures, lakes, and streets in with his 1/24th to scale models. It's really quite amazing that these photos look as real as they do and I love the theme he has run with. I contacted Michael last week and he was nice enough to tell me more about his process. Enjoy.
Interview
How did you get into this?
My project Elgin Park came about from a need to put my 300 diecast model car collection into some sort of physical context. Even though they looked interesting lined up my shelves, all they did was sit there. It occurred to me I could construct a 1/24th scale building to showcase the cars.Starting with a gas station, because it's something universally connected with cars and trucks, it was just a matter of time before other structures started to be made. Utilizing all of the knowledge I had acquired from studying 20th century culture, these dioramas could be authentic down to the last detail. There are a total of 15 buildings in my town, at the moment. Because of space limitations, the models are not set up as a "town". They are packed in various boxes and closets and are brought out only when I get inspired to do a photo session. Also the buildings are not completed structures but are made in a modular way so I can mix and match them to give the appearance of a different building.

Is there a science to this that you can share with the rest of us?
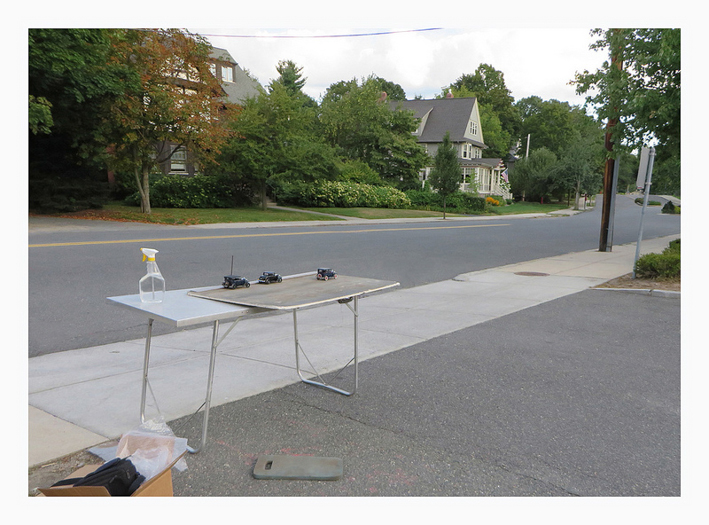
The whole forced perspective process was used extensively in early movie making back in the 1920's. Because it was too expensive to create massive full size sets outside, detailed models were created and placed at the correct distance behind the actors to create the illusion of a city or some fantasy location. It was a very effective special effect.The use of models in Cinema is still happening today. As a matter of fact, audiences are tiring of CGI and model making is getting a resurgence. The actual math that is involved to create a consistently good forced perspective shot is something I can't figure out because I am math challenged. Over the years I've been doing this, I've developed a sense of how far I have to be away from any given background to make the scene work. There are still times when I have the shot set up, look through the camera and discover the distance is incorrect. In a very unprofessional way, I drag the table with the diorama on it until the scene lines up correctly.


What equipment are you using to shoot this?
The camera I'm using now is a 14 megapixel Canon SX280. Before that I was using a Sony 12 megapixel point and shoot, which died suddenly for some unknown reason. And my original camera was a Sony 6 megapixel point and shoot. The little Sony 6 megapixel was what I learned on. I really didn't know what I was doing so I just created setups and started shooting. The learning curve was steep. What I have found is that 14 megapixels is almost too much for what I need to take convincing diorama shots. There is too much information being recorded which makes every little detail show up in the photographs. When working with miniatures, at least for myself, too much detail distracts from the total scene. Also, to capture a "retro" feeling, there needs to be a blur of sorts. If you go through old photos there is a slight lack of clarity to them. I think psychologically it gives them some emotional distance.
How long does it take you to build a set?
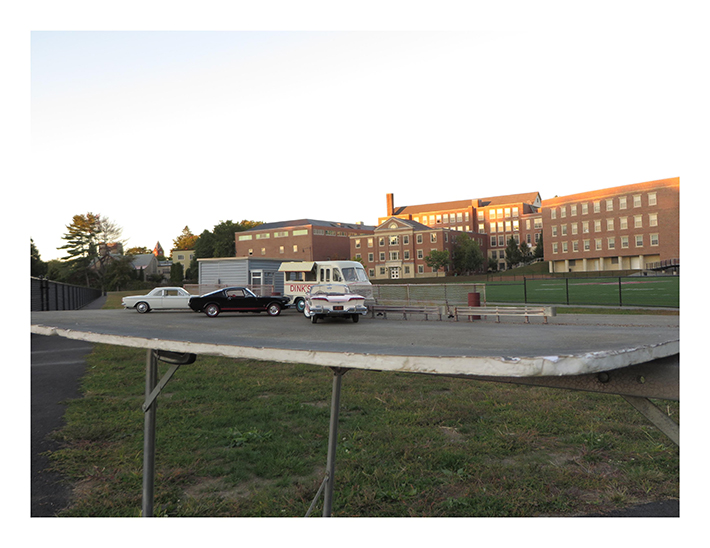
A few days, and here is why that is. When I get inspired for a photograph, and that inspiration usually comes out of the blue, I will start to look at my diecast collection for vehicles that would best represent what I'm trying to portray. Using my latest photo as an example: The 1965 Mustang in the school parking lot. Every day I take a walk and pass by the Winchester Junior High School. On a particular day, the sun was starting to set which lit up the back of the school along with the bleachers. The drama of it started me thinking about my High School days in Pittsburgh. Those were perilous times for me because I wasn't involved in the sports scene. Getting back to the diorama, I thought about the cars people drove, back in the day. There was a real mixture of vehicles with the usual daily drivers, the beaters and usually a brand new car that made everything look dated. I knew I had a 1965 Mustang fastback diecast in my collection that I had never photographed before so it became clear to me that this was the era I would try to illustrate.
The vision of the Winchester school lit up at sunset felt like the perfect backdrop for the story forming in my mind so I made the decision to stick with that. Now the question was, what other cars and/ or trucks could add to the visual story line? I had constructed, a few years ago, a mobile Ice Cream Truck which would work well in a school parking lot setting. Having the cars parked around it with the bleachers in the background made sense. And amidst all that, the new shiny black Mustang.
The final question is: what model details will help round out the scene? Going through my boxes of Detail Stuff, I decided a phone booth, some chain link fencing, some large garbage cans, a generic one room building and some guardrails. I then did a dry run on my kitchen table which stands in for my workbench. Throughout the dry run, I would consider different cars but always kept the Ice Cream Truck and Mustang. On the next nice day, I waited until an hour before sunset and headed out to the Junior High School, which is at the end of my street. I use an old aluminum folding table as my base, then place the "road" on it. The "road" is a 3 foot by 4 foot piece of board that I have painted and textured to look like a street. From there I place the models in position that I had on my kitchen table. Seeing the diorama out on location usually has me tweaking the set so as to get everything working together.
That was a long winded answer but it gives you some insight to the process. Here is the particular shot I was describing:
What's the hardest part about making this look as real as possible?
That is a tough question. Getting the perspective correct is the biggest factor. Once that is in place, the placement of the model buildings and vehicles is critical. And then there is "detailing" the set with scaled down dirt and misting the road with water to add another dimension to the scene. If any of those factors are not working, then the scene falls apart. There have been times when I thought a model building would blend well with a real background only to find it didn't, for whatever reason. Another difficult part is to remember not to get too close to the model when shooting. It might look great through the view screen but when downloaded, the point of view or composition is all off. In addition very bright sunlight is not good for miniatures. This might sound odd, but if there are too many bright reflections bouncing off the models, the light becomes out of scale. On a sunny day, I try to photograph under a tree so there is dappled sunlight on the model to create an interestingly illuminated set.
What sort of post processing, or photoshop magic, are you doing on these cars/environments?
There is some post processing done to almost all of my photographs. Although I do use photoshop, it is for removing an unwanted sign or person that happens to be in the picture. I will not use it to move objects around or add anything to the photo. I've given myself the challenge, from day one, to setup each shot in the camera. If it's not correct when I down load it, then I won't use it. There have been some really good images that got away. Using filters in post production has become an interesting aspect to the finished product. Desaturating the color, altering the yellow/ blue content, along with blurring and tinting the photo all add to the final look. I try to use it sparingly and subtly so as not to overwhelm the original image.
How accurate are these replicas?
The diecast vehicles I use are amazing replicas of the real cars and trucks. The wheels steer from the steering wheel, the shock absorbers work, the doors, hood and trunk open, the front seats fold forward, there are removable spare tires and the list goes on. One of my diecasts has a real cloth convertible roof that folds down and another has roll down windows. And these models are only 3 inches tall! The colors are actual paint colors from those eras and the tire treads are accurate for each decade. These vehicles make me very happy. When I was starting to create the buildings for the dioramas, I gave myself the challenge to make the structures as good as the diecasts vehicles, down to the interiors. So you may not see them in the shot, but the houses have furniture, wallpaper and rugs that are appropriate for that particular building.
What has been your most difficult shoot?
There have been a few, but for different reasons. Weather tends to be a big factor for the obvious reasons, but there is also the problem of photographing in tight spaces which restricts moving the model around to get various perspectives. Here are some examples:
- One was a snow scene, done outside in winter along side the Aberjona river. To get the shot I had to place my folding table close to the edge of the water then cantilever the diorama base off the table. This was done in knee deep snow, so the table started to slip down towards the water which caused the model cars to start rolling. With frozen hands, I started grabbing everything at once while trying to pull the table back onto the river bank. I'm pleased to say I didn't lose anything.
- Another one was during a windy spring day near a lake. A gust of wind picked up the table and models and flung them into the air. There were no casualties, I'm pleased to announced.
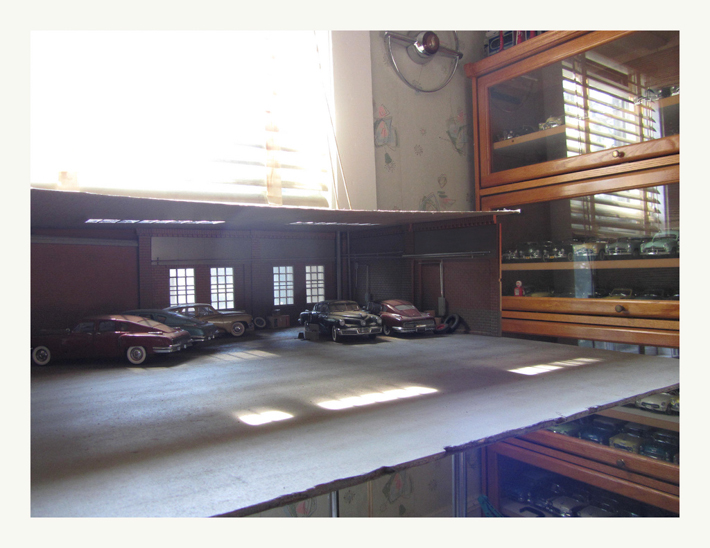
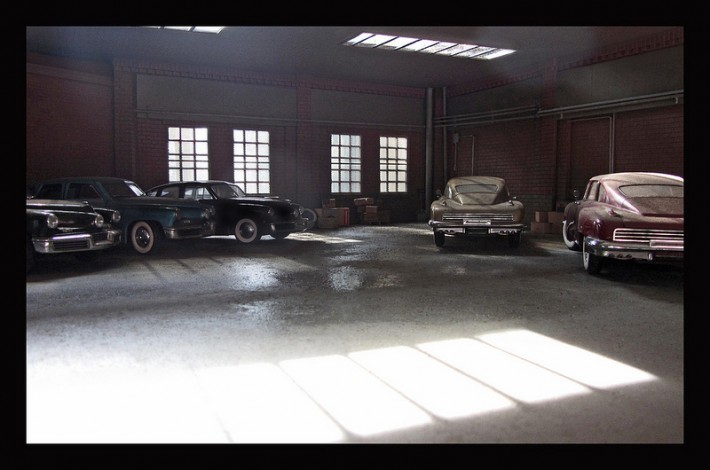
- Another was on an indoor shot, such as the Tuckers in the Warehouse, there is always the problem of not being able to move around the diorama to get various angles. The Tucker photo shoot was one of my most difficult sessions. Actually I shot for 3 days with over a hundred images taken. To get the light streaming through the model windows and skylights, I only had the early morning sun coming in my window for about an hour each day. Natural sunlight has an ethereal quality to it that makes everything glow and I wanted that quality to filter through the fogged up windows and skylights. Due to lack of space where I live, I placed the set on a table up against an open window. It wasn't 100% right, so I pushed part of the model outside the window so it was hanging out in space. It was the right thing to do, but a dangerous position for my set because I live on the 3rd floor of an old Victorian house. By jamming the set out the window, though, it gave me even less room to maneuver. So I ended up tracking my camera, which is hand held, about a quarter of an inch at a time across the set. By doing that I was finally able to find the perfect spot that gave me the proper perspective and distance. That was one tough shot, but I got it.
Here is the particular shot I was describing with the Tuckers:
Have you ever had a shoot not turn out how you had hoped? If so what happened?
This has happened a few times. An example: there is a wonderful small house nearby that has not been changed in 100 years. The surrounding homes are generic enough to not interfere with an historic feeling. What I didn't count on was the lack of distance between me and the house. I had the shot set up, the lighting was terrific but I needed to be about 3 more feet away from the building. But I couldn't back up any more because there was a house behind me and in my way. I took the photos, anyway, trying all sorts of angles but it just didn't look good. Actually, it looked like little cars in front of a nice house. Also, having a small model base is limiting. If I could somehow carry around a base that was about 4 feet by 6 feet, that would give me some distance between the model and the camera. But I have to carry all of my stuff with me on a baggage cart because I don't have a car.


Where are you getting these replicas? Do you actually build and paint them as well?
My diecast collection came from three manufacturers that no longer make them. They are The Danbury Mint [ the holy grail of diecasts ] The Frankin Mint [ they started the whole trend back in the late 80's ] and West Coast Precision Diecasts. West Coast came in late in the game and only produced Chevys, but oh they were beauties. The front seats moved on rails, the glove compartments open. I have a few other vehicles from assorted companies but they are not as detailed and I tend to alter them to bring them up to speed. Now I have created my own vehicles. There is a car carrier, a garbage truck, a 24 foot [ to scale ] trailer and a teardrop trailer. Because I don't have a shop, everything is done by hand and creating a vehicle is very precise work. I just don't have the patience to make them. I will take a diecast, though, and repaint it. Actually I did some cosmetic work on a Tucker model to make it appear as though it was a design study for the 1951 model year. It was quite convincing.
What advice do you have for someone trying to do something similar to this?
The most important rule is to be further away from the background instead of closer. Also, keep the camera lens at the proper height that is appropriate to the scale of the models you are photographing. For 1/24th scale, I have the camera no higher than 2 inches from the model base. This would be the point of view of a 1/24th scale person looking at the scene in front of them. It really is a fun and creative challenge, with quick results.
Now if you are going to create building and complicated scenes with details such as telephone poles and the like, then do lots of research on how reality looks. Study old photos, especially snap shots. They give a very accurate description of what an era looks like because the amature photographer, back then, was not trying to take a glamor shot. The stuff that's going on in the background is priceless in terms of what was around during any particular era. Another piece of advice that I think is helpful is: you don't need expensive equipment or lighting to create a realistic photo. Too much information in the photo is not a good thing when creating a forced perspective image. You need the subtle blur and the effect of an average lens.
Also, don't try too hard during a shoot. For myself, if I'm shooting for more than an hour then I'm overloading my brain. The best sessions I've had were about 20 minutes long. During that time I'm in the ZONE letting the scene describe itself. And don't second guess yourself. If you're thinking too much behind the camera, then you've lost the creative magic that happens between the model and the lens.
What's the most important thing to remember when creating a scaled down environment like this?
Here is the most important aspect of making models and photographs appear real: Keep everything in scale. From the thickness of the shingles down to the wallpaper design and door knobs, everything must be in the proper relationship to each other. I can't stress that enough.
Check out his Flickr.
38 Comments
Amazing work!
this is waaayyy cool!
Lighting, perspective, color perception, texture, and craft making - all intertwined to blow our minds beautifully. Great article!
Wow, this is incredible
This is great! And I love that he doesn't actually have a car of his own!
My god this is incredible. I love creative minds like this!
well it looks like a 200$ point and shot.
but the camera is not the important part here anyway.
what do you mean by this?
cameras will ultra small sensor sizes can keep everything in the frame in focus (deep or wide depth of field). No DSLR could make these images look realistic because the background would be too blurry in relation to the cars.
Thanks for clarifying this Lee, I had the same thoughts when reading the article, a point-and-shoot was the appropriate camera for this forced perspective. Regardless of camera used, this man has real talent.
DoF increases with focal length (and decreases with distance and aperture).
Or to think about it another way DoF increases by the crop factor of the sensor for the same field of view. Or you get the same DoF on a full frame if you use aperture * crop factor i.e. he shoots at f/3.5 on the compact with a 5.2x crop factor camera (a type 1/2.3 inch sensor) which would require f/18 on full frame camera for the same DoF.
Note that as he is shooting at f/3.5 on the compact so you're letting more light in with the wider aperture than the full frame at f/18. Think about the exposure triangle. If you keep shutter speed the same (to stop motion in the same way) and choose the appropriate aperture for DoF f/18 then on the full frame camera you must change the ISO to get the exposure correct. It has to change by the square of the crop factor too: the compact is shooting at ISO 80 so the full frame would be at ISO 1600 (close enough to 2000).
To sum up:
Compact camera: 1/160, f/3.5, ISO 80
Full frame camera: 1/160, f/18, ISO 2000
For the really geeky: (ignoring read noise and different sensor QEs) both images will have the same signal to noise ratio i.e the same shot noise as they get the same number of photons.
This is why full frame isn't always better than a smaller sensor camera. If you can shoot the same "equivalent photo" on a compact sensor it can be a better trade off to use a smaller sensor.
Choose the right camera from the right job (from 8x10 down to cell phone sensor).
well, technically, in this instance, the camera IS important....the point and shoot he's using has a super small sensor in it, so it gives tremendous DOF....if he tried this with a DSLR, he'd have to stop down to f/22 or further, and at short working distances, the background could very well still be blurred too much.....when combined with the proper perspective, the huge DOF adds to the effect tremendously....
Wow! Love this great! Great in depth article!
His work is amazing, and he is a great artist (in more than one way), but his camera is worth a lot more than $200...
Actually, no! I Just saw a new SX280 HS for $195 on e-bay....
Wow... Indeed, prices have dropped a lot since I last checked. That camera was $299+ two months ago. Even Amazon is selling it for $239 now.
Anyhow... His work is great, and the price of his camera is just one more detail.
Such a wonderfully creative mind, and his gallery on Flickr is great! Reminds me of why the old Star Wars and Superman movies' production quality (with the use of miniatures) is so much better than the newer ones. Back then they had to "fool the camera", nowadays they just "fool the viewer".
Just what I needed... a new hobby. I do each of these separately (photography and scale model building).
Extremely creative gent here and fantastic work. This is a great article!! Love the concept!
Amazing. Very well done.
These are great! I'd love to see him do a drive-in movie scene...that'd be a really neat challenge.
Bazinga! creativity trumps expensive gear once more!
this is cool
Incredible job! I really enjoyed this article.
Wow - this is amazing. Love it!
awesome!
So Kool!
Great post and brilliant idea and photos :)
amazing job I was also surprised to hear he didn't have a car, given the subject matter. But then again, I'm not surprised at the same time.
I like his craftsmanship. He's really making some believable images (not all but a majority) here with his attention to detail and all. The worst part about the article is that the writer of the headline makes it seem this is astounding doing it all with a small point and shoot when in fact, he needs the lower level (smaller sensor) tool to make the shots work.
The gentleman creating the scenes/images is a real craftsman.
Amazing models and shoots, it seems so simply ! Great works
this is so difficult , really lots of respect.. to fake and make it real is the master of the mind..
Love your work. !!!!
These are wonderful Foreground Miniature shots, but not necessarily modeled in Forced Perspective. (In which, scale and vanishing lines are intentionally distorted, to mimic those of a much larger landscape).
I don't know how it happened on the Internet, but somehow "Forced Perspective" has come to be used (incorrectly) to mean "Foreground Miniature." Much as "chromakey" is used carelessly sometimes, to mean "greenscreen compositing."
Some Foreground Miniature shot are modeled in Forced Perspective, but not all of them. It is an error to refer to them all as "Forced Perspective." These are wonderful Foreground Miniature shots.
Sam Longoria
Producer
Hollywood CA USA
http://samlongoria.blogspot.com
Fascinating!
Yeah $250 P+S but most of those models are around $300 not to mention the background props Sooooo... you need money to do this :P
Super cool and inspiring story. Thanks for sharing.
These are Great. I've used this method ,to some extent, to do my "Moments to Remember" series of '50s paintings.