
I recently teamed up with the crew at Fstoppers to create a video tutorial that focuses on the foundations of creating a standalone product hero shot for advertising. What’s a standalone product hero shot you ask? It’s a standalone image of a product that’s generally well lit, super crisp, super clean, and essentially aids in selling a company's product.
An Intro To Standalone Hero Shot Images
Standalone product hero shots are very common in advertising and are used by just about every company who manufactures and/or sells products these days. These types of images are multi-faceted, serve many purposes, and have a ton of value for any client. You’ll see standalone hero shots on websites, digital display advertising, billboards, and even the sides of delivery trucks. Next time you open your favorite magazine, be cognizant of these shots. Just look at some of the ads. A really common advertising layout that I often see displays a standalone hero shot at the bottom corner of the ad. In some cases, it even serves as the focal point.
Product Photography Compositing
Whether you’re new or unfamiliar with the genre of product photography, you may not realize that when you see a great looking product image in an advertisement, you are more than likely looking at the result of a composite image. It’s no accident that great product images have perfect lighting in all the right places. What you may not realize, is that it’s very likely that what you’re seeing, couldn’t have ever happened all in one shot.
For those of you who aren’t familiar with composite imagery, the concept is actually pretty simple. Essentially you are combining and blending several images, frames, or exposures together in order to create one cohesive composite image. Composite imagery can be relatively simple or extremely complex depending on the end goal of the final image. In any case, the art of compositing should become an extension of your creative repertoire as it gives you the artist, total control over every aspect of how your images looks and feels.
The More You Know
The more you know about the product you’re about to photograph, the better. Don’t always take a product at face value. Before you get it on set and start photographing it, be sure to touch it, feel it, and study it. Look at the shape and design that make up that product. Look at the surfaces and textures of the product you’re about to photograph. Think about the properties of those surfaces and how they react to light. Is it reflective? Is it matte? Is it transparent or opaque? Look at the colors. How does the product make you feel? See where I’m going with this?
Breaking It Down
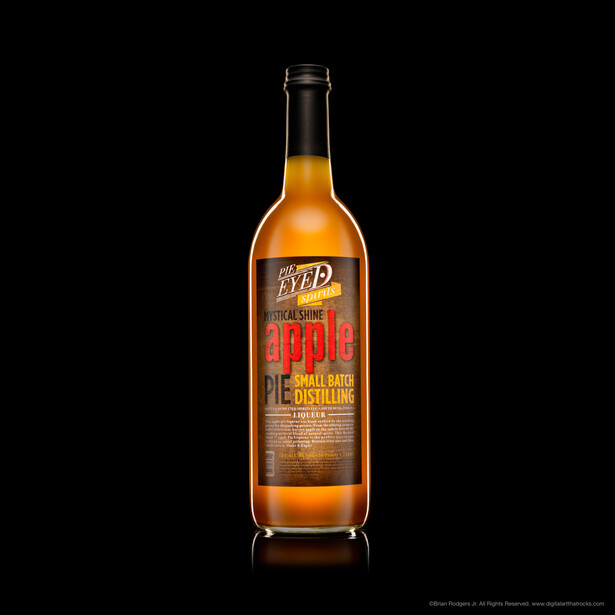
When photographing a product, break it down into pieces. Not literally…break it down visually. When you’re on set photographing a product, focus on one area of that product at a time. Even the simplest product can present many unique challenges. In the case of the liqueur bottle that I’m photographing for a client in the tutorial video, it presents it’s own unique set of challenges because of the cylindrical shape, the translucent yet reflective surface of the glass bottle, the matte finish of the printed label and the fact that there’s also a thick somewhat opaque liquid inside of it. As you’ll see in the video, I take on each challenge, one step at a time and build the shot.
My Approach
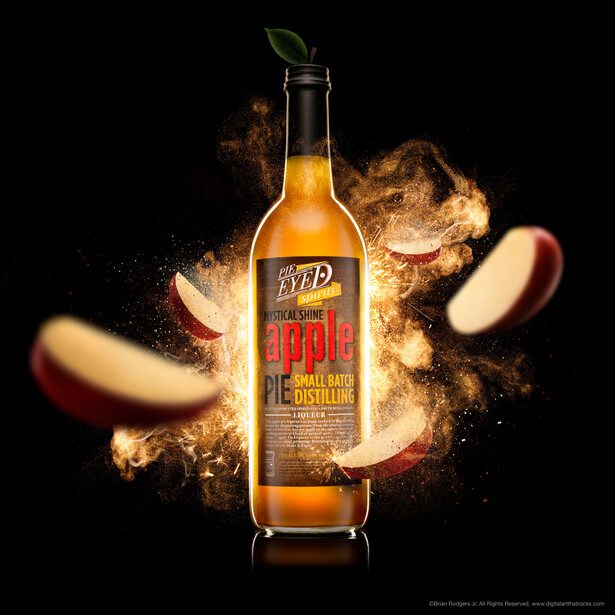
In this video tutorial, I demonstrate my approach to creating a standalone hero shot composite image by photographing a client’s liqueur bottle. To make things a little more interesting and also prove that you can create an amazing product shot with minimal gear, I used only one light. The takeaway here, is that I’m breaking it down and building the shot in pieces. Though I’m only using one light, I’m crafting the light with various light shaping tools, and putting emphasis on one area of the product at a time. Once I have all the frames I need to make a successful composite image, I use my post production process to build the final standalone hero shot.

The Larger Picture
While this standalone hero shot serves as a great image for advertising on websites, digital display advertising, billboards etc.,this kind of image can also serve as the base to a much larger and intricate composite image (as seen below in the before/after). I’m not going to go into detail on how I put the entire composite image together, I simply wanted to demonstrate the creative direction that an image like this can take on. Hopefully this video helps inspire you to think about product photography in a new and creative way.
Interested In Product Photography?
Fstoppers and I have collaborated to produce an in-depth tutorial on commercial product photography and post-processing. If you're interested in product photography, be sure to check out my tutorial The Hero Shot - How To Light And Composite Product Photography.


Join the Fstoppers community for free
-
Post comments and join in the discussions
-
Browse the site ad-free
-
Share your work and get featured in the community
-
Compete in the photo contests for fun and prizes
36 Comments
fun to watch how other guys get the end look :)
and great stuff in your portfolio !
composite & retouching how it should be done !!
the two bright refraction spots near the base are bugging me :)
Hey Chad,
Thanks for checking it out! I actually like the specular highlights at the bottom, so I left them in ;)
trying to be careful to say bugging me with a smile ;) hahahahahahahah
cause figure based on your other work ya had your reasons :)
don't do grammar so well either so sometimes hate typing things out as they come off wrong :)
LOL, no worries :)
Great job! Excited this is finally released
Thanks man, same here!
I loved the video man, but now I wanna see part 2 ! :D
Thanks Fernando! Be sure to sign up for the email list right at the end of the article for more info :)
Yep: Liked. Subscribed. Now commented. I look forward to updates.
Thanks for a great tutorial and write up.
Awesome! Thanks for checking it out Simon! Stay tuned
Fantastic tutorial Brian! Great job!
Thanks for checking it out Jonathon!
Such a great video, Brian! What size is the softbox you're using for the edge light?
Thanks Matt! Honestly, I'm not sure what size that softbox is because I was just using the Profoto gear that the Fstoppers crew had on set in their studio. In my studio, I use Paul C Buff equipment and I use this technique all the time with the Paul C Buff 32" by 40" softbox. It's considered to be a "large" softbox. I think it's a pretty descent size without being too big.
Cheers!
What sort of modifier do you use on your Buff strobe when you handhold it?
It depends on what I'm trying to accomplish. Sometimes I'm just hand holding a Buff strobe with a parabolic reflector w/a grid, other times I may hold a stripbox or large softbox. Obviously bigger modifiers may require two hands instead of one. But it can be done
Dude, that was amazing. I'm just getting into photography and I was wondering how to turn it into money. Any tips on where to start? Or how you started? On a scale of 1 to 10 of how good I am at photoshop, photoshop is my enemy. Nice one
Thanks Logan! There are so many paths to a career in photography.....so it's hard to give you a direct answer.
From my experience, turning your photography into a career and making a living does not happen overnight. It took me years of hard work, working for large fortune 500 companies and small businesses alike to learn how businesses function at multiple levels. Years determination, resilience, patience, practice and experimenting to put together a really nice professional portfolio. And literally years before I started my own business as a commercial photographer.
But I think it really all boils down to setting goals for yourself, working really really hard, learning as much as you can about running a solid business, creating great work, networking and just being a genuine person to other people. If you do those things, you will have a great chance of doing this full time; if that's your goal. If you're just looking to make some extra money, you can always create work and try licensing your work on stock photography sites.
Hopefully that helps, cheers!
WOW, a new world for me, Thanks
Awesome to hear!
Really fantastic work, Brian–the final image and the tutorial. Thanks so much for sharing!
Thanks for checking it out Jared! I appreciate it man!
it was really great to see this. how beautifully composition can be done. will like to see more like this.
Thanks Rajiv! Fstoppers and I will be working on a full length tutorial. For updates, be sure to sign up for the mailing list (right at the bottom of the article).
For sure i will subscribe it. i do clicks for students which can also be checked at http://www.sirtbhopal.ac.in though it is in under going few changes at the moment.
How To Photograph And COMPOSE A Commercial Beverage Image In Photoshop
Product Photography COMPOSITION
and so on
Writing skills go a long way in article credibility.
Very good article though, but my anal side can't get over the writing errors.
Learned more on this product photography thing. Great job Brian!
Thank you!
I learned more in 30 minutes than I have in a long time. Well explained Brian. Inspiring too. I know what I'm going to try this week!
Thanks Mark, that's great to hear! I really appreciate it!
thank you for your explanation .. good job
Surely good read the article is describing everything which we need to know about Photograph And Composite A Commercial Beverage Image In Photoshop, we will suggest students form http://trubainstitute.ac.in to read this. thank you for your contribution to the society by your writing skill.
Hey Brian,
I tried to shoot a photo with flames like you controler with a MacBook and was asking my self were you got the flames from. Im not sure if Stockphotos are the only way to go.
Greatings from Germany
Kilian
Hey Kilian Seiler , I photograph all of my own assets for compositing, so all of the flames that you see in my product photography were photographed by me. For me personally, I try not to use stock elements for compositing unless I'm in a pinch. That said, if you live in an area where it would be hard to start a controlled fire in order to create fire assets, you could certainly go the stock route.
Cheers!
Hey Brian,
I saw this video of yours on YouTube quite awhile back and it was a real game changer. I am not a professional but I love to do product photography and this tutorial helped me a lot.
I would like to learn more about the creative compositions of yours. Could you please make a tutorial on how you made the final image? Cheers!!
Hey Brian, I would like to know how you did the thing with those apples, pls gimme a tutorial on that.... i am a beginner in photoshop and I really wanna learn things