
Layer masks are one of the most useful tools in Photoshop, allowing the user to apply adjustments to an image selectively. Masking, however, can be one of the most frustrating aspects of post-production, sometimes requiring lots of intricate work. One tool in Photoshop that can make your masking life easier is also one of the most overlooked: Apply Image.
Masking can be incredibly tedious, especially when working with fine detail or areas without hard edges. Using Apply Image on a mask can give you more control over where your adjustments are applied since the source of the mask is the pixel information in the layer you choose to apply.
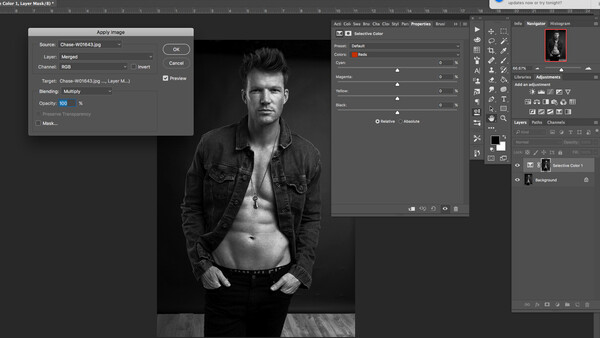
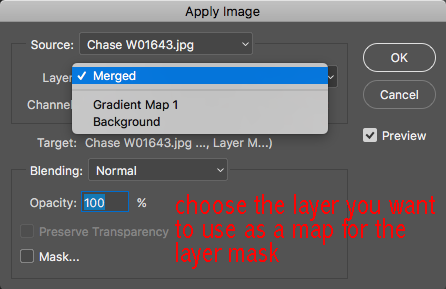
Apply image allows you to choose a source layer, like the background or even a merged version of the whole image, and apply that image to the layer mask of your choice, using the blending modes or not, in black and white. When using masks, white reveals while black conceals, so having a perfect representation of the layer of your choice on a layer mask can be incredibly helpful in selectively applying adjustments.
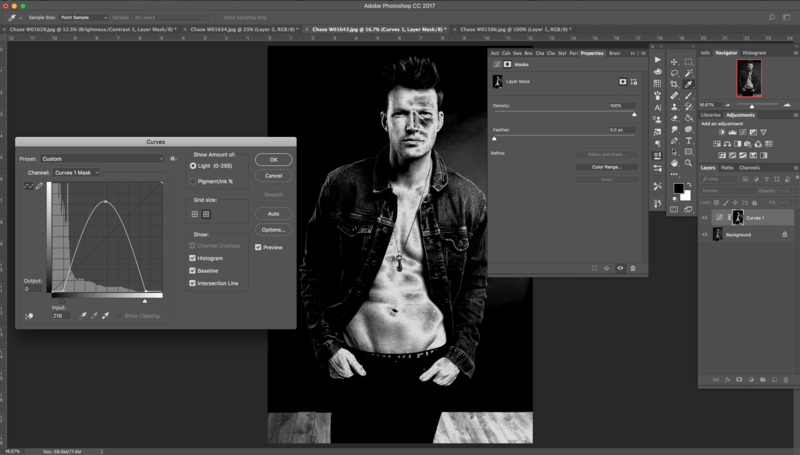
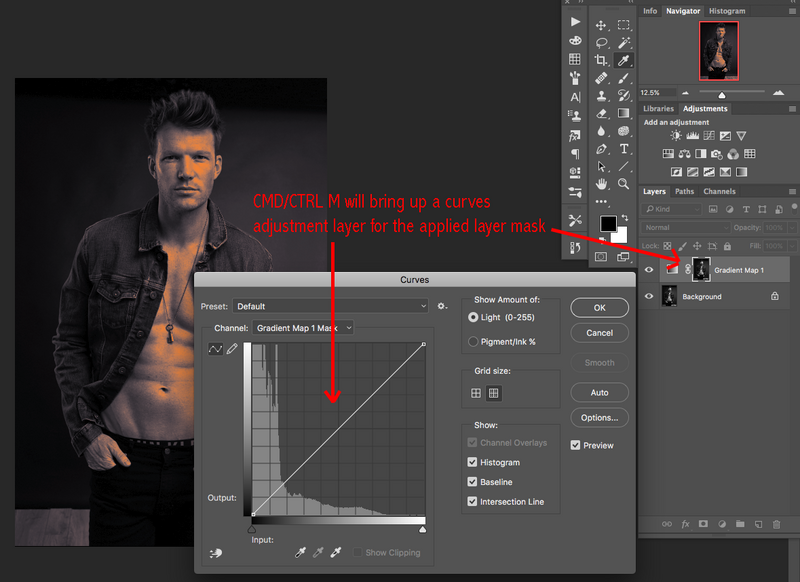
Not only can you see the working layer mask in full size by pressing Option/Alt and clicking the layer mask, which gives you incredible detail to work with, but you can make broad adjustments to the layer mask by using a handy little command. Select the layer mask, and press Command+m/Ctrl+m. This will bring up a curves adjustment just for that layer mask only, so you can change the luminosity of specific areas of the mask, like the shadows, midtones, or highlights to control which areas of your adjustment are revealed and which are concealed by adjusting how much black or white is in that area of the mask.
This technique can be used with any adjustment layer, so you can affect the luminosity, hue and saturation, color, exposure, and others with more precision, either on a small scale or globally.
Apply Layer can be particularly handy for color grading and exposure adjustments.
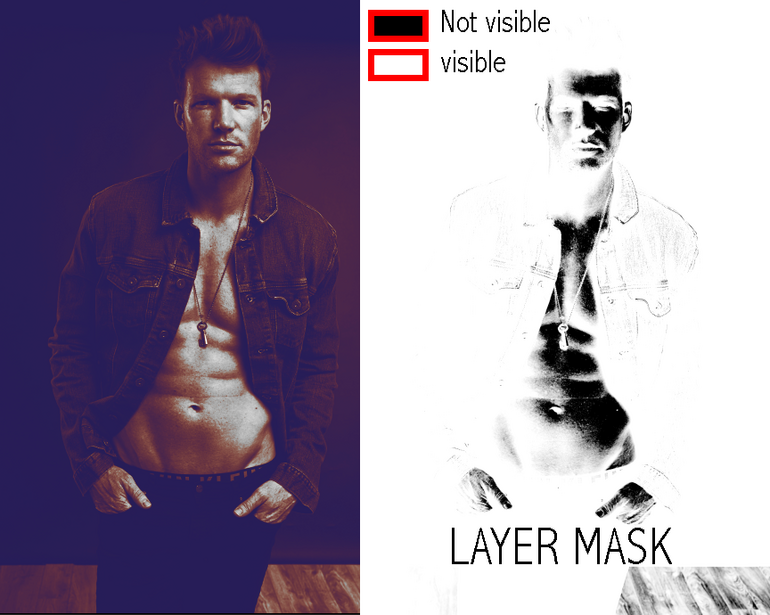
This image below relied on Applied Layer Masks to finesse the skin contrast.
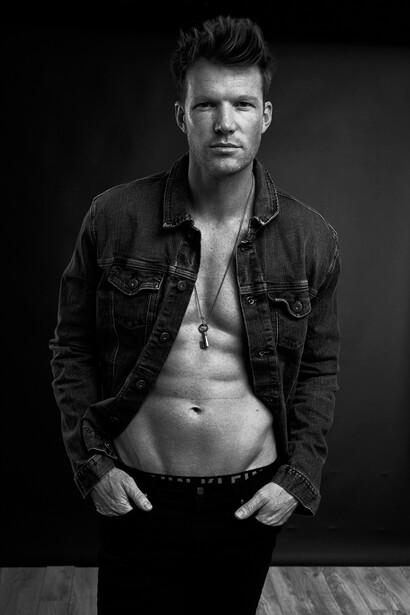
I created a Curves Adjustment Layer, then used Apply Image to bring the gray scale mask to the layer. I used Cmd+m to create a curves adjustment on my layer mask and used that curves adjustment to darken the highlights and the shadows until only the midtones were white. This means that the contrast was only added to the midtones. If there are areas that can't be covered by the mask curve, I can always go in with a few quick brush strokes to make up the difference.
To Use Applied Layer Masks
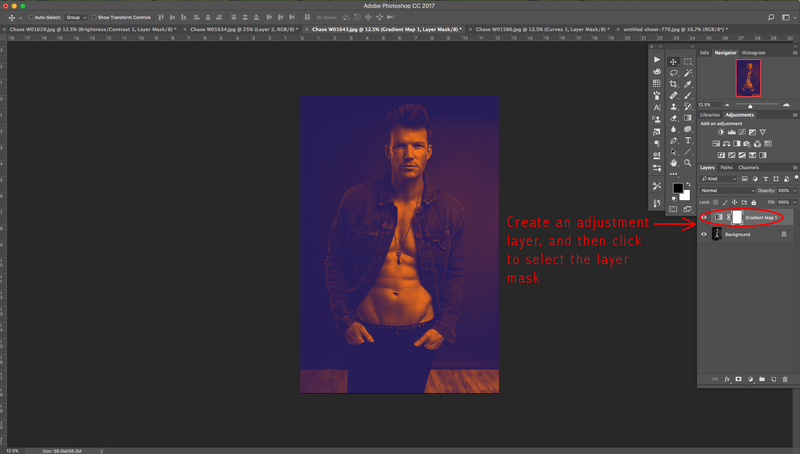
1. Create an Adjustment Layer and Select the Layer Mask
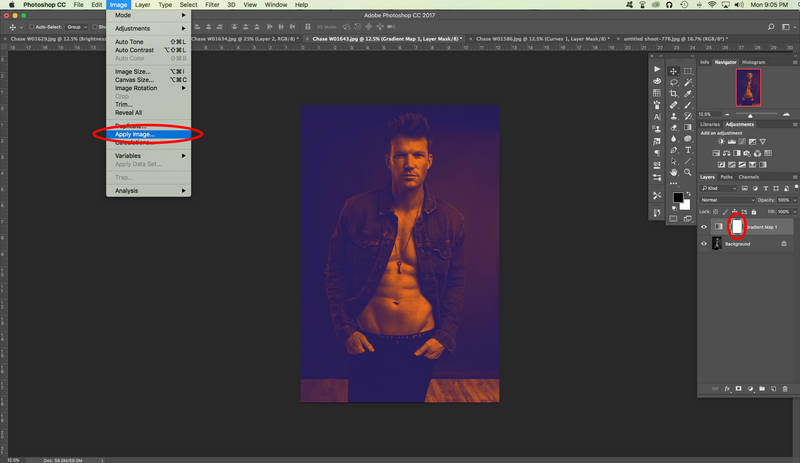
2. Select Image > Apply Image
3. Choose the Layer You Want to Apply to the Mask
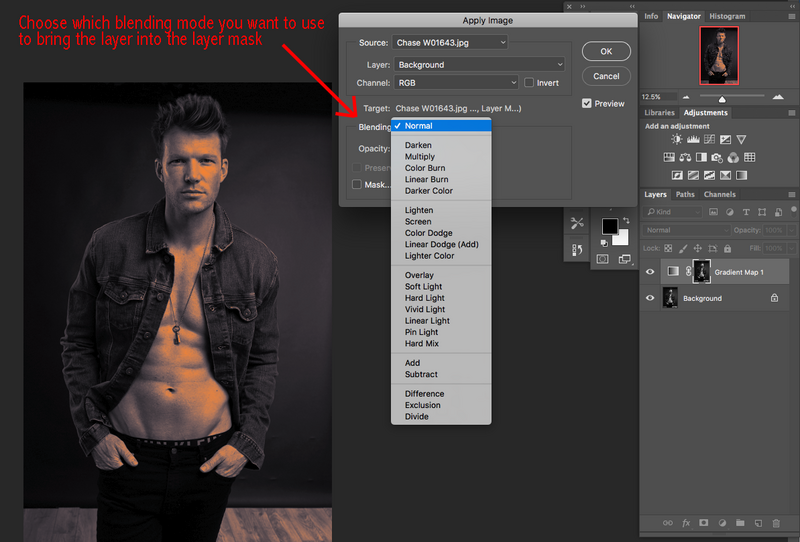
4. Choose the Blending Mode
5. Make Adjustments to the Applied Layer Mask
You can use a black or white brush, or a Curves Adjustment directly to the Mask with Cmd/Ctrl+m
The result of using Cmd/Ctrl+m to expose or hide the effect of a Gradient Map Adjustment. Don't forget that black conceals and white reveals.
Of course, this gradient map is an extreme example, but the visual should help you see how other effects, such as exposure or color adjustments, can be applied and the carefully controlled using the power of Apply Image to an Adjustment Layer Mask. Experiment with different blending modes such as Multiply, and using Inverse in the Apply Image dialogue box, to see how those changes affect your mask and the image as a whole.
If you'd like to take your photo editing to a new level, make sure to check out the variety of Photoshop tutorials and plugins that will speed up your workflow and help you create stunning, professional work. Save 15% by using "ARTICLE" at checkout.


Join the Fstoppers community for free
-
Post comments and join in the discussions
-
Browse the site ad-free
-
Share your work and get featured in the community
-
Compete in the photo contests for fun and prizes
3 Comments
Great tip!
Thanks for taking the time to write it out rather than just a video haha videos are great, but not always the most convenient so I appreciate a good written out tutorial.
I'm so glad it was helpful! It's a little trick I really love to use, so I'm glad to know it worked for you :)
Great tutorial – I have a lot of use for this. One note you might add is that when using Apply Image with a second image, both images have to be the same bit depth. Otherwise, the second image won't show up in the Source list.