
There are countless tools, tricks, and techniques photographers use to edit their photographs. This is one I use 99 percent of the time when editing my landscape images.
Before I introduce the one trick I always use when editing landscape images, it should be noted that it may not work for every person's style. My personal style I gravitate toward when creating photographs is that of extremely dramatic contrast in color and light. I think these tools and tricks help me get to that end goal. Though, if you like creating light and airy images, perhaps they could still be useful when editing your own images.
The easiest way to explain the trick is that it is essentially creating and controlling my own vignette. I introduce a layer of black or darkness, then brush away the darkness to emphasis certain parts of an image in order to (hopefully) move the viewer's eye in a certain direction across it.
First, I'll always start with a raw image I shot in the field. Once I transfer the files to my computer, I'll bring the image into Lightroom to make initial, basic adjustments that suit my taste and style. Some of these adjustments include using the exposure, contrast, saturation, vibrancy, clarity, sharpening, white, black, shadows, and highlight sliders, as well as cropping and slight vignetting.
Once I've completed my initial Lightroom edits, I'll then export the file to Photoshop. After making more slight adjustments to the file using curves as well as dodging and burning, I'm ready for the final trick and tools. First, I'll create another curve adjustment layer and move the sliders so they appear as such. This creates drastic contrast and really accentuates the bright and dark areas in the image.
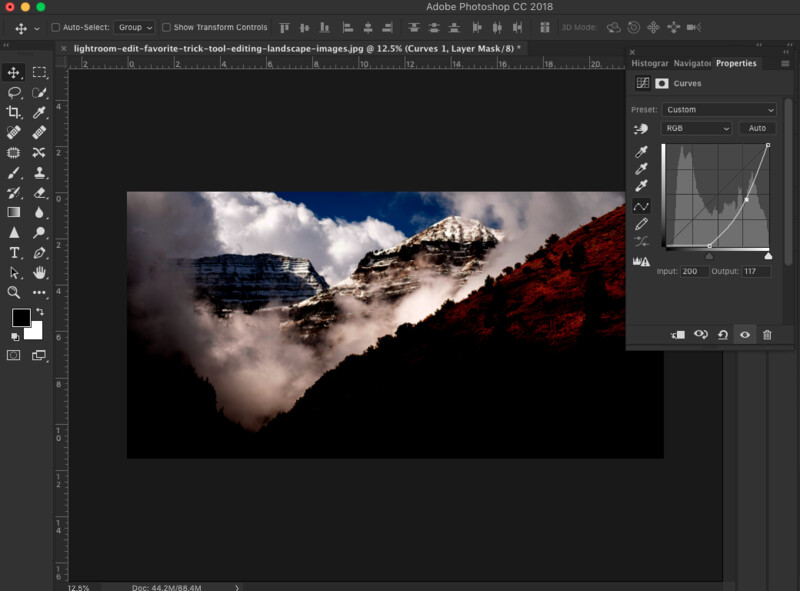
Next, I'll create a gradient adjustment on the very same layer. When doing so, I make sure to have the gradient's spectrum go from black to white, and I also select the "radial" gradient option at the top bar. This gives the desired effect I'm looking for, although there are four other choices that can be experimented with. I also usually leave the opacity on 100 percent, but this always depends on the image and the overall effect I'm aiming to create.
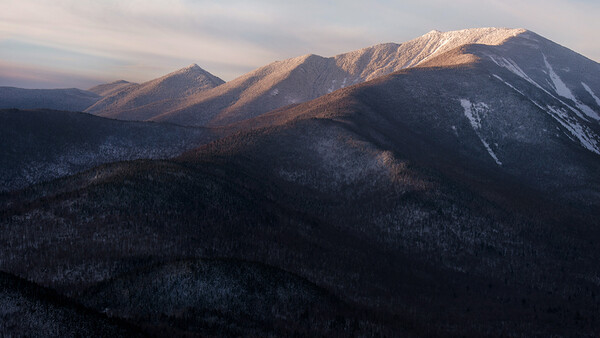
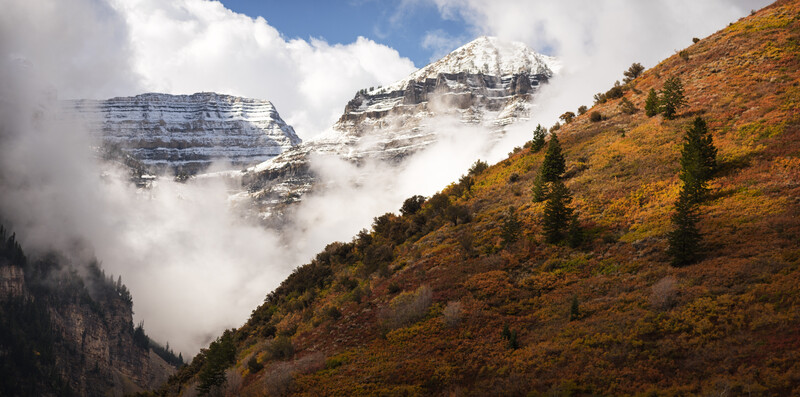
After getting my settings dialed in, I'll put the gradient adjustment into effect. I'll look for the part of the image I'm hoping to emphasize the most; in this case, it's the snow-covered mountain in the background on the right. One thing to take note of before actually using the gradient tool is that the longer you pull the line away from the initial click, the more intense the effect will be. You can experiment by redoing and undoing the adjustment to see what I mean and until you achieve the look you're going for.
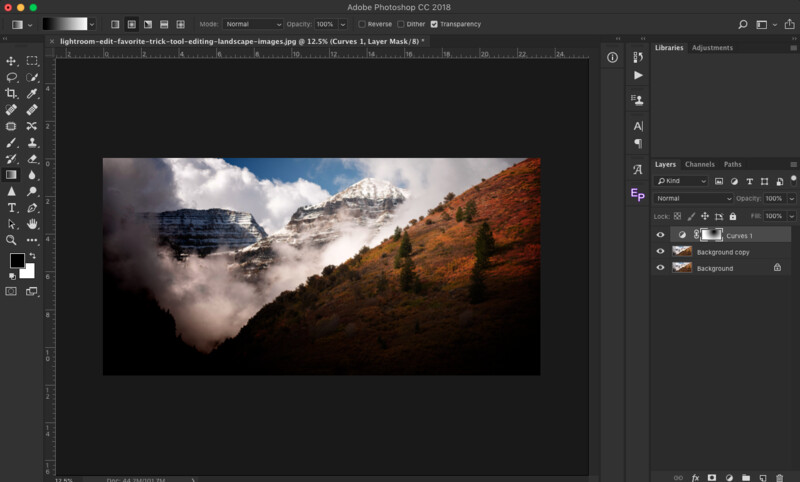
Lastly, I'll select the brush tool and brush away remaining black or darkness until certain parts of the image look the way I want them to. I always start with a low opacity number such as 25 or 30, then work my way down so that the transition from light to dark is gradual and smooth. Brushing away the remaining darkness takes some practice, and it's always better to start off with a smaller opacity number in my opinion. It may take more time this way, but more control over the effect is also had. Finally, before saving the image and exporting it as a JPEG, I'll make small, additional dodges and burns to further accentuate any areas with brightness or darkness.
I don't just use this one trick for landscapes: I've also used it for portraits, food photography, and commercial work. But as stated earlier, this technique creates a unique look that may not work in all situations. But when it does fit into your theme and image, I think it's a powerful trick that can really bring your photographs to the next level.


Join the Fstoppers community for free
-
Post comments and join in the discussions
-
Browse the site ad-free
-
Share your work and get featured in the community
-
Compete in the photo contests for fun and prizes
12 Comments
So what's the trick now?
Great tip. Remind’s me of Matt Kloskowsky’s tip to highlight streaming light and darken everything else.
Thanks - hope it helps!
I cannot figure out how to "create a gradient adjustment on the very same layer", My PS creates a layer for the Cure Adjustment and a separate layer for the Gradient adjustment. A clarification would be appreciated.
I'd say you just apply a radial gradient to the Curves adjustment layer and then additionally tinker with brushing away unwanted contrast, all modifications still on the adjustment layer. But maybe I get it wrong and indeed it should be clarified by the author.
Unlock the background layer?
You are talking about gradient map from the adjustment layers panel. Select gradient tool from the tools panel on the left.
Yep - I'd just be copy and pasting Aneta's response as that is what I'd say as well.
Nice one! A different and additional take on dodging and burning to draw the viewer’s eye.
Thanks, Nesh!
hope it helps!