
The lust for better photo gear is something every photographer struggles with. In our photography industry, many people swear by the quality of light of this brand verses that brand, but in the end isn't light just light? In this video I create a classic beauty lighting setup with $10,000 worth of lighting equipment and then replicate that same setup with only $425 worth of lighting equipment. Will they look the same? This is the Rich Photographer vs Poor Photographer lighting test.
If you've ever been on a photography trade show floor or listened to some of the industry's best photographers talk about lighting, you are bound to hear all sorts of strange and unusual claims. They may say "Our strobes have the best quality of light on the market" or "My favorite light modifier gives off this amazing specular quality that I can't reproduce anywhere." While there are no doubt some differences between light modifiers and flash design, for the most part I believe 90% of these claims are simply marketing hype. Will a double diffused softbox look different than a single diffused softbox or will a silver beauty dish appear slightly harsher than a white beauty dish? Probably, but how big of a difference will these subtle nuances make in a real world shoot? Today I will attempt to create a simple beauty photograph with both cheap and expensive lighting equipment.
Rich Photographer's $10,000 Shoot
The first shoot was built around Profoto's B1 battery powered 500 watt lights. Each one of these lights is about $2000 and you can get a two light kit for around $4000. This kit does not include the Profoto Air Wireless Remote so you need to add an additional $320. To create soft beauty lighting, we decided to use a variety of softboxes to achieve the desired effect. The key light B1 strobe was modified with a Profoto HR 3' Octabox and the lower clam shell lighting fill strobe was modified with a Profoto 1' x 3' HR Stripbox. The final strobe used to light our model's hair and jawline was softened by using a Profoto 2.7' x 2.7' HR softbox but I can only find the 2.6' x 2.6' version online. Of course you also will need 3 Profoto Speed Rings to mount all of these softboxes to your B1 heads.
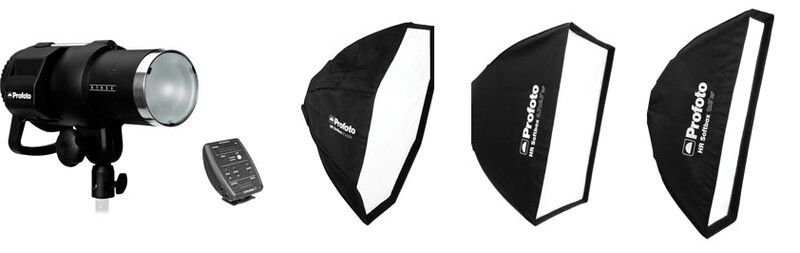
All in all, with 4 B1 strobes, 1 remote, 3 speed rings, and 3 softboxes, the cost of this setup is right around $10,000. Now, for most photographers this is an extreme amount of money for lighting gear, but buying Profoto does come with some big advantages over other less expensive options. I'm personally a huge fan of Profoto gear and for most of my commercial work and on location portrait work, these are the main lights I will grab when shooting a paid job. This post isn't about whether expensive lights like Profoto's B1s are or aren't for you, but having used these lights for about 5 years now, I have no issues with them whatsoever except the price. They are the most reliable, easy to use, modular, robust lights I have ever used, and for me, the added price for piece of mind during a shoot has made these my go to lights 90% of the time.
The total price tag on this lighting setup came in right around $10,000
Poor Photographer's $425 Shoot
The second photo I took was crafted exactly the same way as the expensive setup only this time I tried to replace every element with a much more affordable version. For lighting, I opted to use Yongnuo YN560 III battery powered speedlights. These lights are only $57 and I own about 10 of them for wedding work, remote flashes, events, beach portraits, or anything else that doesn't require tons of power. They are so inexpensive that I also use these when I want to light something in rough conditions where water, wind, rain, or sand might destroy my more expensive flashes. Unlike the Profoto lights and other more expensive speedlights made by Canon and Nikon, these flashes aren't the best build quality, and you might get some variation in flash color and output, but the differences really aren't that big of a deal. I'd say at worst you are going to get 10-15% variations from time to time but honestly it's very, very subtle when it does happen. But again, these are $57 so just buy 8 of them and have backups.
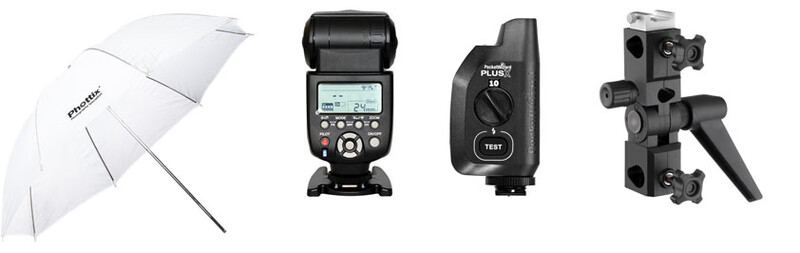
For lighting, I used 3 Yongnuo flashes total and 2 of them were modified with white shoot through umbrellas. These umbrellas allowed me to get the top of the umbrella super close to my model which caused my light to be super soft but also have some highlights and shadows caused by the light fall off (if you aren't familiar with the inverse square law, check out this video here). The advantage of umbrellas is they are cheap and easy to use, but unlike the Profoto Softboxes, these lights do throw light around everywhere. This can make it much harder to control the color of your background, especially if you are in a small studio. You can also upgrade your umbrellas to something like the Photex Softlighter to get even softer lighting with additional shoot through vs bounce options. For this image though, I was using pretty cheap umbrellas to create the final photo.
Unlike the rich photographer's shoot which used Profoto's Air Remote to control every one of the 4 B1 strobes, for the poor photographer's shoot I simply used a set of Pocket Wizard Wireless Remotes to fire my key light. Instead of putting Pocket Wizards on all of the other strobes, I opted to set the 2 other Yongnuo flashes to Optical Slave Mode so they would fire when the key light was triggered with the Pocket Wizard. This allows you to still have reliable wireless control over your flash while only having to invest in a single set of Pocket Wizards. Of course you could remove the Pocket Wizards altogether by using a pop up flash or on camera bounced flash to trigger everything with optical slave. Add a few umbrella brackets to mount the speedlights to your lightstands and you are basically done building out this cheaper lighting setup.
The total budget for this setup came in right around $425.
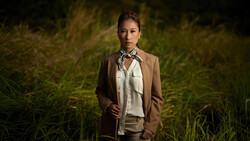
Final Results
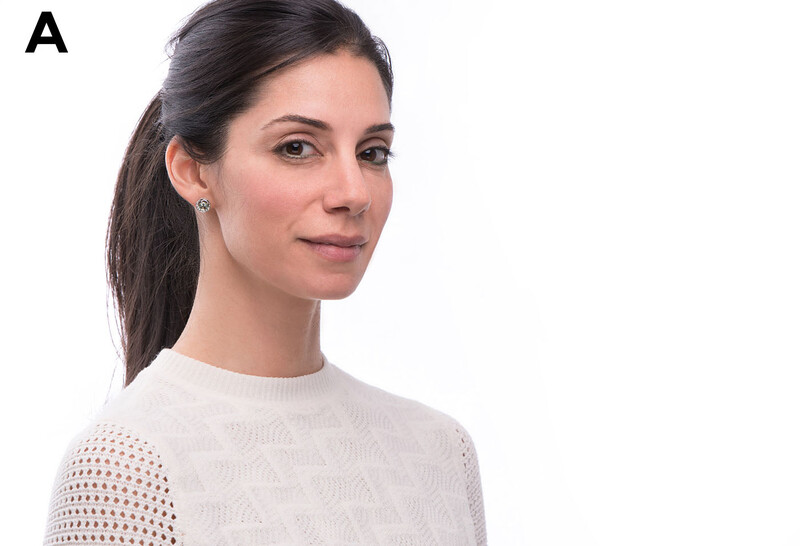
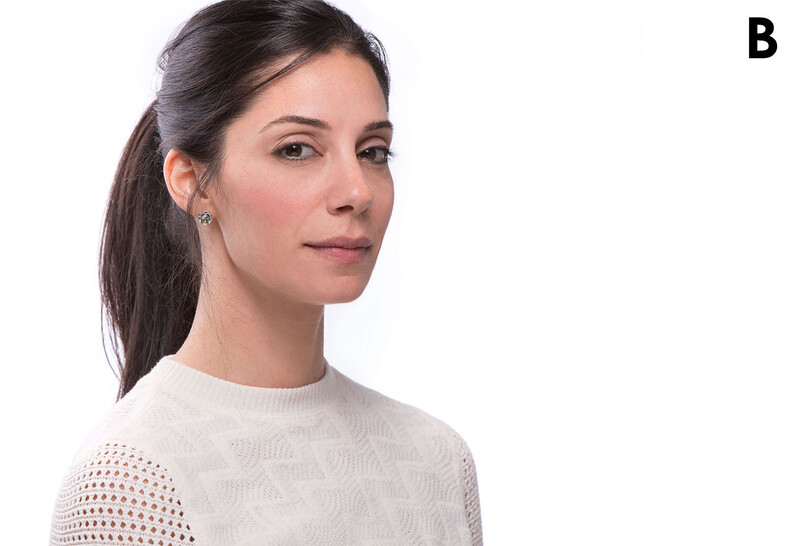
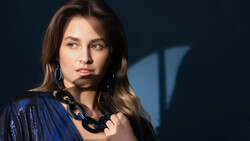
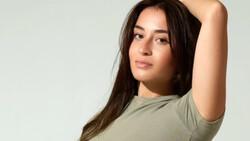
I have posted two images below labeled as A and B. If you watch the video you will easily be able to see which image was shot with which set of lights, but I thought it might be fun for everyone who has read the post first to be able to guess which one is which. There are obviously a few tail tell signs that should give it away just by looking at the images, but I think the two photos look nearly identical for all practical purposes. Of course the model, my friend Shani Bachar, has a different expression on her face for both of these images, but I think the lighting from both setups is a great example of just what can be achieved if you take the time to place your lights in the correct position and dial them in perfectly.
The big take away from all of this is I want photographers to understand that you can still get amazing photographs with cheap gear. The most important thing to learn is the physics of lighting such as how the apparent size of a light looks on your subject, where to place the light for flattering lighting, and how light fall off affects the highlights and shadows. Simply spending a ton of money and upgrading your lights to the most expensive strobes on the market will not make your photos suddenly go from mediocre to world class. The old saying "light is light" is very true, and nothing super magical is happening when you fire a strobe through a $700 light modifier compared to a $10 bed sheet. That is not to say that more expensive gear like Profoto's B1s are not amazing lights and that owning them won't make your life much easier. However, in many cases, the actual final product, the photography itself, may not be that significantly different between one system and another.
If you take the gear you already own and really pay attention to the details in your photographs, I have no doubt that you can make incredibly professional looking photographs no matter how much your lighting setup costs.

Join the Fstoppers community for free
-
Post comments and join in the discussions
-
Browse the site ad-free
-
Share your work and get featured in the community
-
Compete in the photo contests for fun and prizes
74 Comments
They could have saved even more by not using the Pocket Wizards and used a Godox Speedlight with their inexpensive but super reliable triggers.
Where are you buying your Profoto modifiers and speedrings? Your prices are way high!
What I would’ve suggested for an incomparable rich man’s light would be one Bron Para. You probably would have a hard time even making a B1 do anything remotely close to that! See Karl Taylor’s beauty lighting comparison video.
The speedrings we have are from BH Phoot which is the industry standard for pricing
Yeah, that's where I was comparing them from too. But now I see upon closer inspection that you're using HR versions. Although for stills with strobes that's overkill.
I'm honestly not even sure the difference. Maybe the HR are used for high heat applications and since we use them for video as well we went with those?
Yes, Heat Resistant. They cost quite a bit more than the non-HR versions.
Nice Video, I think it proves that physics doesn't change, but workflow does change, and workflow is important to some and not to others.
The softest light I ever got was DIY. I just built a triangular box with a white sheet, in which I sat. The sheet was close to me, and flat behind me. I used a flash in the back for background, and a flash on either side of my face for a vertical clamshell. All flashes were shot through the sheet, which was big and close to my face. Boom. Super soft light.
Great video ! As a poor man's light studio user, I use Yongnuo (writing it is not easier than saying it loud :-) flashes and cheap accessories. And i'm fine with that ! Especially when I have to move and carry the lights to shoot on locations (portraits or indoor)
As you say it, the important thing is how to use the light, where to place it.
But I think that the difference might be also in the long term reliability, maybe also the strength of the strobes, and the power they offer. Especially when shooting outdoor.
Stefan I assume your editor's pick of the boot was shot with Yongnuo's?
Not with the Yongnuo, that I bought after I did this shoot. But with a cheap version of studio flashes, a poor man's choice of chinese no-name kit.
I can definitely appreciate the renewed vigor you guys have applied to producing so much quality content in 2018.
Videos Like this just demonstrate how ridiculously overpriced photography and video gear is. Once you pass a certain threshold of quality, it's all just massive diminishing returns.
e.g. The slight improvement in consistency and flash recycle times of a profoto vs a godox strobe is not worth astronomically higher price.
And modifiers are the biggest ripoff of all since there is an embarrassment of riches on Amazon of various deep octas, deep umbrellas, collapsible beauty dishes etc. Sure the build quality might not be quite as good as broncolors or profotos, but just don't treat your gear like shit and they should last long enough to make plenty of money with them. And at such low prices, you can buy 3 of them and still pay only a faction of a single modifier from the "rich man's " brands
I could tell and the biggest give away were the hot spots on her face, subtle as they may have been. Probably could have been mitigated in post though. Overall the $10k is more even (note the shadow on the shirt from the cheap kit).
Excellent video ! Once again, proof is made that excellent shoot doesn't requiere rich man gear !
Light is light. Buying the more expensive Protofo isn't about just about getting better light, it's also about consistency, durability, and power. The B1 and B2 are far more versatile than hot shoe flash. They are more consistent from from shot to shot in color and lighting power. They're more powerful, and have better refresh rates with less misfires, especially when the hot shoe flash starts to heat up or the batteries wear down.
It's not always about just the light, it's about how well the system works in multiple environments and scenarios.
Great Vid !!!! Finally someone put it in practice:)Thank you Patrick, Personally never convinced VIP lights are the quality of life in Photography. Of course I can tell you stories but was always keep it low key cause never like arguments with my fellow photogs:) Thanks again!!
While I appreciate the notion that you can do more with less, the images really aren't identical... highlights and shadow transition differ by quite a bit, light from the speedlights is much more straight, this due to the shoot thru umbrella and the flash tube design of the speedlights.
I have no doubt if I spent another 20 mins I could have gotten them to look almost identical. I even mention that in the video. Not sure how the flash tube design of the speedlights is any different than the flash tube design of the Profoto lights.
Patrick thanks for taking the time to respond. Are you telling me that you don't see the difference in the light !? I mean it's not only due to the difference between a shoot thru umbrella and a softbox. Look at the nose, looks at the forehead, look at the hair. Don't you see it?
The flash tube of a speedlight is optimized for a beam, even though you can zoom it, it's very directional and can really not fill a modifier the same way a a horseshoe/omega flash tube can. Now the B1 has a recessed flash tube so the difference could be even more evident with a strobe that has exposed tube that can spread the light 180°.
So flash tube design makes a difference, i can see a clear difference between a AD600E flash tube design and a standard omega/horseshoe design. I.E Shoot them up in the ceiling and the difference is really noticeable.
Depending on modifier the hotspot created (by speedlights and more forward shooting designs) may be more or less apparent, a shoot thru umbrella is will show that as you video demonstrates.
I would love to do a test on this. I could see your point if the B1 had the frosted dome on it but both tubes are recessed an inch or so into the casing. Yes the B1 is maybe 4x the physical size but they are both so small that I don't think you could see that difference. I will do this text next week
You loaded the C-Stand/Boom Arm wrong.
The way you loaded the boom is on the wrong/LEFT side of the Clamp.
The way you have it in the video, any excess weight on the boom, will pull down in a counter clockwise direction causing the clamp to LOOSEN producing a dangerous situation.
The boom on a C-Stand clamp, should always extend out from the CLOCKWISE/RIGHT side, so that the more weight you add to the boom, the tighter the clamp gets.
Everyone using C-Stands or boom clamps should know there is a PROPER way to load the clamps and a dangerous way.
After watching your video, I found some videos online that explain the difference visually.
I used C-Stands for years before the Internet and before Arny Freytag taught me how to load the stand/boom arm properly. SAFELY! I was doing it wrong for years.
Yes! We can often get away with it, but if we train ourselves to do it properly over and over, it becomes instinctive/reflexive.
.
I offer these video clips as educational material under Title 17 USCA Section 107.
http://dizeman.net/cstand/cstandpropergrip.mp4
Which stand/boom are you using in this video?
Profoto is great and easy to work with but I would never own. Couple Godox AD200s and a Magmod Octabox is as rich as I see myself getting.
Talk about truth - this video is it. I did a headshot project for a corporate client using two SB-800s in shoot thru umbrellas at camera right and left as main and fill, an SB-26 with a small softbox as a kick, and a reflector underneath to pull up the jawline shadows and it worked brilliantly. Trigger was an Odin with the Odin receivers. Took headshots of 130 people with this rig and the light was nearly flawless. Not that this rig is a solution for everything, but it worked great in this situation.
We did the shoots at the client's offices. One thing that was a bit annoying was the number of misfires with the Odin, but that only happened at one of the sites (there were four sites total) which leads me to believe that there may have been something about this site that was interfering with the signal.
One thing that I learned on this job is that Peter Hurley is right -- without expression, the best lighting in the world isn't enough. Some of the people were just annoyed by the fact they were required to get their photos taken and I couldn't get them to loosen up in the 5-10 minutes I had with them.