
Shooting on a clean white backdrop can be one of the more complex in-studio lighting setups around. Properly exposing for full lengths while giving your models room to work can require four or more extra lights and considerable amount of setup time. While taking the time to take care of the details is important for getting the perfect image and saving yourself hours of retouching on the back end, sometimes you just want to get a nice clean background without the hours of prep.
Lighting Setup
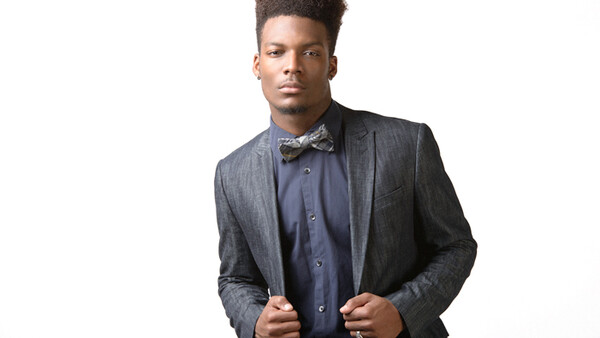
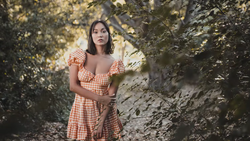
In the shot above I used a two light setup. The main light, camera left, is a Profoto D1 1,000Ws head inside of a 50 inch Westcott Apollo Softbox. While the idea of mixing what is considered to be a high-end strobe with a budget softbox my not sit right with some, I find the indirect lighting source from a Westcott or Photek to give a really nice and even light. The 60 inch Photek Softlighter, which I also enjoy using, may only cost $95 but gives a really nice, soft, and even light. If these lower cost indirect sources are good enough for the likes of Mario Testino and Annie Leibovitz, then they are good enough for me. Clay Cook did an great article on these lighting sources, "Lighting Like Leibovitz," that you can find here.
The fill light for this shoot is also a Profoto D1 1,000W strobe in a Westcott Apollo Orb, which is camera right and with the light sitting about waist height. This light is also pulled back a bit further than the main to give a wider spill. Since I am using my lights to do two jobs, lighting the subject and the background, I am not gridding and instead placing them so that one edge of the modifier is pointing towards the edge of the seamless and the other is towards the subject.
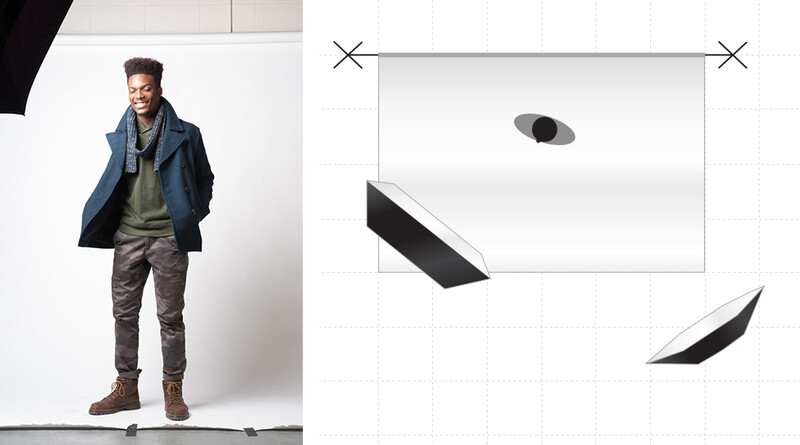
In this SOOC shot, you can see just how down and dirty this setup was. The backdrop is not pulled out very far and taped down only in a couple of spots. In the top left edge of the image you can see the corner of the 50 inch Apollo. This also shows that the right edge of the light is hitting the subject, allowing for a soft feathered look, but more importantly for this setup, it's allowing the rest of the box to light our background.
Why It Works
The main cause of this working is distance. Notice how close the subject is standing to the background and how far away the main light is from the subject. In this example, the subject is approximately 2 feet from the backdrop and the main light is approximately 4 feet from the subject. If you're new to this, I would recommend starting with your main light a bit further back to make it a little less challenging. You will see why in a second.
In these images I am keeping the light source the same distance from the subject, approximately 4 feet, and moving the subject further away from the backdrop. I am also only using the main light (no fill) so we can see the changes clearly.
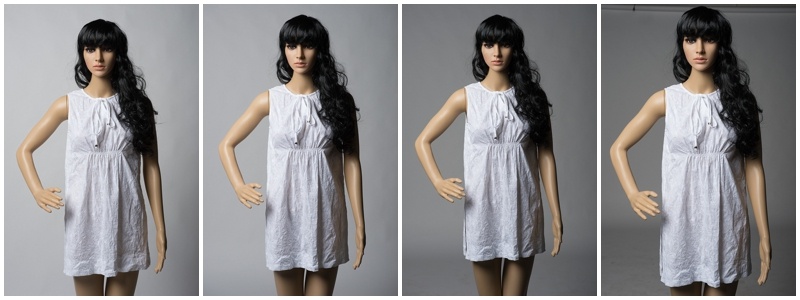
Starting From Left to Right:
- Subject is 4 feet away from the backdrop
- Subject is 8 feet away from the backdrop
- Subject is 12 feet away from the backdrop
- Subject is 16 feet away from the backdrop
What this tells us is that keeping the subject close to the backdrop is key when attempting to use the same light source to light our subject and backdrop.
In this next set of images, I am keeping the subject the same distance from the backdrop, approximately 4 feet, while altering the distance of the main light (and also changing the output of the light to get an equal exposure).
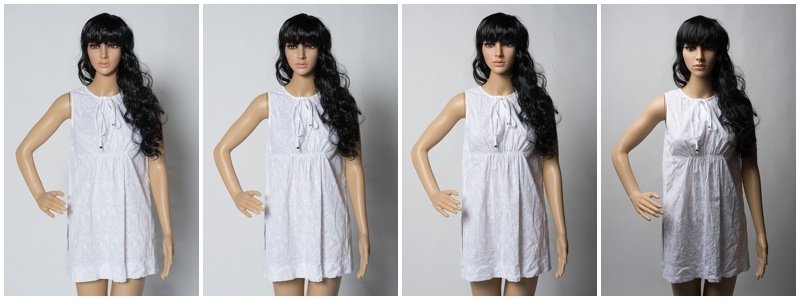
Starting From Left to Right:
- The light source is 12 feet away from the subject
- The light source is 8 feet away from the subject
- The light source is 4 feet away from the subject
- The light source is 2 feet away from the subject
What this tells us is that the further away the light source is from the subject and backdrop, the more likely we are to get an equal exposure from one to the other. The quality of the light source can also change with distance. You will notice that as the light gets further away it becomes a harder light with less transitional values. Also, if the subject appears to be further away from the backdrop in the last image, it's due to me needing to use a shorter focal length (zoom out) to avoid getting the softbox in the shot. The shorter focal length exaggerates perspective.
Again, if you are starting out or having trouble I would recommend getting the light a little further back (somewhere between 4 to 8 feet if using a similar sized light source). You will also notice that the right side of my backdrop is actually not 100 percent white, it fades to a light gray shade. I could increase my fill or correct this in post-processing, but the slight shift is intentional in this image.
There are probably infinite variations on lighting setups, but this setup allows me to get nice indirect light on my subject, provides a directional quality to the light source, and gives me a clean white backdrop with a slight transition from white to light gray, while only requiring minutes to setup.
Gear Used
- Nikon D800
- Nikon 70-200 f/2.8 VR II
- Profoto D1 1,000Ws (2)
- Westcott Apollo Mega 50 inch Softbox
- Westcott Apollo Orb 43 inch Octobox
- Impact Backdrop Support System
- Savage Seamless Super White Paper
In summary, the key factors to getting the backdrop and subject lit in a similar exposure zone is distance; The distance of the subject to the background and the distance of the light source to the subject. Decrease the distance of the subject to background and increase the distance of the main light to the subject to make this easier. The key factor for getting a soft and directional quality to the light is also distance, but it's the opposite. By getting the light closer to the subject, we can create a softer light with more directional qualities. Also remember that these qualities of the light are relative to the size of the light source. If you are using a smaller light source, you will need to get it in closer to hold those transitional values. If you are using a larger light source, you may be able to get your light further back and still hold those soft-light qualities. Also, if the examples and basic principles here make sense to you, you have kind of just learned the inverse square law!
To see more from this shoot, check out the full gallery on my site.

Join the Fstoppers community for free
-
Post comments and join in the discussions
-
Browse the site ad-free
-
Share your work and get featured in the community
-
Compete in the photo contests for fun and prizes
10 Comments
I shot this with just two lights. This is SOOC. http://www.lightingdiagram.com/tocfjengqf
It helps to have a long and tall studio too!
Hey John, thanks for sharing. Well done!
Food for thought!
Since amazon patented the shooting a photo on white technique could all of these be classified as infringement?
Their patent is more specific than that if I recall correctly. People sensationalized it as being anything shot with a white backdrop.
Ya, adam, when I first saw the thing about Amazon's patent on the white backdrop setup I thought it was crazy and ridiculous, but when I actually went through and looked at what they patented, I saw how specific it was. Thanks for the post!
Good article and good example of the inverse square law. The inverse square law was huge in helping me understand why my lighting plans never worked out.
Haha, thanks Jason. I look at the inverse square law as this big scary term that in reality is a pretty practical and not super complex theory, in practice. Thanks for readying.
Yeah, the math behind it isn't so relevant once you really understand it.....but you've got to understand it!!
Your female model needs a few drinks. She's very stiff.
Good article.
Haha, thanks Spy Black!!