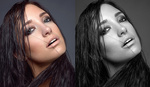
Changing makeup color or the color of anything in Photoshop for the matter doesn't have to be a challenging task, although it can be very easy to mess up. In this tutorial I will show you three different ways of changing makeup color in Photoshop.
However, these techniques can be used to change the color of any portion of your image portrait or otherwise. The techniques in the video will range from quick methods that beginner Photoshopers users can use to the more advanced techniques retouchers can make use of.
Method 1: Curves

Curves in my opinion is one of the fundamental tools of Adobe Photoshop, it always you to do major changes of different kinds to your image, from dodging and burning to color correction. For this process remember that you are going to want to mask out or mask in the area you want to affect. Since we are changing makeup color we only want to target the one area. If you are trying to change multiple areas then I would recommend using separate adjustment layers for each section.
First you will need to understand your complimentary colors when working with Curves. You will have the option of either altering the "Red", "Green", or "Blue" color channels, but when you do so, you won't only be able to introduce or remove those colors, you will also be altering the complimentary colors. So remember the following:
Removing Red increases Cyan
Removing Green increases Magenta
Removing Blue increases Yellow
You will also probably recognize these additive color opposites – Cyan, Magenta, and Yellow – as the "CMY" in CMYK. If you have studied additive and subtractive color you also know that RGB is an additive process and CMYK is a subtractive process, so it can also be intuitive to a degree that we can add Cyan, Magenta, and Yellow, by subtracting Red, Green, and Blue.
By going into each channel in the Curves adjustment you can mix the exact color that you are looking for. In the video you will see how I go into each channel and make slight adjustments until I have the desired color.
Blending Mode
The Blending Mode you choose for your color adjustment will also play a large part in how the adjustment affects your image. In Normal blending more the adjustment will affect the hue, saturation, and luminosity of the base layer. If you change the blending mode to Color then it will only affect the hue and saturation, and finally if you change the blending mode to Hue, it will only affect the hue. In the video you will get to see how each blending mode changes the appearance of the adjustment layer, I also give my recommendation for which one to use.


Method 2: Channel Mixer

Channel Mixer is the one method that will come with a warning. It gives you a lot of control to completely re-write the output channel information, but it is also really easy to wind up with an overdone result that is overly saturated and can destroy a lot of the value information for that particular area. If done well however, Channel Mixer can be really great. I would recommend for beginning Photoshopers to maybe experiment with this one, but not to make it their go-to method quite yet.
With Channel Mixer, you will have the option of selecting the Output Channel, as you can see on the graphic above. The red channel will default to being 100 percent red and zero percent green and blue. The green and blue channels will also default to being 100 percent green or blue respectively. You then have the option completely changing the amount of red, green, and blue that will comprise each channel.
In the video above you will see how you can quickly mess up the area you are trying to change, but also how you can change the output channels to get a very customized appearance.
Also remember to look at the blending mode of the Adjustment Layer. Again, look at the Color and Hue blending modes and decide which gives you the better result. You can also take the opacity of the adjustment layer down, if you don't want the change to be quite as strong. I like to usually pull down these types of changes by 10 to 20 percent.
Method 3: Hue/Saturation

For this particular image, Hue and Saturation is probably my favorite. As you can see in the graphic directly above, there is a small Colorize check box. Select Colorize when doing this and instead of tweaking the hue of the current area, you will actually be able to select the exact hue that you want and it will overlay it on the selected area. Hue and Saturation is a very efficient way of working. You will see in the video that it only takes seconds for me to find the hue that I want and then slightly tweak the saturation as well. I would also recommend leaving the lightness alone, as you don't want to change the luminosity of the area (especially for something like eye makeup) because the areas of skin around it will have the original luminosity and the effect will clearly look fake.
In the graphic of the Hue/Saturation properties window, you can see the exact settings I used. I chose 268 as my hue and then bumped the saturation up just slightly to 34, but it is important to remember that this isn't a recipe to be followed, it a concept that you can apply to your image, so select and tweak the values that best suit your image!
Also remember to look at the blending mode and opacity of the adjustment layer once you are done. Even though I bumped the saturation of the affect I still decreased the opacity just a bit.
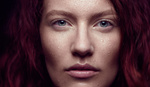
Mixing and Stacking
My actual final result that you see in the banner image was not done by using just one of these methods. I actually combined and stacked a few of them with different blending modes and opacity levels to get exactly what I wanted. I highly encourage you guys, whenever you read or watch a tutorial, to experiment and make the techniques your own!