

Ask a non-photographer about their ideal shooting conditions, and they'll probably describe a clear, sunny day with blue skies. Ask a professional, and you'll get a very different answer. The photographers whose work stops you mid-scroll on Instagram aren't waiting for perfect weather. They're actively hunting for the atmospheric conditions that most people hide from.
The sun is just a raw light source, and it's the atmosphere between that light source and your subject that creates the magic. Weather isn't something that cancels shoots; it's the ingredient that transforms ordinary scenes into extraordinary photographs.
Before we dive into the creative opportunities that weather provides, let's address safety. Chasing dramatic weather conditions can put you in potentially dangerous situations, and no photograph is worth risking your life or health. Always check weather forecasts before heading out, and respect warnings about severe storms, flooding, extreme cold, etc. If you're shooting in winter conditions, dress in layers and be aware of the signs of hypothermia and frostbite. When photographing storms, maintain a safe distance from lightning and never put yourself in the path of severe weather. Do not walk on frozen ice. Tell someone where you're going and when you expect to return. And remember, if conditions feel unsafe, trust your instincts and pack it in. The weather will come around again, but you only get one life.
The Overcast Sky: Your Giant Studio Softbox
This is the most common "interesting" weather, and many amateurs mistake it for a dull day. They're wrong. An overcast sky is a thick, uniform layer of clouds that diffuses the sun, turning the entire sky into the world's largest softbox. Here's why this matters: soft light comes from large light sources. The bigger the light source appears relative to what you're shooting, the softer and more flattering the light becomes. Direct sunlight creates hard shadows because the sun, despite being massive, appears small in the sky from our perspective 93 million miles away. When clouds cover the entire sky, they scatter and redirect that light, effectively making your light source the size of the entire visible sky dome above you.
This provides incredibly soft, even, and flattering light that eliminates the harsh, ugly shadows under a subject's eyes and nose. No more raccoon eyes. The light wraps around your subject from all directions, filling in shadows naturally without the need for reflectors or fill flash. The even exposure across the frame means you're working with a much more manageable dynamic range, which is especially important if you're shooting in a format like JPEG where you have less latitude to recover information in post-processing. It also gives you more latitude to shape things in post, such as dodging and burning your subject to taste.
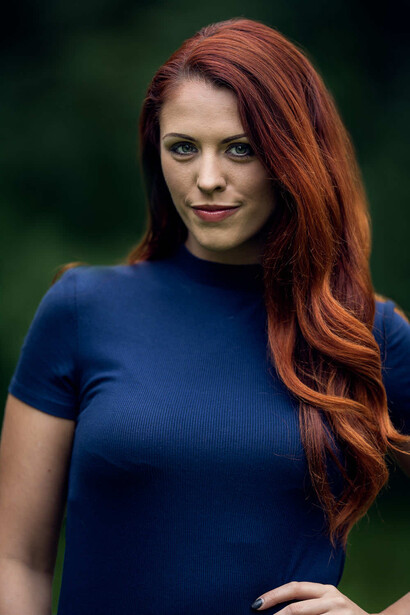
This is the best light for portraits. Place your subject in an open area, not under a tree, which would be darker and create uneven lighting, and shoot. The even illumination means you can focus entirely on your subject and composition without fighting the light or constantly repositioning to avoid harsh shadows. Overcast conditions are also fantastic for landscape photography in forests or canyons, where they reduce the extreme dynamic range between bright sky and dark shadows. In forests on sunny days, you're often fighting 8 to 10 stops of dynamic range between the sky peeking through the canopy and the shadowed forest floor. Overcast conditions can bring that down to a much more manageable 4 to 6 stops, allowing you to capture detail throughout the entire frame without losing information in the highlights or shadows. What seems like boring gray weather is actually a gift that many photographers fail to recognize and utilize.
Fog and Mist: The Ultimate Subtracter
Fog is a gift to photographers. It's the ultimate tool for simplification and creating an immediate sense of mood. From a technical standpoint, fog is essentially a cloud at ground level, consisting of tiny water droplets suspended in the air. These droplets scatter light in all directions, which creates several photographically useful effects. First, it diffuses any available light source. Second, and more importantly for composition, it progressively obscures objects based on their distance from the camera.
Think of fog as a natural gradient filter that gets progressively more opaque the farther you look. This creates what painters and photographers call atmospheric depth. Objects close to the camera remain relatively sharp and contrasty. Objects in the middle distance become lighter and less saturated. Objects far away nearly disappear into a uniform gray or white. This natural layering is incredibly powerful for creating depth in two-dimensional images. Your brain interprets the progressive fading as distance, giving your photos a strong three-dimensional quality even though you're working in a flat medium.
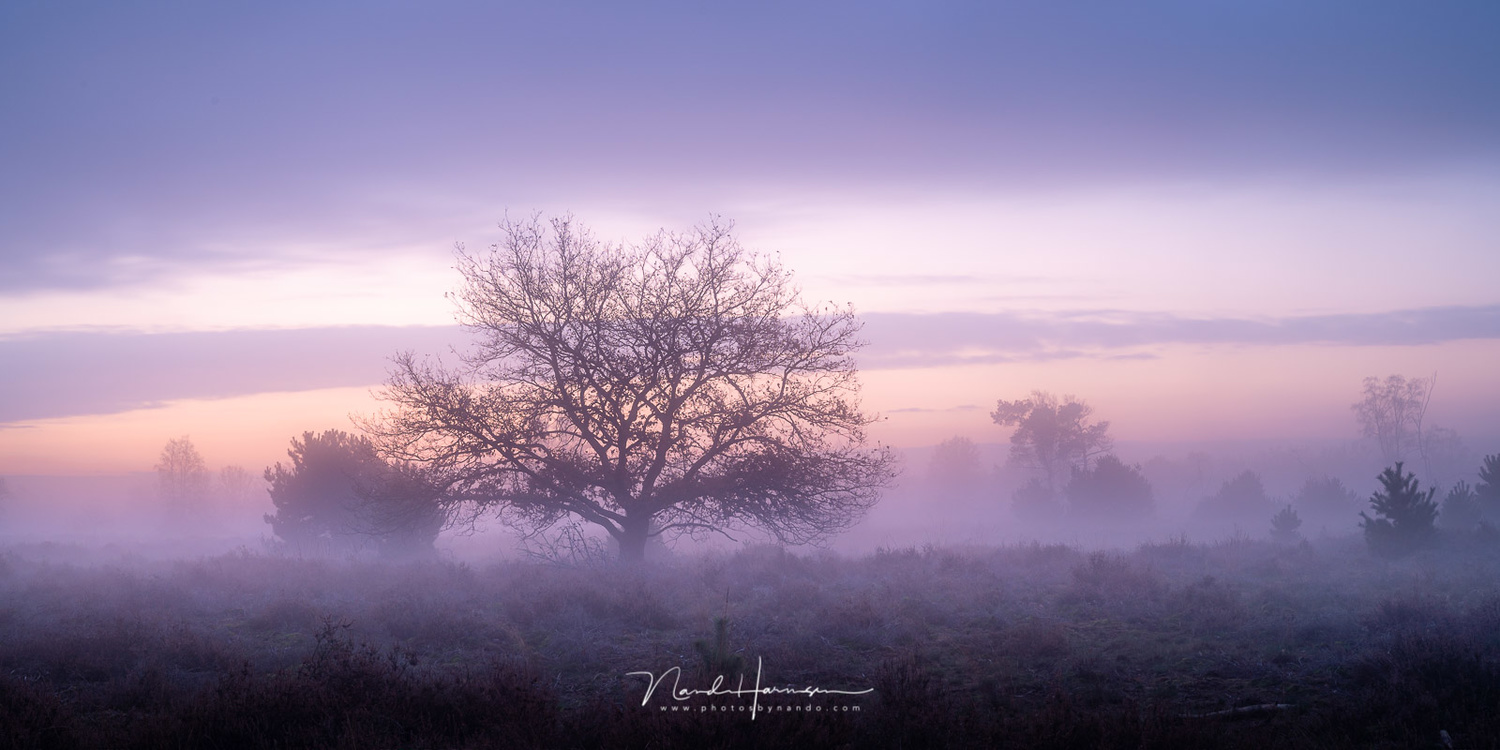
That messy, ugly background of power lines and billboards? Gone. Fog creates negative space for free, which makes your subject pop. This is the principle of figure-ground separation, and it's why graphic designers and photographers obsess over clean backgrounds. Fog does this work automatically, hiding distracting elements and isolating your subject. The mood is instant: mysterious, quiet, cinematic, or haunting, depending on how you expose and process the image.
For landscapes, head to a forest where the fog will separate each row of trees, creating a magical, layered effect. Each tree trunk emerges from the mist at a different distance, creating natural depth that would be invisible on a clear day. The fog effectively creates multiple visual planes in your image, from foreground to middle ground to background, each separated by a veil of mist. For street photography, find a single, strong subject like a person with a bright umbrella, a lone tree, or a streetlight and let the fog erase the rest of the world. The simplification is dramatic and immediate. That being said, fog is low contrast by nature, which can fool your autofocus system. The AF needs contrast edges to lock onto, and fog softens all those edges. Your camera's autofocus will often struggle in low-contrast fog. Switch to manual focus and use focus peaking or live-view zoom to nail your focus if necessary.
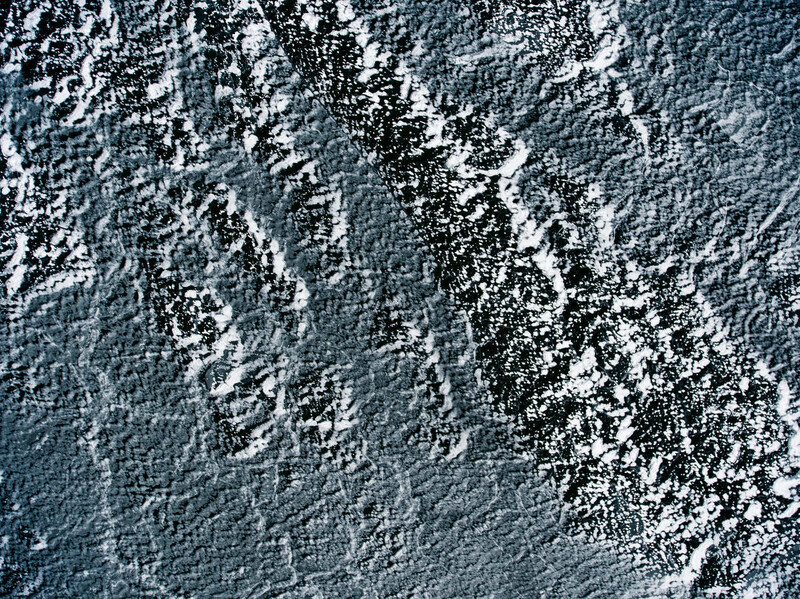
Ice and Frost: Nature's Abstract Studio
This isn't about capturing a snowy scene. This is about using winter's textures to create art that is graphic and otherworldly, from both inches away and hundreds of feet in the air. Ice and frost create intricate, geometric patterns that result from the crystalline structure of frozen water. When water molecules freeze, they arrange themselves into hexagonal crystal structures, which is why snowflakes are six-sided and why frost patterns have that characteristic angular, branching geometry. These formations transform the familiar into the alien. It's a natural art studio that provides endless, unique compositions. These shots aren't about what you're shooting; they're one hundred percent about form, texture, and light.
Understanding how ice and frost interact with light is key to photographing them effectively. Ice is transparent but not perfectly clear. It contains micro-fractures, air bubbles, and crystal boundaries that scatter and refract light in complex ways. This is what creates the white, opaque appearance of most ice despite water being clear.
Frost patterns on windows form when water vapor in the air freezes directly into ice crystals on a cold surface, a process called deposition. The patterns are influenced by microscopic imperfections in the glass, air currents, temperature gradients, and humidity levels, which is why each frost pattern is unique. They're natural fractals, meaning the same patterns repeat at different scales, which makes them endlessly fascinating to photograph.
Shoot through the ice at the leaves or rocks trapped in a puddle. The ice acts as a natural distorting filter, creating a beautiful, abstract painting that looks more like fine art than traditional photography. The trapped objects provide color and form, while the ice adds texture and distortion. Use a polarizing filter to control reflections on the ice surface; rotating it will let you either emphasize the surface reflections or cut through them to see the objects below more clearly.
You can also use a drone to go from macro to macroscopic. A drone's top-down view is uniquely suited for capturing the web-like fractal patterns of ice forming on a lake, the graphic contrast of dark, open water against a white ice shelf, or the way wind carves massive, into snow-covered fields. The shift in scale from tiny frost patterns to massive aerial patterns reveals just how consistent nature's geometry is at every level. When shooting aerials of ice and snow, be careful with your exposure. Snow and ice are highly reflective and will fool your camera's meter into underexposing, turning white snow into gray snow. You'll often need to dial in exposure compensation of one to two stops to keep snow looking white rather than gray.
The Edge of the Clouds: The Spotlight Effect
The most dramatic light isn't under the clouds; it's on the edges of it. This is when the weather provides a wow factor that feels like a multi-million-dollar movie set. The magic happens when the sun finds a small hole in the dark, turbulent clouds. This creates a spotlight effect, where a single, brilliant beam of light illuminates one specific part of the landscape while the rest of the scene and the sky remain dark and dramatic.
This contrast is breathtaking. It adds a sense of scale, power, and drama that a blue sky never could. The dark sky provides a dramatic backdrop that makes the illuminated subject appear to glow. The single beam of light creates a natural focal point, drawing the viewer's eye exactly where you want it. This is the same principle that theater lighting designers use, just provided by nature on a massive scale.
This is a game of patience. You can't force this light; you have to wait for it. Find a good landscape composition, put your camera on a tripod, and settle in. Watch the light move across the landscape as the clouds shift. The beam might illuminate a distant mountain peak for thirty seconds before moving on, or it might spotlight a lone barn in a field. Use a circular polarizer to increase the contrast and saturation in the clouds, making them look even more menacing and dramatic. The polarizer works by filtering out scattered light from the sky, which deepens the blue and makes clouds stand out more dramatically. It's most effective when shooting at a 90-degree angle to the sun. The wait is always worth it when that perfect beam breaks through.
Hunt for Reflections on Rainy Days
When the streets get wet, the entire world transforms into a mirror. Rain creates a second, painterly version of your scene right at your feet. Puddles and wet pavement create reflections that add symmetry, depth, and vibrant color to an otherwise dull scene. From a physics perspective, calm water creates nearly perfect reflections because the smooth surface acts as a mirror, reflecting light at equal angles. The reflection is actually slightly darker than the original scene because some light is absorbed by the water, but this often works in your favor photographically, creating a slightly different version of the scene.
This is one of those conditions where the transformation is so complete that shooting in the rain becomes preferable to shooting in clear weather. The wet surfaces don't just reflect; they also increase the apparent brightness and color saturation of everything in the scene. Dry pavement absorbs a lot of light and appears relatively dull. Wet pavement reflects much more light back toward your camera, making colors appear richer and more vibrant. This is especially true at night when artificial lights are present.
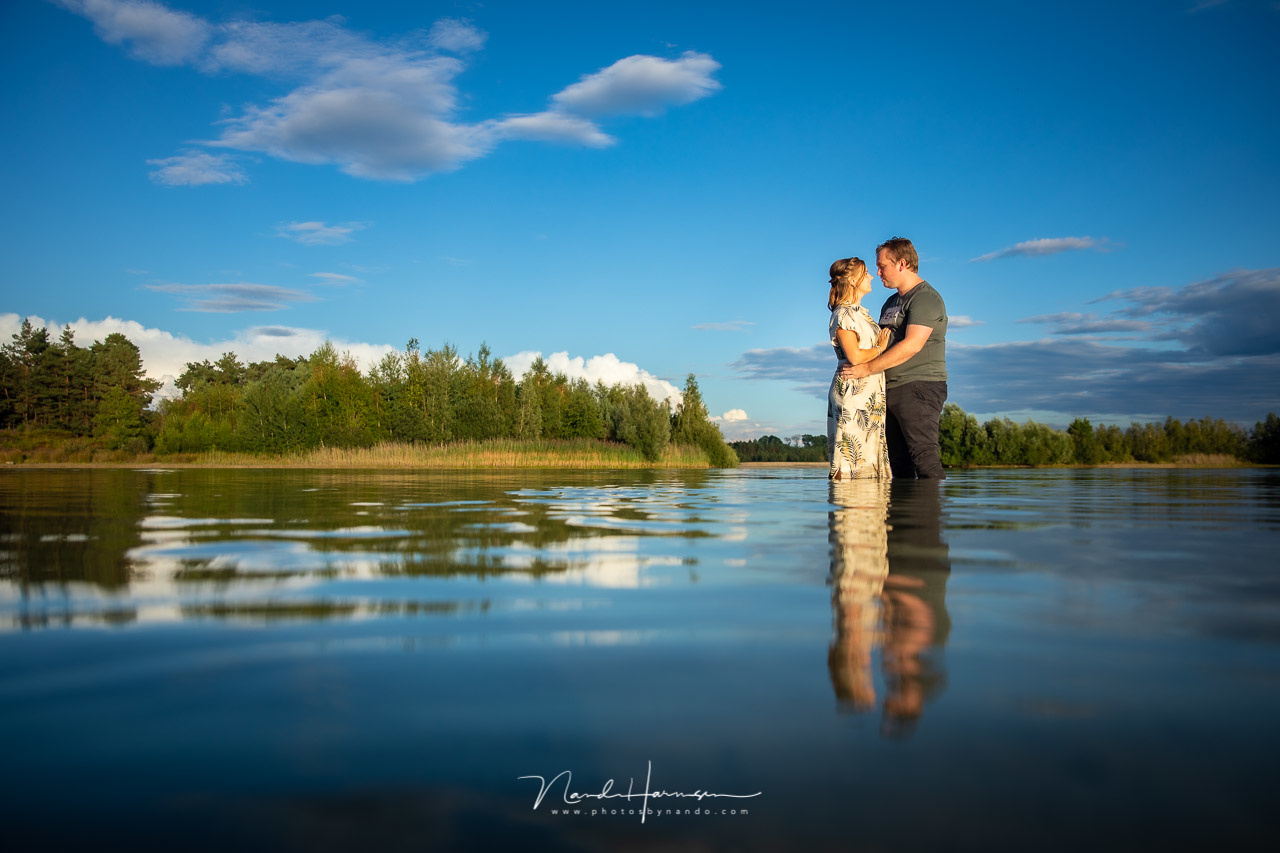
Get your camera low to the ground. This is perhaps the most important technical tip for reflection photography. A puddle that looks tiny and insignificant from a standing position at five to six feet high becomes a vast, expansive lake when you're shooting from just an inch or two above it. This is because of the angle of view and perspective. When you're low, the puddle fills more of your frame, and the reflection becomes the primary subject rather than an accent. Shoot from eye level, and the puddle is just a small element in a larger scene. Shoot from ground level, and the puddle becomes your canvas.
Look for puddles that reflect interesting subjects: neon signs, unique architecture, or people walking by with umbrellas. The reflection often looks more interesting than the actual subject because the water adds texture from subtle ripples and distortion from the irregular puddle shape that creates an impressionistic, painterly quality. You can also intentionally include both the subject and its reflection in the frame for a symmetrical composition. This works particularly well with geometric architecture or solitary figures. Focus on the reflection rather than the actual subject for a more dreamlike, disorienting effect.
From a camera settings perspective, rain and wet conditions present some practical challenges. Protect your gear with rain covers or at minimum, a plastic bag with a hole cut for the lens. Use a lens hood to keep rain off the front element, and keep a microfiber cloth handy to wipe the lens between shots. If you're shooting with a low angle inches from the ground, be prepared to get wet and dirty. Bring a towel to kneel on and protect your camera from ground water, and use the tilting rear screen if you have one.
This is also one of the best times to shoot at night. The wet ground will double the impact of every streetlight, car headlight, and neon sign, creating a rich, cyberpunk, or film noir aesthetic. The city becomes twice as bright and infinitely more cinematic when every surface is reflecting light back at your lens. For night reflections, you'll typically need to shoot at higher ISOs or slower shutter speeds because the scene is darker than daytime shooting. A fast lens with a wide maximum aperture like f/1.8 or f/2.8 will help. If you're using slower shutter speeds, embrace motion blur from passing cars or people, which can add energy and dynamism to the scene. The streaking headlights and taillights will reflect in the puddles, creating elegant light trails both above and below the horizon line of the puddle.
Conclusion
The difference between amateur photographers and professionals often isn't technical skill or expensive gear. It's mindset. Amateurs wait for "perfect" conditions. Professionals understand that perfect conditions are boring. They've trained themselves to see weather not as an inconvenience but as an opportunity, not as an obstacle but as a collaborator. The next time your weather app shows clouds, fog, rain, or snow, don't groan and stay home. Grab your camera and get out there. These are the conditions that separate snapshot takers from image makers.

Join the Fstoppers community for free
-
Post comments and join in the discussions
-
Browse the site ad-free
-
Share your work and get featured in the community
-
Compete in the photo contests for fun and prizes
2 Comments
A very helpful article and one that expands how we think about successful photography. For me, bad weather became the reason to switch to equipment that can handle a winter storm and work at minus twenty degrees. Even city photos look different in this season, and the snow that sticks to the lens creates a natural filter.
Alex, thank you for an article that finally gets it right about what good conditions are and what bad conditions are.
So many articles here get that backwards, and refer to cloudy skies and storms as "bad", and clear sunny skies as "good". For photography, that thinking is completely backwards and it frustrates the hell out of me to see so many articles and videos get this wrong. So that is why it makes me so relieved to finally see an article here that doesn't get things backwards.
Remember, whether weather is considered "good" or "bad" is ALWAYS dependent on what one is doing, and what one's objectives are. Thank you for understanding this.