

One of the attributes of great software is that it has multiple ways to accomplish a single task. Lightroom Classic is one of those in that it has various ways to import files.
These differing import methods each have their benefits and limitations, but most importantly, they help you work in a way that is best for your workflow.
You may not need any of these other import methods now, but it's always good to at least know that they exist just in case you have the need later. Whether it's importing from a catalog that someone sent you to tethering for a client, the faster you get your files into Lightroom, the sooner you'll be able to edit them.
The method you use for importing not only can speed things up, but it can also help with your organization strategy. If files are consistently in known locations, getting them in and out of Lightroom can be a breeze.
1. The Standard Import Method
If you're a Lightroom Classic user, this is probably the method you learned first and probably still use the most. The standard import method is perhaps the most used method for importing photos; I use it for most of my imports.
Invoke the standard import method via the Import Photos and Video menu under the File menu, by pressing Ctrl+Shift+i on Windows and Command+Shift+i on MacOS, or by clicking the Import button in the lower-left corner of the Library module.
I won't go over all the settings in the Import mode, but I do want to point out one lesser-known tip. Once the Import mode is active, you can import from multiple memory cards at the same time. However, it's not obvious how to do so. Instead of selecting your memory card folders under the Devices source area, choose your memory card folders from their location under the Files source area. Hold down the control key to select multiple source folders from different memory cards or drives. Using this method also allows for more consistent file numbering if you're renaming files on import from multiple memory cards.
2. Import From Another Catalog
I've never used this feature, but as I said before, I can see where it could be useful. Selecting Import from Another Catalog from the File menu shows an open dialog for choosing a catalog file, after which the following dialog is displayed:
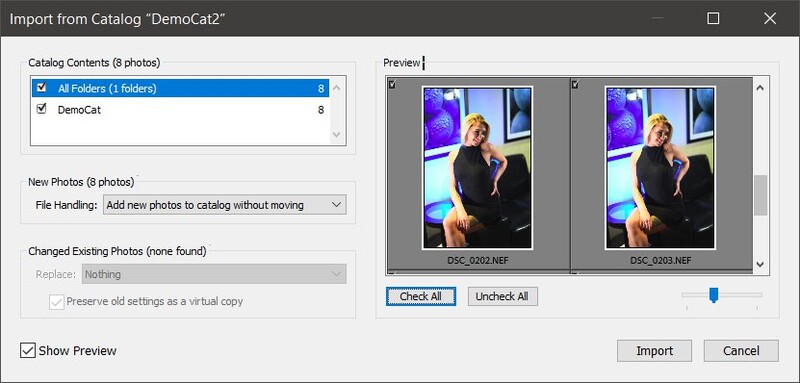
There are various options for which folders to import, options for handling new images (add, copy, and don't import), and what to do if there are duplicates of existing files. Surprisingly, this dialog is also resizable and has a preview feature (defaulted to off) that enables you to select which images to import. So, if you need just a few images from another catalog, this feature makes it easy to import them while maintaining all of the edits and metadata like keywords.
3. Import a Photoshop Elements Catalog
I'll admit I've never used this feature, so I don't know precisely what using it entails. However, if you have a Photoshop Elements catalog, select Import a Photoshop Elements Catalog from the File menu, and I'm sure you can figure it out from there. Surprisingly, it seems that Adobe doesn't include Photoshop Elements in their "everything" plan.
There are a couple of things to know when importing a Photoshop Elements catalog into Lightroom:
- Any albums created in Photoshop Elements are represented as Collections in Lightroom.
- Information added using the Events feature in Elements Organizer will not appear in Lightroom.
- Lightroom Classic imports photos and data from Photoshop Elements 6 through Elements 13 on Windows and from Photoshop Elements 9 through 13 on Mac OS.
4. Drag and Drop
I'm a big user of drag and drop. I run a three-monitor desktop setup, with my left monitor being dedicated almost entirely to my file manager. I work with files extensively all day, so being able to drag and drop files to Lightroom is very handy. If I'm going to be importing files that are already on my system and not on a memory card, I'm probably already at that folder in my file manager.
Dragging and dropping files onto Lightroom opens the standard Import screen with just the dropped files checked for import. Other files in the same folder as the dropped files are also displayed but are unchecked.
If your files are buried deep in a folder, you may prefer to drag and drop instead of navigating to that folder in the Lightroom import screen.
5. Auto Import
Again, this can be a nice feature depending on your workflow. If you copy your files to your hard drive before importing, this could speed up your workflow.
Selecting Auto Import->Auto Import Settings from the File menu displays the following dialog:
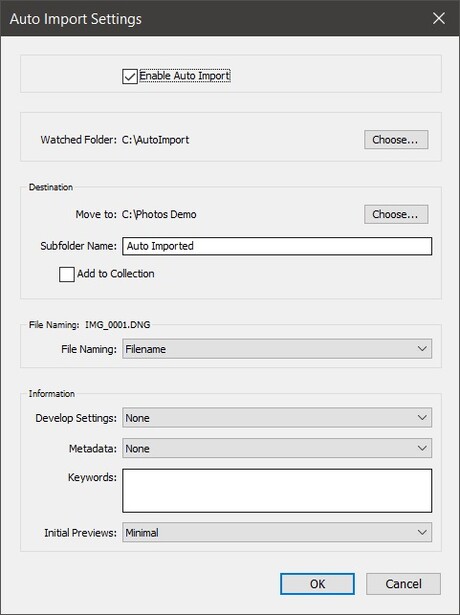
Once in the Auto Import Settings dialog, you can specify a folder to watch and a destination folder for the new files. When Lightroom detects new files in the watch folder, it will automatically move and import them.
The auto-import feature is limited, though, as it does not handle folders added to the watch folder, only files.
This method can be useful for a variety of tasks. I use it when I want to import an image quickly, edit and crop it for the web, export it, and then remove it from Lightroom (memes, forum post images, and other one-off images). I drag and drop the image to the folder, and by the time I get over to Lightroom, it's already imported and ready to go.
6. Tethered Capture
If you have a Canon or Nikon camera, tethered capture may be something that could enhance your Lightroom workflow. The Tethered Capture menu under the File menu contains several sub-menus for use with tethered capture.
While shooting tethered, photos from your camera are automatically transferred to your computer and imported into Lightroom. Photos can be captured using either the camera shutter button, the button in the floating capture bar, or by pressing F12 on your keyboard.
Conclusion
Take your pick; there are multiple ways to import into Lightroom. Although you probably won't use some of these very often, it can't hurt to have one more tool in your toolbox.


Join the Fstoppers community for free
-
Post comments and join in the discussions
-
Browse the site ad-free
-
Share your work and get featured in the community
-
Compete in the photo contests for fun and prizes
5 Comments
Learned a bunch with your article. Thanks
One tip for when using the standard import method in Classic. When you select the card LR reads it and displays thumbnails. Click the first one and then press E (Loupe view). You can now use the left/right arrows to quickly move through the images on the card and hit X to deselect/cull any obvious duds. Doing your first pass cull on the card saves time importing (and then deleting again) the obvious failures.
7. Import onto mobile device and let LR auto sync to classic.
Please do a column on importing from Apple phones and deleting the files.
One way I’ve found around Lightroom classic being slow and hanging on import:
1. Create the folder which you would usually have images imported into (inside your file system hierarchy.)
2. Move the files into it from the card/camera.
3. Inside Lightroom, right click on the parent folder and choose “synchronize folder.”
4. It brings up the standard import dialog with “import in place” enabled. Click “import.”
For whatever reason, relieving Lightroom of the burden of physically copying the files can make it work without hanging.
For bonus speed, set the previews to “minimal and sidecar” and then generate standard previews later.