
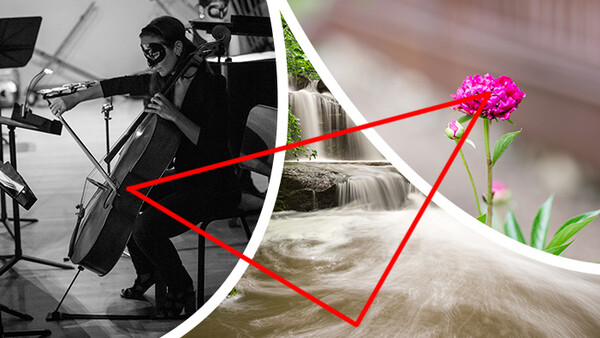
Don't worry, this isn't a geometry lesson. The exposure triangle is a common way of associating the three variables that determine the exposure of a photograph: aperture, shutter speed, and ISO. One must balance all three of these to achieve a desired result, an adjustment of one requiring adjustments of at least one of the others. They do not only affect exposure, but are also the largest determiners of the global appearance of an image; thus, their mastery is absolutely crucial both for technique and composition.
Side 1: Aperture
Aperture is a measure of how open or closed the lens’ iris is. A wider aperture (or lower f-number) means more light will be let in by the lens, simply because the opening is larger. A narrower aperture (or higher f-number) allows less light to reach the sensor.
You might wonder why we would ever want less light to reach the sensor. The answer the majority of the time is that we want a larger depth of field. Depth of field is a byproduct of aperture. Narrower apertures (higher f-numbers) give a greater depth of field, allowing more of a scene to be in focus (think landscapes). Wider apertures (lower f-numbers) create a narrow depth of field, which can help isolate a subject and is one of the greatest compositional tools at your disposal (think portraiture).
You should also note that most lenses are their sharpest around f/5.6 or f/8. However, many photographers are willing to trade some sharpness for the subject-isolating effects of a wider aperture.
Side 2: Shutter Speed
Shutter speed is a measure of how long the shutter remains open and thus, how long the sensor is exposed to light. Faster shutter speeds give the sensor less time to collect light and thus, result in a lower exposure. Slower shutter speeds allow more time for the sensor to collect light and result in a higher exposure.
In this case, the reason we might want to use a higher shutter speed is to stop motion, whether that be camera shake or a subject that is moving, allowing us to maintain sharpness. Remember, as long as the shutter is open, the camera is essentially recording the position of elements in the frame; if one of those elements moves, the result will often be undesired blurriness.
Many photographers will argue that this is the most important aspect, saying if your shutter speed isn’t fast enough to give you a sharp image, nothing else will save the image. In general, I agree.
Side 3: ISO
Back when film ruled the land, there wasn’t the kind of flexibility in this third side that we have now. You might say the exposure triangle was a two-sided polygon (the geometry of that is another discussion, but I promised this wasn’t a geometry lesson). One could control the sensitivity to light of the film they used, but once the roll was in the camera, there was no changing it (unless you had a swappable back, but these were generally restricted to the medium format world). Nowadays, we can control the sensitivity of the digital sensor on the fly, though technically, we’re not controlling the sensitivity; this actually controls a post-image gain applied to the signal, but for all intents and purposes, you can think of this as sensitivity.
Increasing the ISO essentially allows you to work with less light. As always, though, there’s a tradeoff: increased ISOs result in increased noise and less detail. Noise is the result of random fluctuations in an electrical signal. At lower ISOs, the magnitude of the image signal is large relative to the noise (signal to noise ratio), meaning the noise generally remains unobtrusive. When working at higher ISOs, the image signal is generally close in magnitude to that of the noise and thus, noise enters the image.
Think of the image signal and noise as a pit of balls. If my image signal is 1,000 balls, I won’t notice if noise adds 4 or 5 balls to the bunch. If my image signal is small though, say 10 balls, it will be very noticeable if noise adds 5 balls to the bunch. When I amplify that signal through the use of a high ISO, the relatively high level of noise will be amplified considerably too. When high ISO makes the 10 balls into 1,000 balls again, the noise suddenly becomes 500 balls.
So, why ever use a high ISO? Often, when working in lower light, you will find yourself at a point where you are using the widest possible aperture and the slowest shutter speed you can to stop action. At this point, your only choice is to increase the ISO. The lens cannot physically open itself any wider and as discussed above, sacrificing sharpness for a slower shutter speed is rarely advisable. I would rather have a grainy image that shows a well-defined subject than a smoother image with a subject lost in blur.
Altogether: EVs and Stops
We call a specific combination of aperture, shutter speed, and ISO an exposure value (EV) and often refer to a change that either doubles of halves the amount of light reaching the sensor (or doubles of halves the sensitivity) as a stop. This is where the math can get a bit annoying. Shutter speeds and ISO respond numerically how you would expect: a change from ISO 200 to 400 is an increase of one stop; a change from a shutter speed of 1/30s to 1/120s (most cameras will make this 1/125s) is a decrease of two stops. However, f-stops, which correspond to aperture, are arranged in a geometric series that roughly approximates powers of the square root of two (I promise the reasons for this make sense, but it certainly doesn’t lend itself to an intuitive grasp). In other words, in the following sequence, each new f-stop represents a decrease of one stop: f/1.4, f/2, f/2.8, f/4, f/5.6, f/8, f/11, f/16, f/22. So, how do you intuitively work with “doubling” or “halving” an f-stop? You don’t. Just memorize the sequence. It’ll become second nature very quickly and you’ll have no problem jumping between stops and understanding exactly how many stops you’ve added or subtracted to your exposure. For example, moving from f/2.8 to f/8 represents a decrease of 3 stops, so we're now using 1/2 * 1/2 * 1/2 = 1/8 as much light.
(Side 4: Image Stabilization)
No, the exposure triangle hasn’t suddenly become the exposure square. This is just a note about image stabilization: remember that it can help you get away with slower shutter speeds that allow you to use narrower apertures for more depth of field or lower ISOs for more detail. However, don’t make the mistake of confusing camera shake with subject motion. Image stabilization only helps with the first of these. It is ideal for static subjects. I very often see photographers with blurry photos because their shutter speed was too slow for their subject, but they thought image stabilization would save them.
Examples
Let’s take a look at some pictorial examples of the exposure triangle.
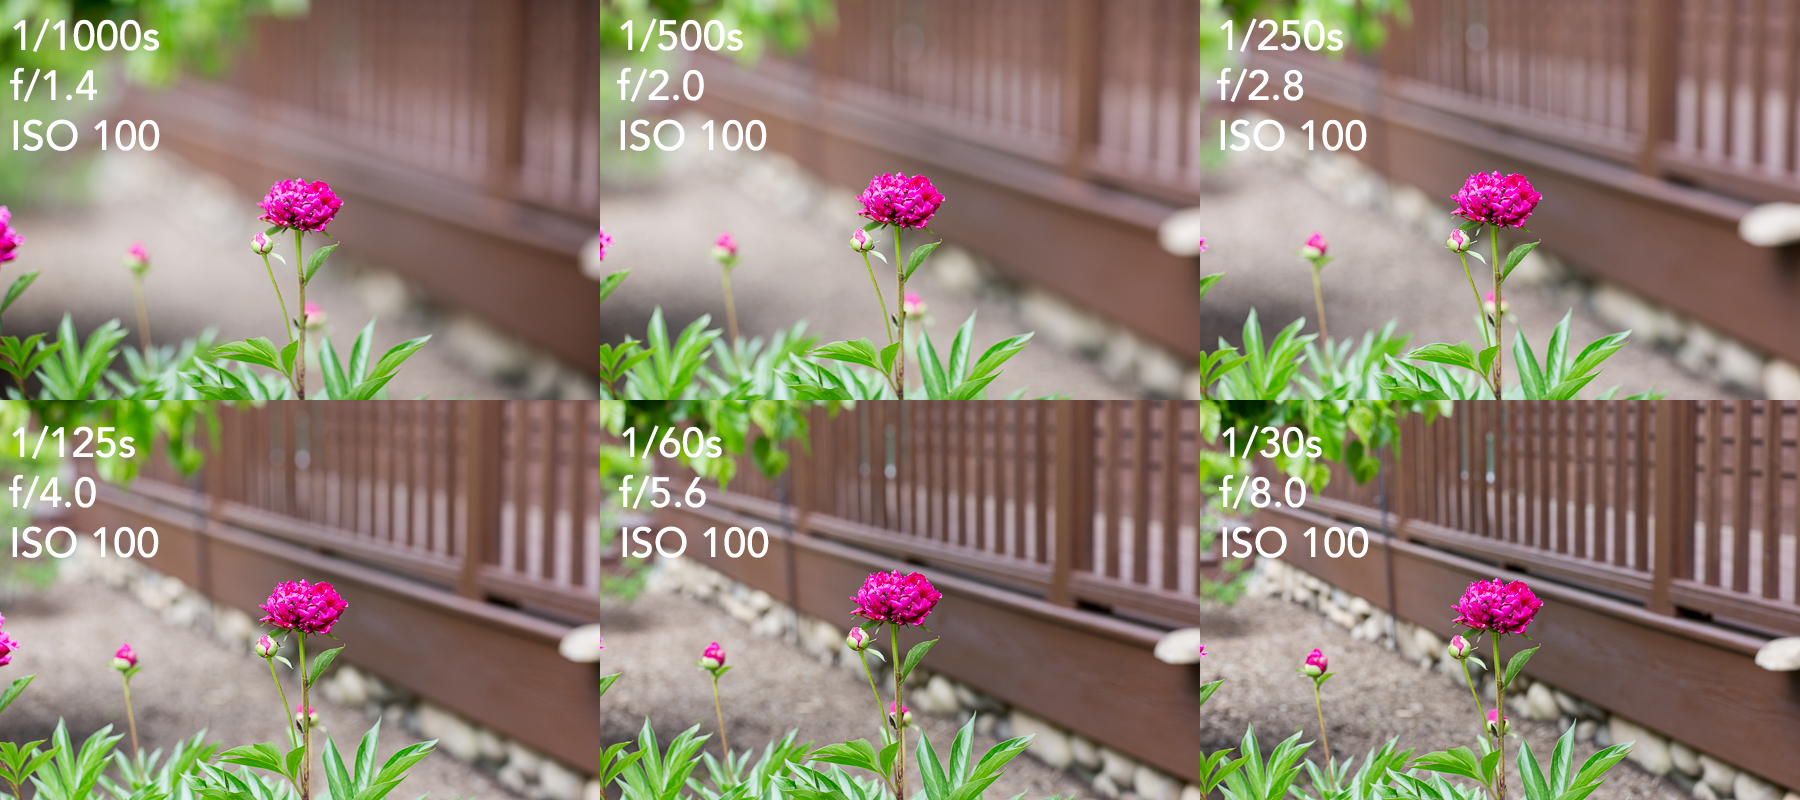
Notice how every time I reduced the aperture by one stop, I also decreased the shutter speed by one stop; thus, the overall exposure is the same in each shot. Nonetheless, the differences are quite noticeable. In the f/1.4 example, the flower in the center of the frame is quite prominent and isolated; the busy deck railing melts away rather nicely. By f/8, my depth of field is much bigger; the deck railing is much more prominent and it isn't clear what the focus of the image is. Also, in the last two images, I'm really beginning to risk camera shake by shooting at speeds slower than the reciprocal of my focal length (I tend to err on the conservative side of that classic rule anyway), 1/85s. Luckily, I've been working on reducing my caffeine intake, so my hands appear to be a bit steadier than in the past.
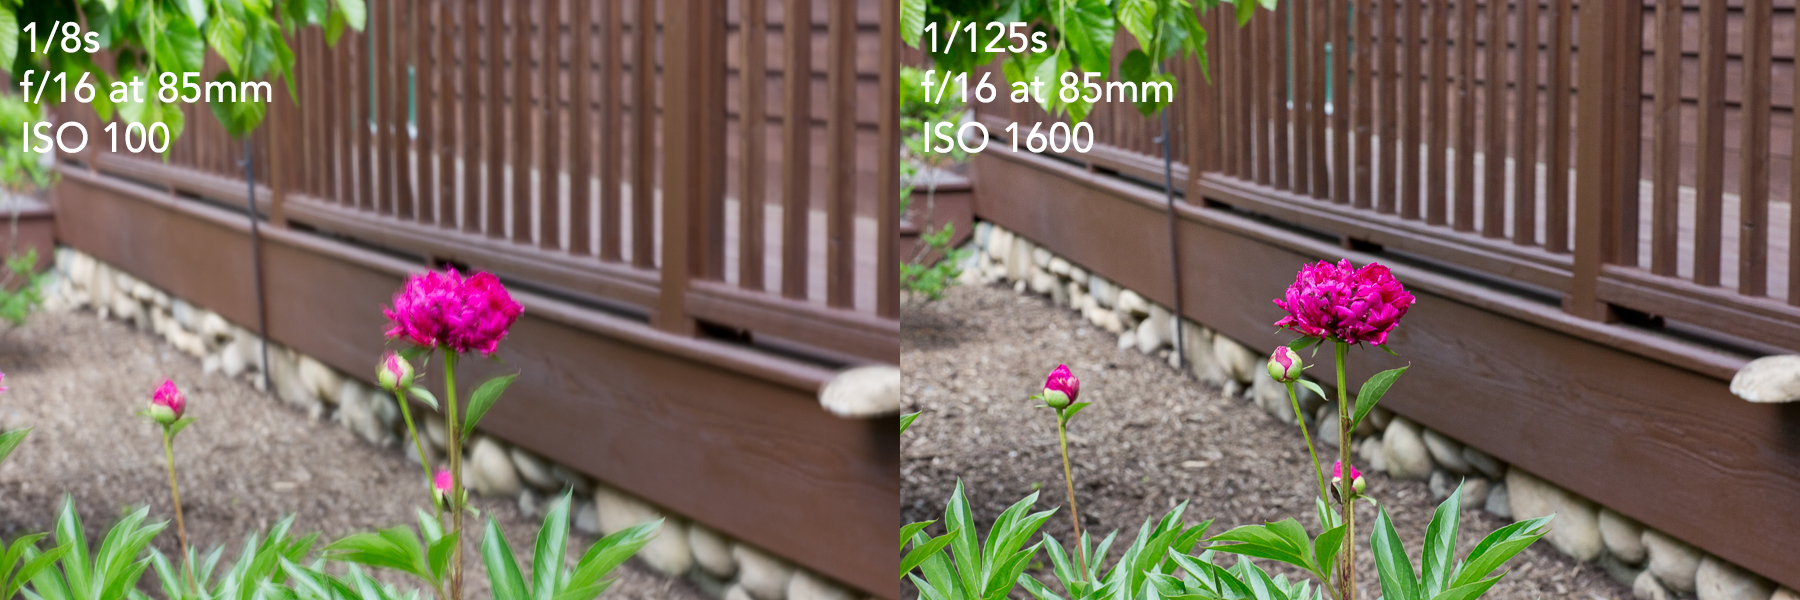
Notice how in this set, I simply couldn't keep the camera still enough for an exposure of 1/8s at 85mm. Even caffeine-free, that's tough to pull off. By increasing the shutter speed 4 stops to a reasonable speed for that focal length and compensating by increasing the ISO 4 stops, I was able to get a sharp image with a large depth of field. Remember, a high ISO, sharp image is always preferable to a low ISO, blurry image.
Knowing the exposure triangle is crucial to getting technically correct images and controlling your composition. Put you camera in manual mode and begin experimenting with the three variables. You'll have an intuitive grasp of them before you know it.
If you'd like to learn more photography techniques and how to take control of your camera, check out our Photography 101 tutorial. If you purchase it now, you can save a 15% by using "ARTICLE" at checkout. Save even more with the purchase of any other tutorial in our store.


Join the Fstoppers community for free
-
Post comments and join in the discussions
-
Browse the site ad-free
-
Share your work and get featured in the community
-
Compete in the photo contests for fun and prizes
9 Comments
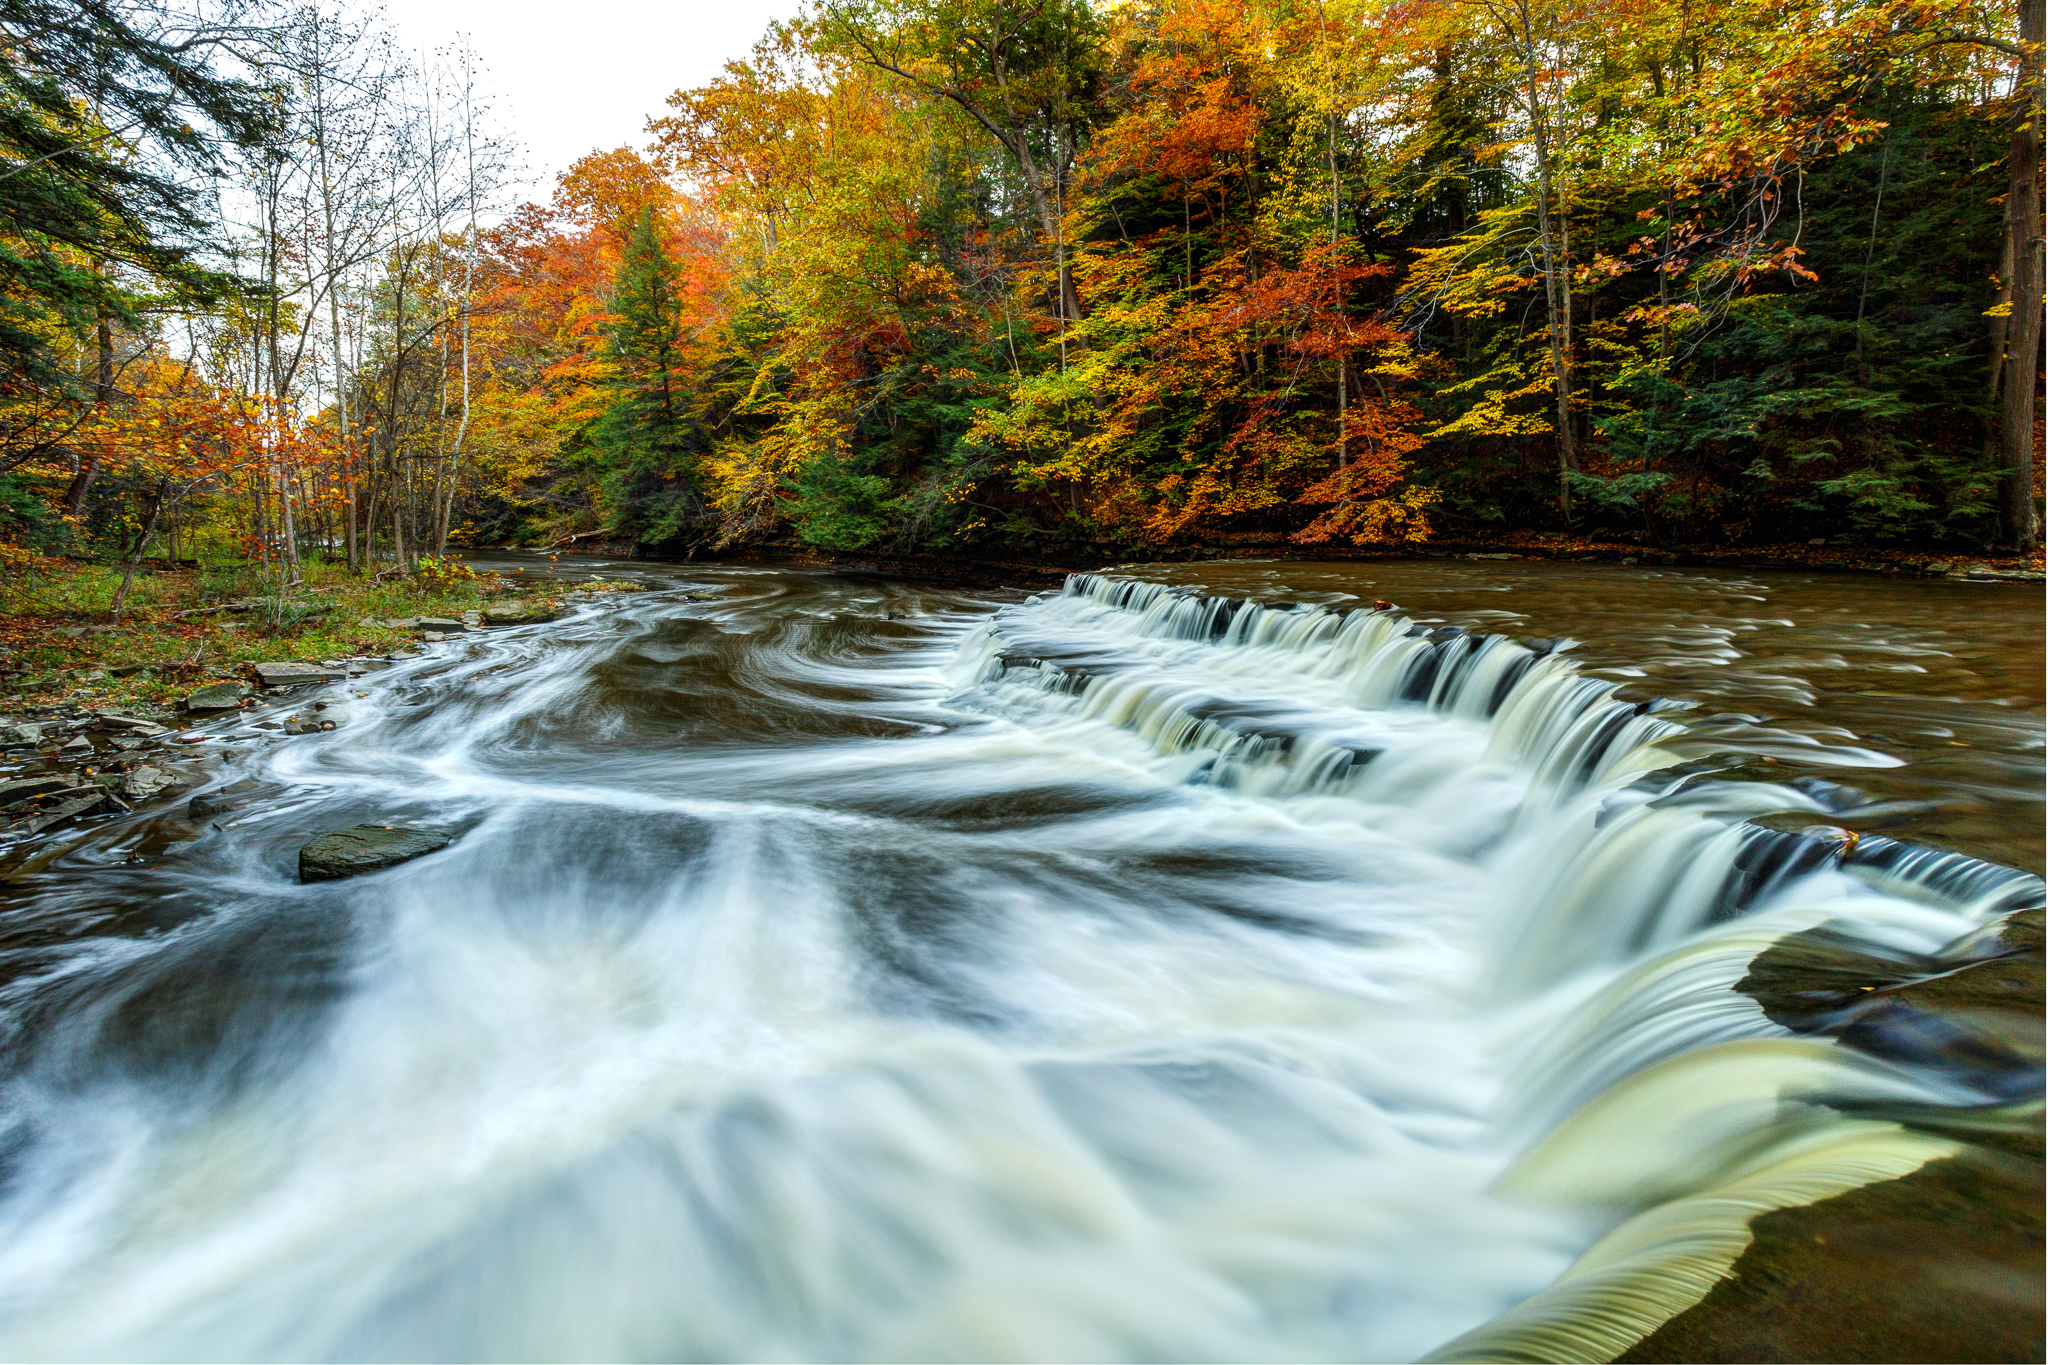
I thought that waterfall looked familiar. Great article Alex!
Thank you, Cameron! That was such a fun morning; we'll have to head out again sometime!
Alex, I think that given the level of talent on this site, you're preaching to the choir.
There is another thing to consider in the digital world that offers more flexibility than film did. That is color temperature. Back in the film days, color temperature was either balanced for daylight or tungsten; nowadays, basically, tungsten film is gone from Kodak and Fuji lineups. Digital offers the opportunity to change color temperature in the middle of a shoot, just like ISO.
Another huge convenience! I love it.
Hi Alex. Being new to digital photography I really appreciate articles like this that helps newbies like me get up to speed quickly. Reading your article, taking time to absorb the information then applying it yesterday by doing my own series of shots much like the ones in your Examples section was an eye opener for me. Thank you!
hello pals, what camera brand do you use?
…except there are always four things to consider, after all, exposure value is the light exposure. Why do we always say, “assuming the same light level….”?
Why don't we give better advise and say, “assuming the fixed base ISO in your ISO invariant camera, unless you have a Canon or a 645D….”! There are four variables in this equation and, for most modern DSLRs one of those variables is actually a constant! (Yes, there are some minor advantages of actually raising the ISO, but, for the most part, not an issue).
Even then, for those with ISO variance, why leave out the most important variable? LIGHT! Less light, less contrast, more light, more contrast. Why, because regardless of how little/much light, black is always black but white can go to grey.
Peterson (or whoever) did a disservice by coining this “exposure triangle” and did a greater disservice by excluding light as a variable. …And yes, light can be controlled.
Great blog. enjoyed reading it. Here is a video on Exposure Triangle: https://www.youtube.com/watch?v=Q_JG54kkP9I&list=PLrNgQxnVJW8NanbFozu6j…