
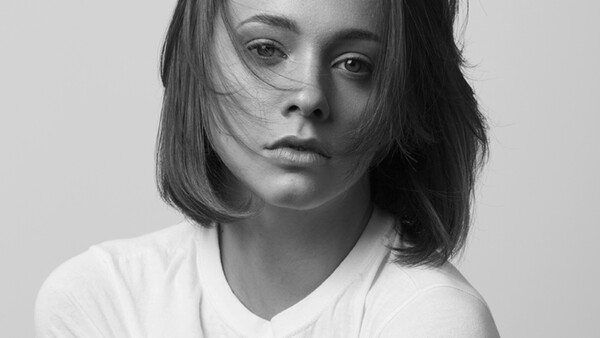
When a client hands a portrait photographer their hard-earned money, they want to see a photograph of themselves they feel great about. Light is a key aspect in producing such a photo, but how is a photographer supposed to choose which lighting style works for their client?
There are several time-tested light patterns that photographers can choose to photograph their subjects, but why choose one over another? Multiple factors can determine what light setup a photographer uses, but this article is going to focus on the one most likely to please clients: light patterns that flatter their features.
No two faces are the same, and each person brings a unique collection of traits to the table to be photographed. Broad cheekbones, lumpy noses, hollow eye sockets, full lips, textured skin, a soft chin, scars, moles, the list of possible facial and skin combinations is endless. Understanding how light behaves will be a huge asset to photographers looking to flatter their clients features.
The most unlikely scenario for the average portrait photographer is the rare combination of genetics that gives one fantastic bone structure, great skin, a long neck, and and strong jaw. These people are unicorns who can be photographed in almost any light and look amazing, so let's pretend they don't exist for now, and deal with the average client who will likely have at least one feature worth lighting carefully for.
The main thing I want the reader to keep in mind through this article is that shadows create shape, and not just on a large scale, but in pores as well. Directional light = shadows = shape. Where those shadows go and how apparent they are to the camera will make a huge difference in how features are seen by the viewer.
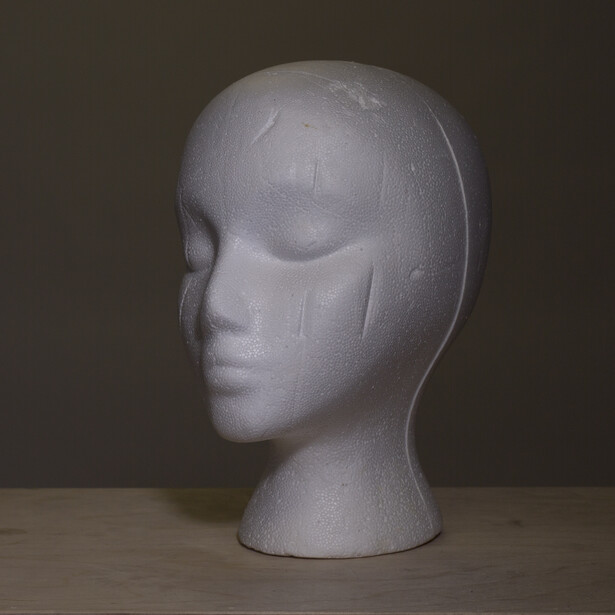
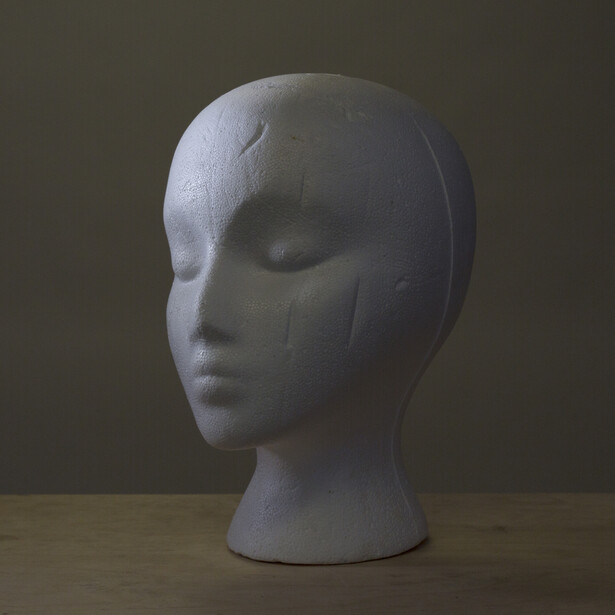
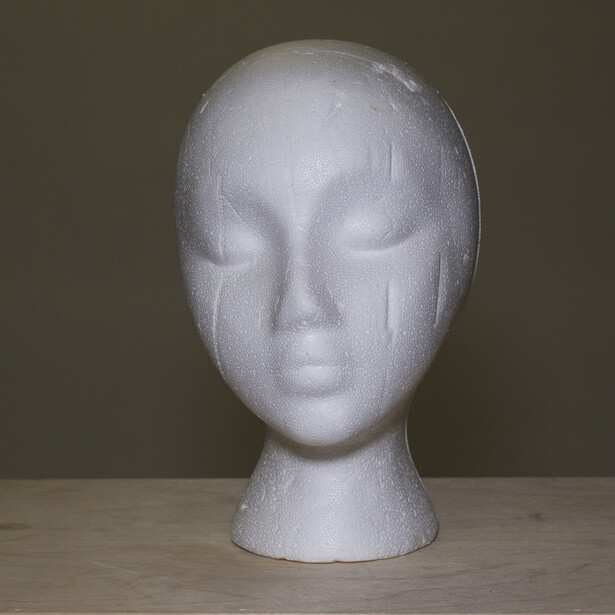
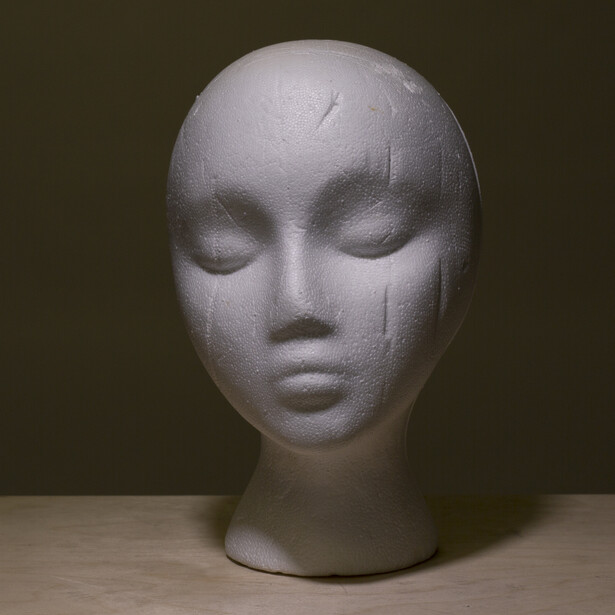
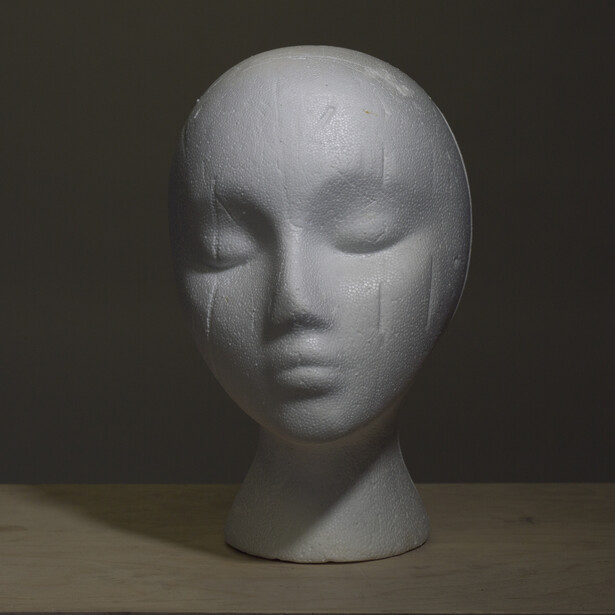
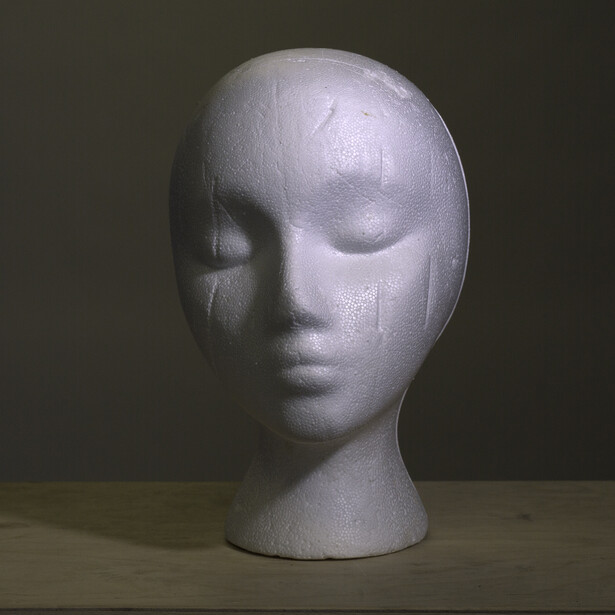
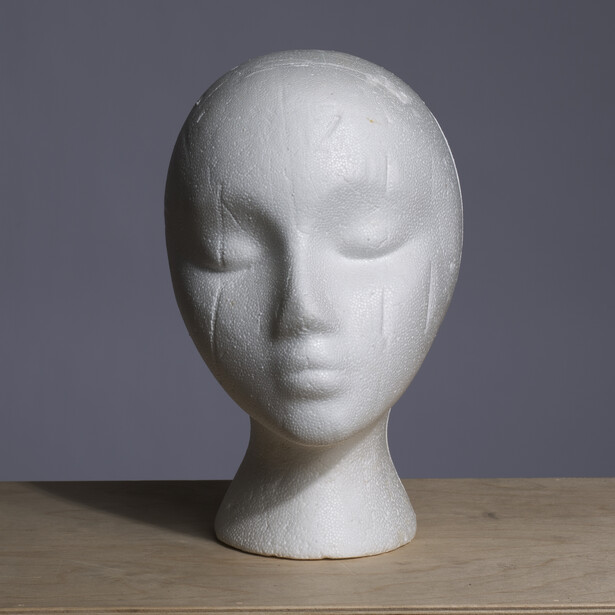
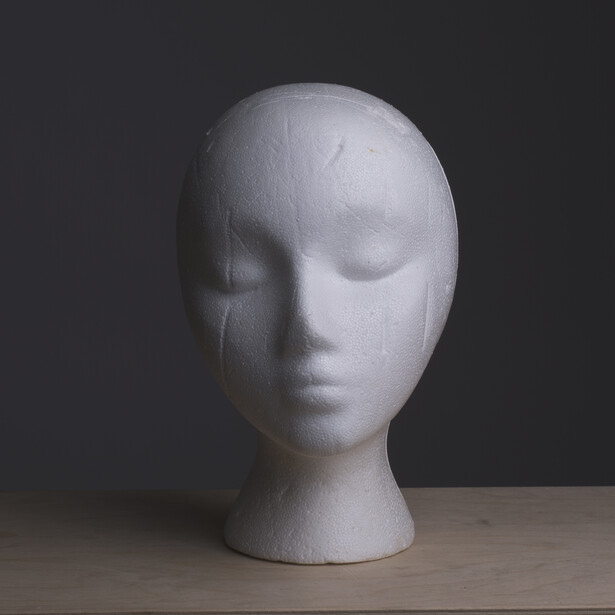
Before we look at the standard patterns, it's good to mention the two broad categories that can alter the appearance of these light shapes and those are the general direction of the light as it relates to the camera. This foam head was chosen because of the marks in the foam that will help to show how light affects texture.
Broad Light
Broad lighting comes from the camera side of the face, and will cast shadow on the off-camera side.
Clients Who Benefit
Clients who have a slimmer face or hollow cheekbones can benefit from this light direction, because broad light ads volume by filling shadows, which means it can also be very helpful for skin with lots of texture, as broad lighting minimizes texture by reducing shadow.
Short Light
Short light comes from the off-camera side of the face and is pointed back toward the camera, so that the camera side of the subject's face falls into shadow.
Clients Who Benefit
Clients with a broader face can benefit from this light direction, as the appearance of the face is slimmed.
Loop, Rembrandt, and Split lighting can all be either created in either a broad or a short direction.
Flat Light
Flat lighting is seen often in the work of photographers using a pop-up flash, or in fashion work like that of Terry Richardson. Flat light comes from same angle as the camera and at a similar height to the subject's face.
Clients Who Benefit
This light shape is devoid of depth because of the lack of defining shadows, so clients who have a broad face may not benefit from this kind of light, as the cheekbones, nose, and jaw will appear wider. However, this light is a favorable choice for those with skin texture issues, under eye bags, and wrinkles, because the lack of shadows means that pores and texture can be mitigated. A great way to alter this light to make it more flattering is to add contrast to the sides of the subjects face with the use of black flags.
Butterfly or Paramount Light
This light shape was made famous in portraits of Hollywood actresses during the Golden Age of film for a very particular reason: it's dramatic, gives shape to the cheekbones and brow bones, minimizes the shape of the nose, and casts a shadow under the chin that defines the jawline. The light is placed directly above and slightly in front of the subject. It can also be modified into what is known as "clamshell" lighting by adding a second light or a reflector underneath the subjects chin to reduce the shadows.
Clients Who Benefit
These characteristics make this light shape great for someone who has a double chin, as the shadow will give them a stronger jawline, and nice for those of us who have lumpy noses, as the cast shadow is downward and minimizes the appearance of the bridge of the nose.
Loop Light
Take the Butterfly light and move it lightly to one side, and you've got loop lighting. Loop light is characterized by the loop shaped shadow under the nose that shifts to the off-light side of the face. This light has many of the same benefits of Butterfly light, such as definition for the eye sockets, cheekbones, and jawline, only shifted so that one side of the face receives more shape due to the shadows, and the other side receives more light so will appear broader.
Clients Who Benefit
Loop lighting is the closes thing we have to a universally flattering light pattern, in part because we are very used to seeing it in natural surroundings. It helps to shape the face by giving more shadow to one side, which adds dimension. Most faces can handle loop light, and it's not a bad place to start. It is worth noting that loop light can be created with either broad or short light, which strongly affects how the facial shape appears on camera.
Rembrandt Light
Named for the Dutch master painter, Rembrandt light is known for the little triangle of light that appears on the subjects cheek beneath their eye on the shadowed side of the face. The light is generally 45 degrees or so to one side of the subject, and up high enough so that the loop of shadow beneath their nose lengthens and connects to the shadow on their jawline.

Clients Who Benefit
Rembrandt light ads an air of mystery to a subject since it casts much of one side of the face in shadow. This pattern has the same benefits of Loop light in that it gives depth and dimension to facial features, but because of the high amount of shadows cast by this very directional light, it may not be the best pattern to use on someone who benefits from minimizing texture. Tired eyes, blemishes, wrinkles, and other skin texture will be very visible with this kind of light if other measures, such as fill light, aren't used to soften the shadows. However, if this light is created from the short side of the face, it can hide a number of "flaws" and create a very dramatic, moody portrait.
Split Lighting
This lighting style, where the light comes from 90 degrees to one side of the client's face, illuminates one side of the subjects face, throwing the other side into shadow.

Clients Who Benefit
Split lighting is rarely used when the purpose is to flatter the subject. Unless the light is very soft and the shadows are filled, this light can be very hard on features, creating unflattering shadows on the face and enhancing texture. While this can be fantastic for portraits that are meant to be compelling and mysterious, it's not often a go-to choice to make clients look great.
Finally, the quality of the light can go a long way to making these light shapes work for client faces.
Hard Light
Light that comes from a small source relative to the size of the client is considered hard light. The sun is a hard light source. This light is characterized by hard edges and very minimal transition between highlight and shadow. This light quality will give very defined shadows even to small objects, which can make texture more readily apparent as there is more contrast with a lack of midtones.

Soft Light
Light that comes from a large light source relative to the size of the client is considered soft light. An overcast day creates soft light. This light quality is characterized by a softer shadow definition with more midtones between highlight and shadow. Soft light is much more forgiving, as texture is less defined and edges are softer.
Any of these light shapes can be modified in numerous ways, from adding fill light and kickers to softening or making the light source harder, but the key is to remember that shadow gives shape. Shadow gives shape, which brings out bone structure and texture. Whether or not that is a good thing depends on the subject you're photographing and how much post production work you want to handle. Pay close attention to your subject, the shape of their face, features you want to highlight and those you may want to minimize, their personal reservations about features--clients will often tell you if their self conscious about certain features--and chose a light shape according to how it achieves your goals.
In any lighting scenario, particularly where skin texture is concerned, you'll also want to pay close attention to hotspots. Outside of a skincare ad, spectral highlights in the skin — such as those in hotspots — can draw a lot of attention to skin texture and be incredibly distracting as well as unflattering... that is, unless you're ready to do a lot of post-production work. Light can be diffused or feathered (where the subject receives only the edges of the light, rather than the full power from the center of the light source) in order to mitigate the chances of hot spots and spectral highlights.
No matter which light you chose for your client, don't rush yourself and play close attention to how the light strikes their bone structure, which features are being enhanced and which unfairly exaggerated, and make adjustments as needed.


Join the Fstoppers community for free
-
Post comments and join in the discussions
-
Browse the site ad-free
-
Share your work and get featured in the community
-
Compete in the photo contests for fun and prizes
25 Comments
Great illustration of how to light for portraits. Thanks for posting. A good read for anyone doing portraits.
Interesting article, thank you for taking time to write it down! Have a nice day :)
Great article! Only way to improve it would be real-world examples and maybe talk about complexions as well :)
I'm hoping to do that at some point in the future, but it might be a bit long for at article, maybe would need to be a series full class to be that comprehensive. I'm glad you enjoyed it!
Yeah might be too long of a read. But like an article every week would be interesting where you show a portrait you took and explain why you chose that particular lighting.
I would also loved to have seen something here for complexion as well. It's a crucial aspect to proper lighting for those of us who photograph people of color. I doubt it would add that much to the length as only a single sentence would be needed for light, medium and dark. As one example: I recently learned how using the gold side of a reflector can add better tones to a darker-skinned subject. Once I change from silver to gold, the difference was major.
I need to bookmark it.
Great reference - Thanks!
I swear, I was just thinking about how I need to improve my Portrait Lighting, and then this great article pops up! Thanks!
Excellent article. Useful and to the point! It's also great seeing someone else from Colorado Springs! What a small world.
Nice article with illustrations 👍
Nice lighting examples. I agree with David T's comment about real-world examples & complexions, which also take into account if they have light or dark and dry or oily skin. Otherwise, I did see some spelling and grammatical errors.
Thanks for picking those up, John! I'll read back through and see what can be fixed. I agree, it would be great to go more in depth, I might have to do a series as all that would be quite long for a single article.
Amazing. Thank youu. Great article.
Nicole - Great article. I just taught a class on this exact subject this past weekend. I am going to send the attendees the link to your article so they can see that someone with better credentials has reinforced the subject matter.
This is one of the best articles I have read on lighting for portaits. It's to the point and is demonstrated brilliantly with the head. Thank you. Bookmarking this!
Very clear and concise, thanks for posting.
Great article, thank you! I've been looking for something like this for a long time now. Most of the lighting articles/videos/tutorials introduce too many variables in the comparisons: different models, different settings, etc. Using the foam head with a simple background is perfect for illustrating only the change in the lighting.
Thanks Nicole! Great article and quick reference guide.
Thank you. I really enjoyed reading that.
Wow! I keep saying corrective lighting and posing is a lost art. It's been a very long time since I have heard (seen) anyone reference these really useful terms and techniques. These concepts work and they work well especially when combined with purposeful corrective posing. Great job of keeping the real professional approach to photography! Digital manipulation is a great tool but it's no replacement for true mastery of technique.
I appreciate that very much, Allen, thank you!
bookmarked!
Great explanations and i prefer picture as examples than having to view a video, in fact i rarely listen to videos
Great article. Very interesting! Thank you.