
Regardless of what genre of photography you shoot, understanding light and its characteristics is key to creating better photos. For those of us working with off-camera flash, there is another layer to the complexity: balancing ambient and artificial light. On top of that there are various modifiers that can be used for artificial lighting to replicate or create certain effects. A great way to become proficient in understanding and seeing light is to examine photographs by other photographers in your genre.
For these examples, I will focus on portraiture but these principles are applicable to just about everything. Let’s take a look at some portraits and try to pick apart their lighting.
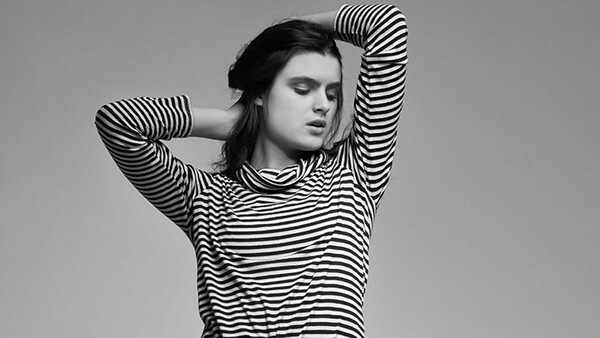
The first thing that I always look at is the shadow area. Shadows can tell you most of what you need to know about a photo or a lighting setup. Flash modifiers determine two things: the size of highlights and the softness of shadows. In this image, we see that the transition from shadow to light areas is very gradual, there is no defined line. This indicates a large or close (in this case both) light source. The background is also lit by a speedlight. This is indicated by the pure white tone of the background. I shot some photos during this session with the background light off, rendering the background gray due to the lack of light hitting it. There is no other noticeable light being used in the photo.
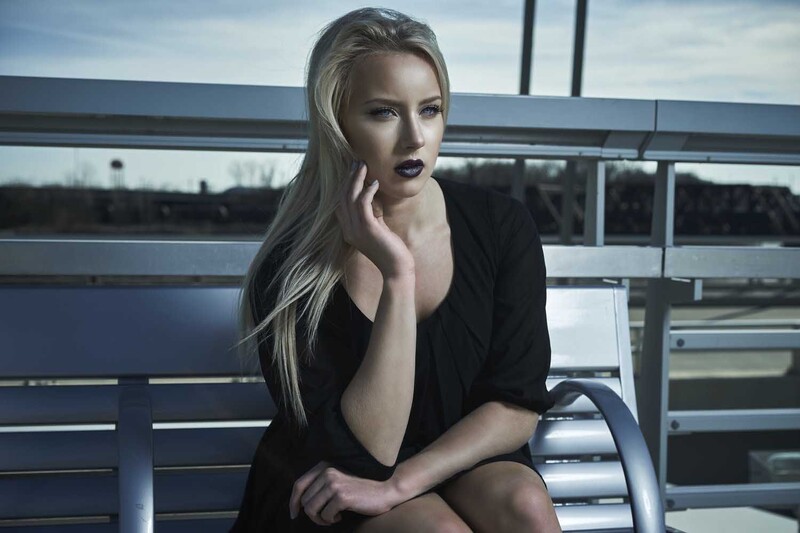
One thing to watch for is the use of bounce cards or reflectors. Bounce cards are often used in fashion and beauty photography to give the photographer more control. For single-light photos, they give you the ability to fill in shadow areas and create a more natural looking light. In the photo below, I placed a large piece of mat board to the left of my subject (right side of the frame) to fill in the shadows on her shoulder, hair, and face. The modifier for this photo was a 48-inch octabox. This moderately large light source provided soft light that not only covered the subject but also the mat board, allowing for the bounce. If the mat board hadn’t been there, the light would have hit the dark backdrop and not bounced anywhere. The shadows would be totally dark.
In fashion photography, dark shadows and hard light are occasionally part of the aesthetic. In the image below, I used a beauty dish roughly 10 feet from the subject. The shadow created by the nose is a tell-tale sign of the hard light source. In this image we see a lot of detail in her hair because natural light is now a factor. There are countless articles and videos explaining the relationship between artificial and ambient light so I won’t go into it. Understanding that balance however, can help you use natural light to your advantage. In this case, I was able to underexpose the natural light, placing emphasis on our model, while still using it to help light my subject.
For our last photo, let’s talk about the one-light setup that countless photographers swear off as the bane of their existence: natural light. Dani Diamond’s incredible work is proof that natural light can be a very powerful tool if used properly. The trick with natural light is understanding where to shoot. Sunny, cloudless days provide the worst natural light but only if you shoot in the open.
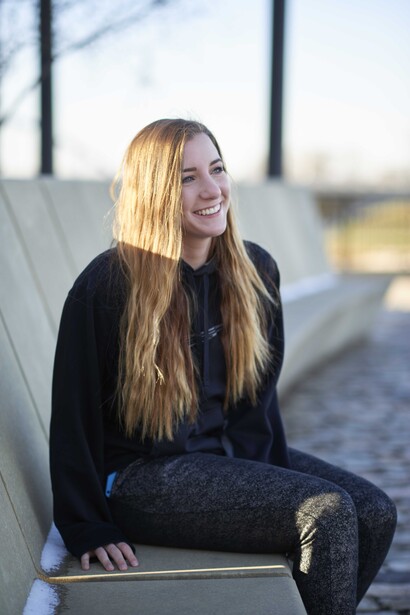
The solution? Find some shade. What if you can’t find shade? Make some! The image below was shot early in the morning on a clear and sunny day. I knew that while I had some great scenery, I needed to be careful about where I positioned the model. The bench that I asked her to sit on was facing away from the rising sun, putting her face in the shade. You can see the even lighting and soft shadows cast across not only the front of her, but the bench and stone walkway in the foreground as well. If you look to the background and at her hair you can see the harsh light created by the clear sky. This was a particularly nasty morning as far as lighting is concerned. This can be determined by the razor-sharp line on her hair where the sunlight cuts off and gives way to the soft, shadow lighting. I wanted a more upbeat feeling to these images, so placing her in the shade allowed me to maintain an even exposure on her while over exposing the background. I was able maintain emphasis on our subject through the control of our light levels similar to the image above.
Alleyways, garages, sides of buildings opposite the sun, and tunnels are all great areas in which to shoot regardless of the weather outside. If you absolutely have to shoot in the open, you aren’t without hope. Scrims (often the innermost panel of 5-in-1 reflectors) can create this effect for you. If you don’t use/make shade harsh sunlight can be used your advantage. If the model is positioned properly, it acts like a beauty dish. While it is harder to control, knowing when and how to use it can make or break a shoot should something happen.
Light makes photography; it is the essence of photography. Great lighting can truly make a difference between a good and bad photo, regardless of the equipment. Regardless of what you like to shoot, you have to have an idea of what you want your end result to be before you start shooting. If you’re shooting portraits, is it dark and moody, or is it bright and cheerful? Are you shooting fashion, lifestyle, or headshots? Understanding the way that your modifier, location, or positioning of the camera or light can affect your photo will make all the difference in your end result. I constantly study the work of those that admire in order to gain some understanding of how or why they used what they used. We live in an age where behind-the-scenes content is readily available through YouTube, Instagram, or the likes. Google your favorite photographer and it’s likely you’ll find something. There is a reason for every piece of lighting in an image. Being able to study, interpret, try, and utilize techniques will push your photography to the next level.


Join the Fstoppers community for free
-
Post comments and join in the discussions
-
Browse the site ad-free
-
Share your work and get featured in the community
-
Compete in the photo contests for fun and prizes
2 Comments
Great article. We often shoot in the open, on sunny beaches. No shades, no modifiers. Lately we have been exploiting the high dynamic range of the Nikon D4s sensor. We shoot the RAW images with the shadows underexposed. The shadows are then recovered in post-processing. Because of the high dynamic range of the camera, the details in the shadows are perfectly preserved. We do this without making the images look fake.
Great article.