While a great image of the Milky Way can be awe inspiring in and of itself, it becomes something else entirely when you add some motion. In just 20 minutes, you will have all the information needed to go out and shoot a time-lapse yourself. Whether or not you are willing to spend countless hours alone in the darkness however...
When Tom Lowes' film "Timescapes" (the first publicly sold 4k resolution film) was released, it took a lot of the world by storm. It's absolute beauty combined with the insanely high detail level of 4k was unlike anything I had ever seen. I remember watching the 4k trailer on my 27" iMac screen and being absolutely blown away, wondering where I would even start in creating something like that.
Well, Ian Norman from the Lonely Speck has made a 20 minute video explaining how to do it. Ian breaks down the process in three distinct parts.
- Milky Way exposure
- Programming the motion controller and shooting the time-lapse
- Processing and compiling the images
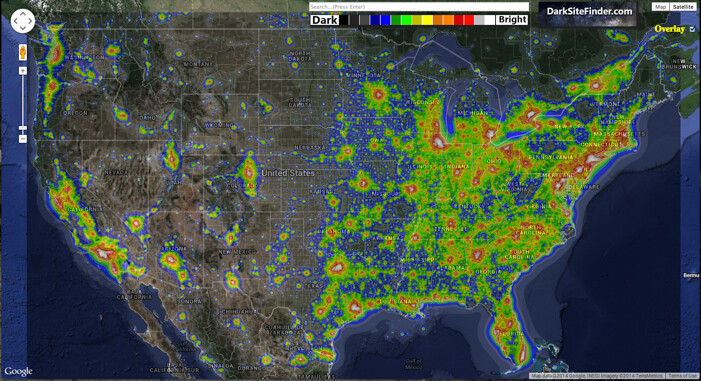
In the first section, Milky Way Exposure, he covers a number of things that are beneficial to anyone wanting to shoot photos of the cosmos at night. The first, and probably most important thing, is making sure that you are shooting in an area with very little light pollution. One of the tools to he uses to help achieve this, is DarkSiteFinder.com. The site has maps of every continent showing you where to find areas unaffected by light pollution.
In the second part of the tutorial, there is an in-depth explanation of setting up the motion control with the Dynamic Perception Stage 1, Stage R and Mx3 Controller. For those of you interested in first getting started with still images or static time-lapse, this section won't be as important as the other two. For those who are wanting to take their time-lapse films to the next level, this contains all the information you need.
In the third and final section, Ian covers his post production workflow using Lightroom and Adobe After Effects. One of the tricks he uses when trying to find the correct white balance for an image is to first max the vibrance and saturation levels. In doing so, it becomes much easier to tell when the image has become too warm or too cool while adjusting the white balance slider. Once all of the images of the sequence have been edited, he exports the files out as Jpeg and opens them in After Effects. From there, it is just choosing the desired frame rate and exporting the final video.
[Via The Lonely Speck]


Join the Fstoppers community for free
-
Post comments and join in the discussions
-
Browse the site ad-free
-
Share your work and get featured in the community
-
Compete in the photo contests for fun and prizes
4 Comments
Great tutorial.
This is probably the best photography/video tutorial I've ever seen. He doesn't leave a single thing out. Now I've got to try this
Ya, it is really comprehensive. I really liked the post workflow as well, simple tips and tricks, but they go a long way.
dude, i was saying the same thing... my wife even liked it... we were on the ski view app for like an hour last night