
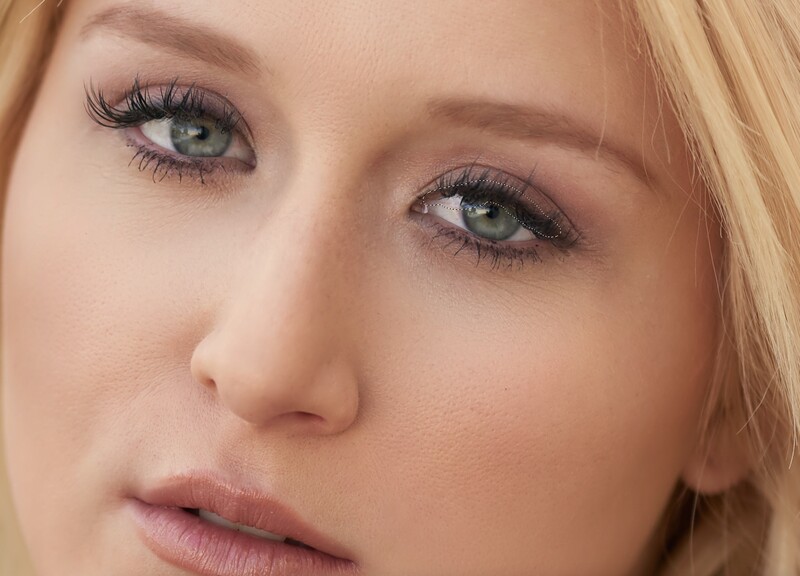
Most people have one eye that is slightly more closed than the other, and it does show in photos more than when you are just looking at the person. Today, I want to share a quick tip about how I open eyes and even them out.
One of the best ways to combat this particular issue is to identify that when you see the person and try to post them with the smaller eye closer to the camera, which will help to enhance it (obviously. not telling the person what you're doing it for that reason). I believe that identifying things like this and handling them automatically are some of the things that we should be doing as professionals.
Even when we do this, there is still often a need to enhance it further to look right. As with everything, there are multiple ways to accomplish this task, but I will talk about two today: Liquify and my method. While Liquify does work, I do not prefer this method as it tends to distort and stretch pixels, and on something generally as small as an eye in a photo, the stretching and distortion is even more obvious.
So, what I do is:
- Draw around the top portion of the eye with the lasso tool
- Switch to our move tool (keyboard shortcut "V")
- Press "command+J" ("ctrl+J" Windows) to create a new layer with those pixels
- Press the up arrow key once (sometimes twice if necessary)
- Press "command+E" ("ctrl+E" Windows) to merge that new layer down
It sounds like a lot of steps, but it literally takes a second, because once you do it a few times, it pretty much becomes muscle memory and you'll do it as fast as swiping across the face with a healing brush or any other task that you do repetitively. I do this on almost every portrait that goes out, and usually just one click is enough. It's a very subtle thing, but often, a lot of subtle things turn into an overall higher quality result.
I have also prepared a quick video showing an example of how I do this, which you can watch above.
And as a bonus, I will share a video that I made a few years back, explaining how to fix glasses and the reflections in the eye. (It’s an old video, so forgive the quality, but I believe the content is still relevant and related to this, since we are talking about retouching eyes today.
https://youtu.be/ATZxny8ErUc
Try it out and be sure to share your results in the comments!


Join the Fstoppers community for free
-
Post comments and join in the discussions
-
Browse the site ad-free
-
Share your work and get featured in the community
-
Compete in the photo contests for fun and prizes
2 Comments
I always place the less open eye further from the camera. Placing it closer may help mitigate the problem but, as you noted, doesn't fix it. Placing it further away does nothing to open it up but gives a reason for it to appear smaller...it's further away. putting it closer has the opposite effect and serves to highlight the discrepancy.
Great, practical little tip and a lot smoother than what i have been doing. thanks!