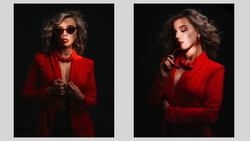
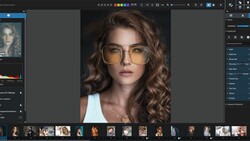
When you're retouching a portrait, I'm willing to bet that you spend the majority of your time working on the subject's face, because, well, it's a portrait. Nonetheless, your subject's face isn't the only part of them, and with a little extra work on their hair, you can really make the entire image pop. This great video will show you how to do exactly that.
Coming to you from Aaron Nace of Phlearn, this helpful tutorial shows how to add shine, color, and volume to a subject's hair using Photoshop. It's actually a fairly simple process, and you'll learn about gradient maps, one of the most useful adjustment layers, which create a map between grayscale luminance values and the colors you choose, giving you the ability to grade based on brightness values. This is an excellent technique for something like hair, where you would expect brighter regions to have a different color than darker regions, particularly as it makes smoothly blending across the luminance values exceedingly easy. As Nace mentions, pay close attention to your background when you're liquifying the subject's hair, particularly if it has a regularly repeating pattern or distinct geometry that could easily give away the effect.


Join the Fstoppers community for free
-
Post comments and join in the discussions
-
Browse the site ad-free
-
Share your work and get featured in the community
-
Compete in the photo contests for fun and prizes
4 Comments
Loreal?
Too bad he didn't clean the color from her face so it doesn't look so red, especially compared to her pale neck.
Good tips!
yep they are