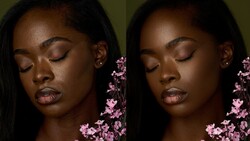
Cleaning hair in post-production is without a doubt retouchers’ and photographers’ worst nightmare. It takes up a lot of time, energy, and precision, but more importantly, there are so many techniques out there that often we forget about even the most basic ones. In this very comprehensive video, Aaron Nace from Phlearn shows how to retouch hair in the most simple way possible.
Fundamentals and straightforward techniques are way too often mistaken for methods that don’t work or aren’t quick enough. Many beginners seem to believe there is a magic way for everything while there isn’t. Photoshop most primary tools should be a staple of any retoucher’s workflow, not plugins and filters.
In the video above, Aaron Nace demonstrates how to retouch hair from start to finish with four to five tools and blank layers, that’s it. He starts by creating a new empty layer and removing any distracting stray hair strands with the spot healing brush. While he works on the image, Nace will give you a few tips to maximize the result you’ll get out of the spot healing brush tool. One thing he doesn’t mention but that’s always a time save is locking the layer’s position.
After cleaning stray hair strands, he outlines the model’s head to remove flyaways quickly. To make a selection around the hair, he uses the pen tool and then the clone stamp tool to make the flyaways disappear. This technique is often used but may take time to master, especially on backgrounds with a lot of details or when the model has curly hair. The next step Nace demonstrates is crucial to keep your image natural looking, it’s just adding back a few flyaway hairs by drawing them with the brush tool. This way you have full control over their direction, color, lightness, and thickness to make it believable but still look clean. Drawing hair is also something that will require a bit of practice, especially if you are not a skilled drawer. Using a Wacom tablet will greatly help and taking advantage of its pen pressure feature even more so.
More advanced retouchers probably won’t benefit much from this tutorial, but beginners should definitely try to follow it and practice these methods as they’ll help them greatly. You can then go further by using blending modes, luminosity masks, color layers, or visual help layers to achieve even better results or work faster. But that’s for another article and another tutorial!
If you want to practice on the same file as Nace, be sure to head over to Phlearn and download the sample image.


Join the Fstoppers community for free
-
Post comments and join in the discussions
-
Browse the site ad-free
-
Share your work and get featured in the community
-
Compete in the photo contests for fun and prizes
1 Comment
Phlearn drinking game: Take a shot every time Aaron says "Basically." :)