Most Lightroom Classic users stick to the same handful of tools and never dig into what the software can actually do. The masking system alone, when used to its full potential, can give you precise, layered control over every part of an image that most basic edits can't touch.
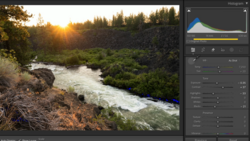
Coming to you from Gareth Evans of Park Cameras, this practical video walks through three Lightroom Classic features that are genuinely useful across a wide range of shooting situations. The first and most substantial section covers masking, specifically how to combine multiple masks using the Intersect Mask function. The idea is straightforward: instead of applying a linear gradient across a sky and having it bleed onto a building, you intersect that gradient with a sky mask so the adjustment only lands where the sky actually is. Stack a color range mask on top of that, and you can target just the blue tones in the sky, or just the whites in the clouds, without touching anything else in the frame.
The same intersect technique works just as well for portraits. In the video, a linear gradient is brought in from one side of the frame, then intersected with a subject mask so the darkening only falls on the subject, not the background. A radial gradient brightens one side of the face while another darkens the opposite side. It's a dodge-and-burn approach that stays entirely non-destructive and adjustable. The before-and-after in the video makes the difference in mood very clear, even if a couple of the adjustments get pushed a bit far for demonstration purposes.
The second tip covers the brush tool's Auto Mask checkbox, which keeps your brush strokes from bleeding outside the edges of whatever you're trying to paint. Without it, brushing over a shadowed area under a cap, for example, spills onto surrounding skin and background. With Auto Mask on, Lightroom reads the contrast edges and keeps the stroke contained. The video also shows how Select Objects works as an alternative when you want Lightroom to do most of the work for you, which it handles surprisingly well on a building with a sky behind it.
The third tip involves the Lens Blur tool in the Develop module, and it's worth watching closely if you've ever shot a portrait with a camera or lens that didn't give you the background separation you wanted. The video shows how Lightroom builds a depth map automatically and applies blur based on it. There are real limits to how far you can push it before highlight areas start looking off, but used with restraint on a photo that already has some background blur, the results are more convincing than you might expect. Check out the video above for the full rundown from Evans.


Join the Fstoppers community for free
-
Post comments and join in the discussions
-
Browse the site ad-free
-
Share your work and get featured in the community
-
Compete in the photo contests for fun and prizes
No comments yet