Panoramic images are a great way to increase the output resolution of your photographs, give a more compressed and less distorted feeling to your wide-angle images, or use a narrow depth of field and a wide angle-of-view in the same frame. They can be a great tool to have in your arsenal and are well worth learning to make.
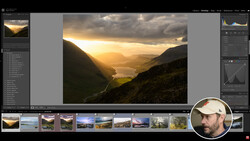
In this video, Nigel Danson walks us through everything that goes into creating a stunning panorama using simple gear (a Fujifilm X-T2 with a 35mm f/2 lens) and only Lightroom. Although complex panoramas can be time-consuming and tedious to perfect, Danson shows us a simple way to capture a beautiful image of a wide vista and turn it into a stunning panorama quickly.
I use a similar technique frequently to make a quick capture of the places I visit, and Lightroom has been my tool of choice for stitching when the scene doesn't pose any hurdles for the software. Lightroom offers one great benefit through its panorama stitching tool over Photoshop: the output is a DNG file. That means that even after stitching, you retain full raw file editing capabilities. When there aren't too many things that could trip up the algorithm, like moving objects or people, Lightroom is a great option for panorama stitching.
What do you use to stitch your panoramas? How do you go about capturing them?


No comments yet