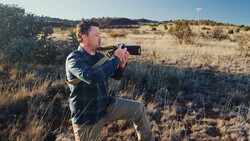
If you’ve ever wondered how the heck to photograph, much less create, a time-lapse of the Milky Way; this video by Rhino Camera Gear explains the process in great detail. The three-part video developed by Rhino, developers of some of the best motion slider equipment around; take us on a behind the scenes shoot in the mountains where they describe the planning, composition, and gear to consider if you are looking to create your own Milky Way time-lapse.
The first consideration is to plan accordingly. You certainly don’t want to be fooling around in the dark trying to figure out where the galaxy is going and how to focus. Ideal locations will obviously have as little light pollution as possible. The team suggests using the website Dark Sky Finder to help you locate the areas around the world with the least amount of light pollution. I’ve tried their service, it works great, and is FREE. It will also be a good idea to determine where in the sky the milky way is oriented at your particular location and time of year. Apps like PhotoPills make this MUCH easier, and will even help you track where the Milky Way starts and ends in the sky. Secondly, you’ll want time your shoot around the lunar phases of the month, specifically the new moon. Shooting the day before, day of, or day after the new moon means there will be little to no ambient light from the moon affecting your scene, i.e. near total darkness. You will also want to note the respective times for sunrise and sunset during these dates and plan on shooting two hours AFTER sunset and ending at least one to two hours before sunrise. Finally, weather. Check your local weather conditions and obviously try to avoid rain or cloudy nights as this will not bode well for your gear or stars.
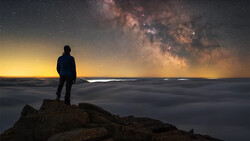
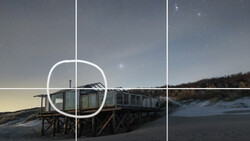
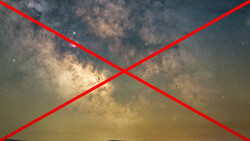
Next, you’ll want to scout out potential compositions in the area you are hoping to shoot. This means you should arrive EARLY in order to scout for possibilities relative to where the milky way is oriented. The three components of an effective composition for time lapses are foreground, subject, and moving objects. Including an up close object such as an interesting rock will help accentuate the motion across your frame should you decide to use a slider. Even if you decide not to use a slider as they have in their tutorial, having a foreground subject is a must as it helps establish depth within your image and begins the viewers journey to your subject. Now it may seem that the Milky Way would be your subject and this certainly may be the case, but as Rhino suggests it is best to have another stationary object mid frame (such as a mountaintop lookout) to again, provide additional depth within your image and accentuate the movement of the galaxy further. Finally, you’ll want to find the galaxy. Again, try and narrow down its orientation and expected movement throughout night beforehand and peg your compositional elements above to this. Ideally, you will want the Milky Way to move from left to right in your sequence as the night progresses and if not using a slider, a seriously wide angle lens will be necessary to include its entire journey in a single frame. If you have a slider, be sure and program its movement to start and end where you believe the Milky Way will travel.
Finally, everyone’s favorite topic: gear. In this particular video the Rhino team is using a Sony AS7 with a Rokinon 14MM f2.8 lens and their Rhino Slider EVO Carbon 24", Rhino Motion, and Rhino Arc with a Manfrotto tripod. If your camera doesn’t have a built in intervalometer like the AS7, this will also be necessary but luckily they can be found cheap. I use a $20 Neweer Intervalometer which doubles as a shutter release and hasn’t failed me yet. In general, a fast prime lens is probably ideal-something with an aperture of at least f2.8. You will also prefer a very wide lens in order to capture as much of the sky and landscape as possible although I have used a 24MM and that worked fairly well. Shoot in raw for extreme latitude in post and set a predefined white balance in advance in order to avoid having auto change it up frame by frame. Really it makes no difference when shooting raw as it can be adjusted in post with ease but for consistency’s sake, it will be easier. Regarding shutter speed, Rhino suggests following the “600 rule” which essentially states that your shutter speed should be 600/your focal length in order to avoid star trails in your image. While it seems they did not follow this as they used a shutter speed of 20 seconds with a 14MM lens, I can attest to the fact that anything greater than 30 seconds will almost certainly produce trails in your images which is undesirable for a time lapse. My suggestion-between 20-25 second max. Then based on your shutter and aperture settings, determine your ISO. The Rhino team is using the AS7’s max ISO rating of 51,700 which is baffling and will produce very well exposed images, however; this may not be feasible for most DSLR users. On my Canon 6D I found that 2,500 was around the comfort zone for my last star shoot. You can go higher but it will likely lead to more post work de-noising your images. Most importantly, focus! Focusing your lens to infinity works fairly often but I tend to use LiveView on my camera and zoom in to the north star or another similar, bright object in the sky and manually focus.
Once you’ve got everything dialed in, take a test shot and see what you think! Time lapses, especially at night; take A LOT of practice and patience but when they are successfully the reward is worth the wait.

Join the Fstoppers community for free
-
Post comments and join in the discussions
-
Browse the site ad-free
-
Share your work and get featured in the community
-
Compete in the photo contests for fun and prizes
3 Comments
Why use the 1/600 rule when the intention is video? As long as you follow the 180deg shutter angle principle, a little motion blur will look perfectly natural. Could be 1min exposures on a 2min interval, could be 10s exposures on a 20s interval.
Hey B-just saw this comment. I agree with you. Don't understand why he included that in his video. They seemed a bit groggy from their 12am rise to start the timelapse. Not only that but he used a 14MM lens and 600 / 12 = 47 or so yet the stated shutter speed was 20 seconds so they didn't follow the rule either.
I imagine his hope is to make the stars as crisp as possible, even though they're moving. It's not unlike using a higher shutter speed in regular video to smooth out the action. Also, although the rule states he can use a 47 second shutter to avoid trails, that slow of a shutter speed probably made for too bright a picture. Using 20 likely made for a better exposure and allowed him to take twice the amount of pictures in the time frame he had.