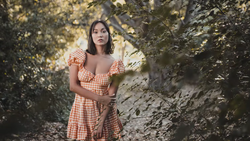
Getting that clean, high-end lighting look in your photos doesn't have to be complicated or expensive. Sometimes, a single light is all you need to create professional results.
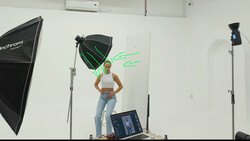
Coming to you from Prince Meyson, this straightforward video breaks down an easy-to-replicate light setup using just one light. Meyson demonstrates how he used the Godox AD600 Pro as his only light source to achieve a soft and evenly distributed light across his subject. The studio being all white helped bounce light around, creating a clean, even illumination that looks expensive but is simple to pull off. For anyone thinking they need multiple lights and fancy modifiers to achieve a professional look, this video is a reality check.
Meyson also discusses how the placement of the light plays a key role in mimicking natural sunlight. He places the light high above the subject, angled down, to replicate the look of the sun around the late afternoon. This subtle approach to lighting gives the images a natural feel, with soft shadows that flatter the subject. The beauty of this setup is in its simplicity—no need to complicate things when one well-placed light can do the job effectively.
Another aspect Meyson touches on is his use of the reflector that comes with the AD600 Pro. Despite having access to various high-end modifiers, he sticks with the standard reflector. This choice emphasizes that sometimes the most basic tools are enough to get the look you want. The key takeaway here is that experimenting with different setups can lead to surprisingly great results. Meyson’s approach shows that you don’t always need the most complex gear to achieve professional-quality lighting.
In addition to lighting, Meyson goes into how he tweaks the background in post-production using Capture One. He uses a subject mask to isolate the background and adjust its color balance. By pulling the color slider toward blue, he cancels out unwanted reds caused by the paint in the studio, achieving a cooler, more neutral tone. This simple adjustment gives the background a clean, polished look without overpowering the subject. It’s a small tweak, but it can make a big difference in the final image. Check out the video above for the full rundown from Meyson.
If you would like to continue learning about how to light a portrait, be sure to check out "Illuminating The Face: Lighting for Headshots and Portraits With Peter Hurley!"
Join the Fstoppers community for free
-
Post comments and join in the discussions
-
Browse the site ad-free
-
Share your work and get featured in the community
-
Compete in the photo contests for fun and prizes
2 Comments
Super simple video with great lighting. I will say a big part of this look is being able to pull your key light further away from your subject and place it high. When you do this, as mentioned in the video, it allows your light to bounce around and fill in the area. If it's too close then often times you will get more greys and stronger fall off.
"soft shadows that flatter the subject"
There is nothing soft about either the light or the shadows in that set up.