
What's up everyone! My name is Pye and I am one of the educators for FStoppers Bahamas! This is my first article here on FStoppers, and I am really proud to be a part of such a great community of photographers. We all know dodging/burning is a fantastic tool when it comes to retouching. But maybe a less common usage, it is also a fantastic tool to enhance muscle definition. Since most of the time we think of Photoshop when we think of dodging/burning and retouch, we are going to stick within Lightroom just to illustrate how powerful and efficient the Adjustment Brush tool can really be.
While I love working in Photoshop for advanced retouch and layering, I try to stick to Lightroom whenever possible simply for workflow and efficiency purposes.
Burning to Enhance Features and Retouch in Lightroom
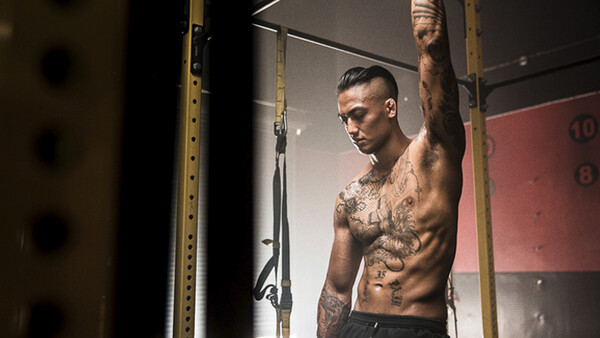
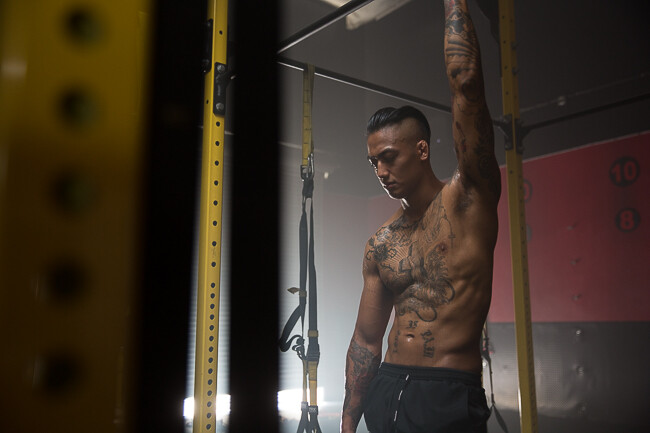
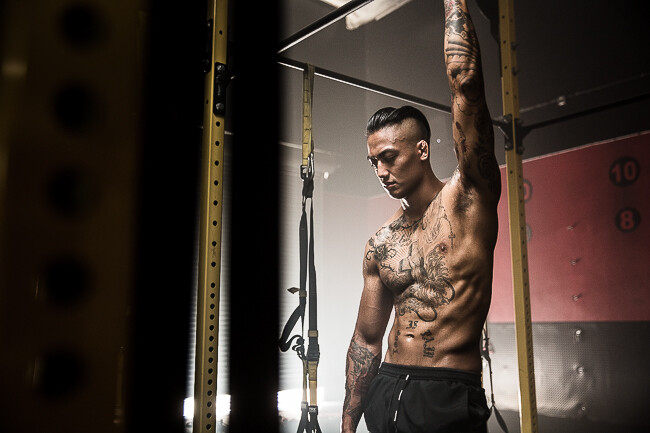
I shot this image for a local boutique gym called The 12 Movement. The image features one of their trainers, who like everyone there, is absolutely ripped! However, we were shooting this image for our upcoming Lighting 101 Workshop where we teach how to create amazing images with just an on-camera flash and nothing else. That meant that we are a little limited in light direction and shaping. While I loved the expression and pose in this image, I noticed it could use a bit of burning to enhance shadows/definition and also do a bit of retouch where light splashed up against the rig.
Starting the Edit
For this photo, I used the Lightroom Preset System v6 which is available in the FStoppers store to start the edit. For anyone also using the preset system, here is the 3-click "Mixology" it took to get this photo to a vivid but desaturated look.
- 01-30 VIVID – FOUNDATION (IMPORT): 31b. Desat + Grunge
- 02-00 ADJUST – EXPOSURE: 07. Brighten +1.0
- 01-50 VIVID – BASE TONES: 52a. Dynamic Range (VIVID STANDARD)
Now many of you may be wondering why we use a "preset system" in our editing workflow, after all, RAW processing in Lightroom is pretty straight forward. The answer is simply for workflow efficiency. The preset system is designed to be a "workflow" preset system allowing users to get to any look within just a couple clicks rather than spending minutes. In addition, it allows users to share how they got to a particular look by simply telling someone the 2 or 3 click Mixology recipe, rather than having to show all the sliders.
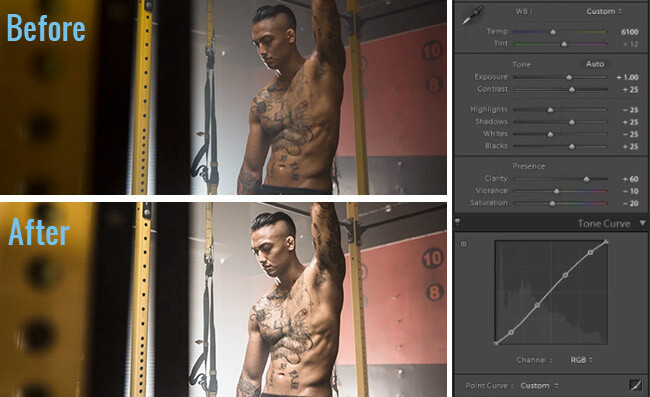
But, the image below shows the primary adjustments used to get to this point in the image before we start dodging/burning.
The Key Brush Settings for Lightroom Dodging/Burning
The real key to a great Lightroom dodging/burning effect is using the appropriate Adjustment Brush settings. While a Wacom Pen Tablet is a fantastic tool (and absolutely required for Photoshop retouching) you can actually get away with a mouse in Lightroom since Lightroom's controls are a bit less precise.
So, here are my tips for setting up a decent Lightroom Dodging/Burning brush
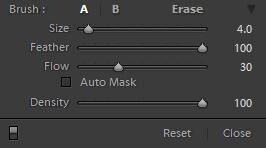
Size - Adjust size while retouching to fit the size of the area you are working on. Generally, I like my brush to be slightly larger, while keeping a heavy feather to create a smooth transition area.
Feather - Typically for dodging and burning, I like my Feather to always be at 100 to provide a very soft and gradual transition between the effected vs unaffected areas.
Flow & Density - Flow vs Density is a relatively confusing slider in Lightroom. Think of it this way, Flow controls the speed water is coming out of the hose. However, once the water comes out of the hose, Density controls the total amount of water that covers a particular area.
So, let's say you set your adjustment brush to an Exposure of -2, a Flow of 30 and a Density of 50 as shown below.
With a Flow of 30, our -2 exposure adjustment will be applied with 30% strength over the painted area. However, with Density set to 50, we are limiting the total effect to 50% of whatever adjustments we have dialed in. This means, even if we paint over the same area multiple times with our 30% strength brush, the maximum Density of the effect will never exceed 50% or -1 stop (since we started with a -2 stop adjustment).
When it comes to dodging/burning, I like to keep my Density at 100% so that I can eventually reach the "full power" of whatever adjustments I have dialed into the brush settings, however I keep my Flow at very low amount depending on the settings used.
For example, I am comfortable painting in at 30 Flow when my Dodge/Burn is fairly light, say a 1 stop adjustment. However, if I am using a much more powerful brush, with say a 2 or 3 stop Dodge/Burn, then I will lower my Flow to 5 or 10 to make sure that the effect is painted on very slow and gradually.
Auto Mask - When retouching, generally always leave the automask turned off. The Auto Mask will apply a very uneven and spotty mask when turned on. Auto Mask is only worth using when you are painting areas separated by heavy contrast. When used over skin it simply doesn't work well.
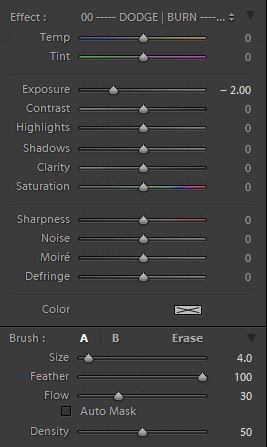
So, for this type of muscle enhancing burn, I’m going to use the adjustment brush and have the settings set to:
- Exposure: -1.00
- Feather: 100
- Flow: 30
- Density: 100
- Auto Mask: Off
Painting and Checking the Before/After
With the burn setting dialed in, I simply paint to enhance existing shadows or areas where shadows should exist.
This is where it is important to be careful, make adjustments slowly and methodically and constantly press "\" to check out the before/after as you work.
For areas of existing shadow, you want to be careful you don't burn them to be the darkest area of shadow in the image. When I am burning muscle tones, I try to burn them down to the same black/shadow level of other dark areas of muscle tone.
For areas where you are creating shadow you want to be even more careful. You can't really apply much burning to these areas without the effect looking fake. Especially within Lightroom. Again slow down the effect by adjusting the Flow down even more and constantly check the before/after image.
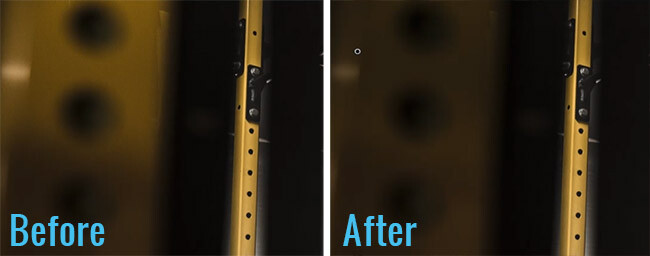
Burning Out Distracting Elements
To finish out the image, the bright spot on the yellow bar on the far left side of the image is quite distracting, so I'm going to burn it down to even it out. To do this I select the Adjustment Brush and set my Exposure to -1.53 and paint over the bright areas on that yellow bar. The easiest way to make this adjustment is simply to adjust the brush to a large size with a heavy feather, make paint in the effect, then adjust the exposure to match the darker section of the image. Afterwards, simply erase/paint with a large feathered brush to smooth and even out the transition. To see this in detail, it is best to watch the video above.
Lastly, the bar on the rig right between the workout straps is a very strong and saturated yellow, I want to burn and desaturate it a bit to make it less of a focus. I'm going to select a new Adjustment Brush, set the Exposure to -0.5 and turn on Auto Mask to paint along and desaturate the strong color. Lightroom's Auto Mask works well here because there are strong contrasting lines, so instead of trying to paint in the negative exposure manually, the Auto Mask helps us quickly desaturate the yellow bar.
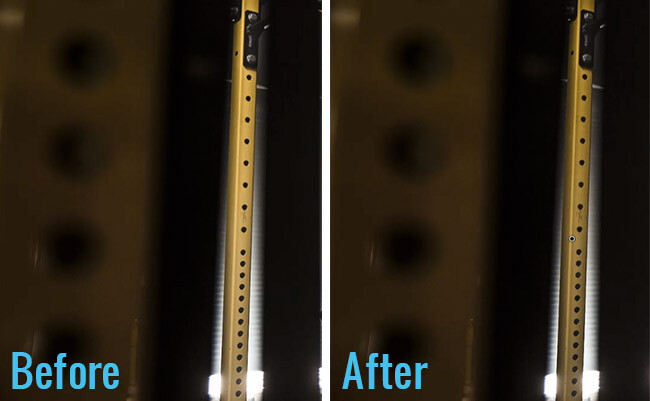
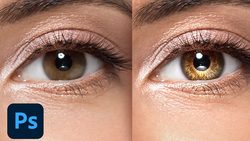
Here is the final before/after image.
Before
After
Conclusion
Hope you all enjoyed this tutorial! Please feel free to share your thoughts and ideas in the comments below.
If you'd like to learn how to use Adobe Lightroom more efficiently on any device, make sure to check out our Mastering Adobe Lightroom course with Pye Jirsa. The content Pye covers will appeal to every level of photographer and will save you an incredible amount of time on your image editing. Save 15% by using "ARTICLE" at checkout.


Join the Fstoppers community for free
-
Post comments and join in the discussions
-
Browse the site ad-free
-
Share your work and get featured in the community
-
Compete in the photo contests for fun and prizes
11 Comments
I'm sorry to be negative on this post but, waaay too complicated for Lightroom considering the amounts of adjustments. This is a Ps job.
The technique is pretty simple and quick, perhaps I need to write it a little more straight forward next time. The video might do a better job of showing the technique.
Why would anybody do detailed editing in LR instead of PS? Why give up all the layer and mask control of dodging with PS?
The raw edit shown above on this photo would only take around 3-5 minutes. If I need to prep it for a poster print, then by all means, I would go into Photoshop. Otherwise, it saves time to just do it within LR. But, this is good enough for a "proof print" until a client says they want to do something more with the image, at which point we will revisit in Photoshop.
Great write up Pye and I love how much detail you put into the article to explain the process. While PS is a great program there are times like this when LR can get the job done. Often though many LR users don't even realize the capability is there. Thank you for sharing this knowledge and showing all of us there are many ways to get a job done!!!
If I can do the bulk of my edits in lightroom and not have to export to photoshop and create a 300mb to 1gb tiff/psd file, I will.
Amen brotha =)
I feel it's only a matter of time and trickled out updates before we see more convergence and overlap of Photoshop within Lightroom. Not to say Lightroom could/would ever replace PS, but it would be reeeeeeal nice to work start to finish completely in Lightroom as much as possible. Thanks for sharing the tutorial!
Damn! And here I've been bustin' my ass in the gym forever. Who knew?...
Came here to post sarcastic comment about doing it wrong by going to the gym...but you beat me to it!
Great video Pye! Thanks for sharing. My main issue with doing stuff like this is in LR is that you can't see the mask/layers. I'll stick with PS for now :)