
Correct buildings that appear to lean back away from the camera with three techniques using both software and hardware, it's simpler than you'd think.
What's the Problem?
When shooting buildings, or any kind of upright subject that's taller than you and the camera are, there's an issue that comes in the form of converging verticals. That is, the top of the building appears to lean back, away from the camera. That's because the distance of the top of the building is much greater than the bottom so it appears smaller to the camera while shooting. This problem is exacerbated with wide-angle lenses and by shooting near the bottom of the building as the distance between the two points (the bottom and top of the architecture) is more dramatic. Fortunately, there are a few ways you can correct this and capture accurate shots with nice, straight lines. I'll show you two ways with software and one way with a lens. So let's get started.
How to Shoot To Prepare for Editing

When it comes to photographing a building the parallax effect can really make a difference between a beginner's snap and a more refined photograph. In order to make any corrections to this distortion using software, we must capture the subject in such a way that relieves us of heavy editing when developing the image. In the image above the castle slants away from the camera thanks to the parallax distortion. However, if we were to try and correct this in software the top part of the frame, above the castle, would become so minuscule that the composition would be ruined. In order to address this potential issue and avoid having to extend the canvas and paint in more sky, there's a quick remedy to bear in mind. Aim to shoot your architectural subject about 10-20% wider by either zooming out, using a wider lens, or moving back with the camera.

This extra 10-20% as pictured above will provide you with enough vertical and horizontal space to complete an edit without ever having to clone in or create any extra space in the image. That'll speed up editing time and make things look more natural. Of course, once you have your image the next step is to take it into your favorite editing software. Every photo editing software I can think of will provide you with the option to make this alteration, but I'll list my two favorites below: Lightroom Classic and Photoshop CC.
1. Lightroom Classic

In Lightroom Classic it's pretty easy to correct the converging verticals, or pretty much any straight lines, in photos. Open up the Develop module and head down to the Transform panel. There are six preset options to choose from including Auto, Guided, Level, Vertical, and Full (as well as Off). Auto usually does a pretty good job of correcting any issues but manual adjustment can be made to the image at any time (regardless of whether a preset is being used or not) using the sliders beneath. In the shot above I've given some negative Vertical slider at -43 to bring the top part of the frame out wider, and a little positive Horizontal at +4, making the right turret larger to help balance the visual weight of the scene. Tick Constrain Crop if you want Lightroom to automatically crop the image without leaving any gaps around the edge of the frame.
2. Photoshop CC
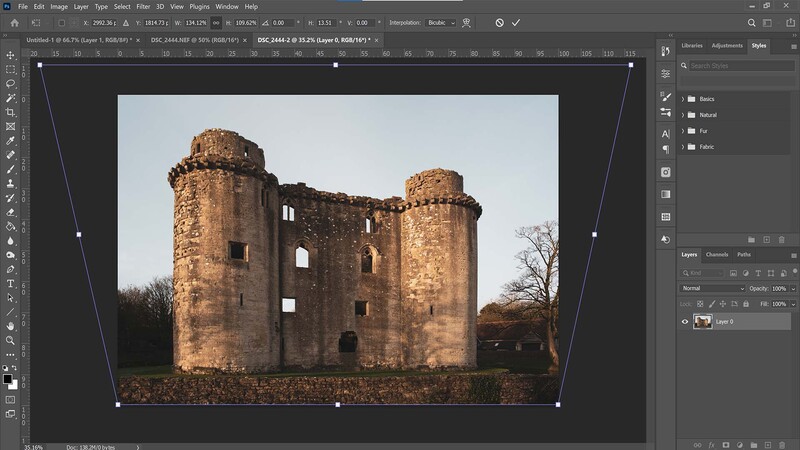
The old method of correcting converging verticals would be to alter things manually. I don't recommend this method as there are easier and more accurate ways of doing it, but for old time's sake, I'll outline the most basic form of doing this. Once the image is open in Photoshop CC use the move tool (V) to reveal the transform controls, the squares in the corners, and halfway along the edges of the photo. If this doesn't display make sure your image layer isn't locked (double click it and hit enter), and ensure the Show Transform Controls button is ticked in the toolbar at the top of the window.
Hold down Ctrl (Cmd on a Mac) and select one of the top corner transform controls. Click and drag it out to the side, holding down Shift on the keyboard to keep things level. Match this on the other side. Keep moving outwards until the verticals are practically straight. Notice how the building now appears short and fat. To correct this hold Ctrl (or Cmd) and grab the upper central transform control, then drag it upwards to extend the height of the shot. As you can see, it's rather basic and while there are other ways to do this kind of manual adjustment in Photoshop, there's now a much simpler way.
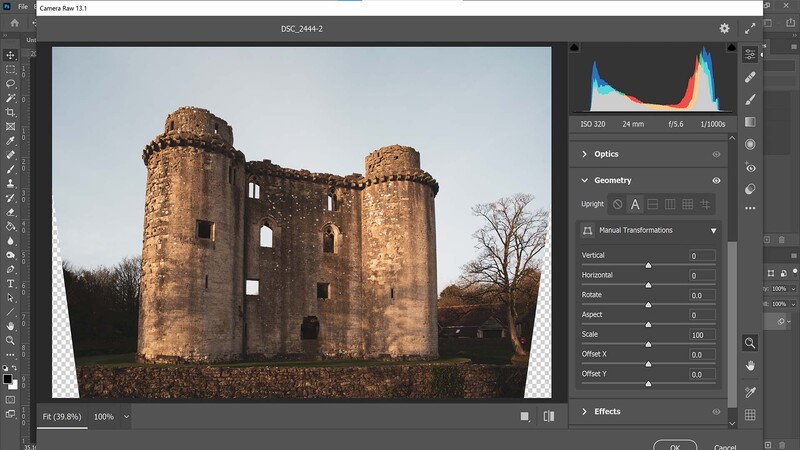
With the image open in Photoshop already (or when opening a raw file) we'll use Camera Raw to make the same visual adjustments as we did in Lightroom Classic. If opening a raw file this dialogue window should open automatically, if you're opening any other file type head to Filter>Camera Raw Filter (Shift+Ctrl+A, or Shift+Cmd+A on a Mac). Next, head down to the Geometry tab to reveal the same types of controls as we found in Lightroom Classic. Unfortunately, at the time of writing, I can't seem to find a Constrain Crop option when applying manual adjustments using the sliders, so for me, Lightroom Classic is probably the easiest way to make this correction between the two software.
3. Tilt-Shift Lens
Of course, arguably the best way to get clean, straight vertical lines in images that suffer with parallax distortion is to get it right at the source. A tilt-shift lens is required to capture it without any editing software. Is this the best method for counteracting converging verticals? There are arguments to make for and against. The benefit is that the photographer captures the full resolution that the camera's image sensor is capable of. That means more detail to play with when it comes to editing and publishing/printing said photograph. It's also probably the fastest way to get those verticals (or horizontals for that matter) nice and straight. However, the drawbacks of using a tilt-shift lens come in the use of the actual lens itself.
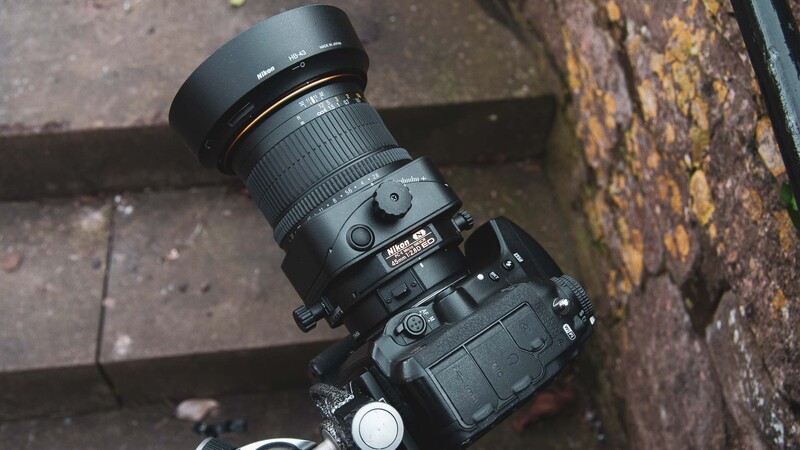
Manual focus which is common in almost all tilt-shift lenses means unless you're spot-on with your focusing you could spoil the shot. Also, it'll take a little longer to get things focused up. Then there's the added problem of chromatic aberration (color fringing to you and me) that appears around edges with high contrast. This is pretty normal in a tilt-shift lens because the glass is literally being moved around in front of the image sensor. Of course, lens manufacturers build them and add coatings to remove as much of this as possible, but I've found there's always quite a bit around the edges of the frame if you look closely.
The best way to do this is to turn the shift dial on the lens until the verticals have straightened out. Be careful though as depending on which way your lens and camera body is oriented you may find the leaning gets worse. If so, dial it back in the other direction. Also, check to see if your lens is oriented the right way on the body as most tilt-shifts have an extra switch that allows it to rotate without spoiling the composition.


Join the Fstoppers community for free
-
Post comments and join in the discussions
-
Browse the site ad-free
-
Share your work and get featured in the community
-
Compete in the photo contests for fun and prizes
6 Comments
And he keeps mentioning the supposed "parallax" effect. 3rd article in a row. He completely ignores comments and recommendations given to him by the readers.
Somebody at this site cares about quality and veracity of articles? Hello fstoppers? Any admin cares?
Or does his camera really have a stereo 3D sensor?
I noticed the same. No reactions on serious comments and still saying things that are incorrect. Like the "turn the shift dials until the verticals have straightened out" complete nonsense. You do not use a shiftlens like that.
And he speaks about filling in the sky, when it is the foreground/lost area which may need the filling in.
The also missed the obvious way, (although it means not using the entire sensor), which is to simply keep the film plane vertical, and shoot with a wider lens. (Any method short of a proper tilt/shift shooting means losing resolution, anyway).
He also blames focal length for perspective issues, as is common. Using a wider lens does not exasterbate the problem; getting close to the subject does.
Who keeps allowing this person to publish these inaccurate articles? This is the third attempt at converging verticals, and still he gets it wrong.
The problem here is, the corrected photo is not the same photo as the example.
Two different angles were used, this is like bait and switch.
The photographer is to the left, also closer, higher and with a wider focal length.
This is misleading, you shouldn't do this.
What does this jumble of non sequitir words even mean?
'Manual focus which is common in almost all tilt-shift lenses means unless you're spot-on with your focusing you could spoil the shot'.
i) ALL tilt-shift lenses are manual focus. ii) WHAT? I didn't realise that I could spoil a shot if I didn't focus. Exactly the same is true with auto focus if you focus on the wrong area.
Also . . .
'. . . The best way to do this is to turn the shift dial on the lens until the verticals have straightened out...'
No, no, no no. The shift control moves the image circle up and down the sensor. Nothing more. It does not, NOT change the spatial relationship, between the subject and the film plane. Therefore if your parallels are converging, shifting the lens ain't going to straighten them out. All shift will do is reposition the image on the sensor.