
There's a lot of time-wasting traps you'll encounter when editing images in Lightroom, things that'll send you down a rabbit hole for hours on end. Find out how to avoid them and what to do instead.
You shouldn't be spending any more time in front of the computer than you have to, not only for your own personal health but so that you can be more efficient and proactive in your photography endeavors.
Lightroom is a fantastic image editing software that I use on a daily basis, but when I first started out I fell down the rabbit hole and spent hour after hour painstakingly removing blemishes, adjusting little things, and balancing colors all day long. Was it worth it? No. In fact, although I learned a lot, the biggest thing I discovered from the whole process was that I needed to sharpen my skillset and save time in the post-production stage. I've done the grinding so you don't have to, so read on to find the 7 biggest time-wasting traps you should avoid in Lightroom, and how to avoid them.
Fine-Tuning White Balance
If you're a photographer that likes to rely on automatic settings to get the job done then you may have noticed that despite shooting in the same location for an hour or so, each of your photos is colored differently. That might be because you're using automatic white balance (AWB) which your camera will change depending on the colors and tones you're photographing.
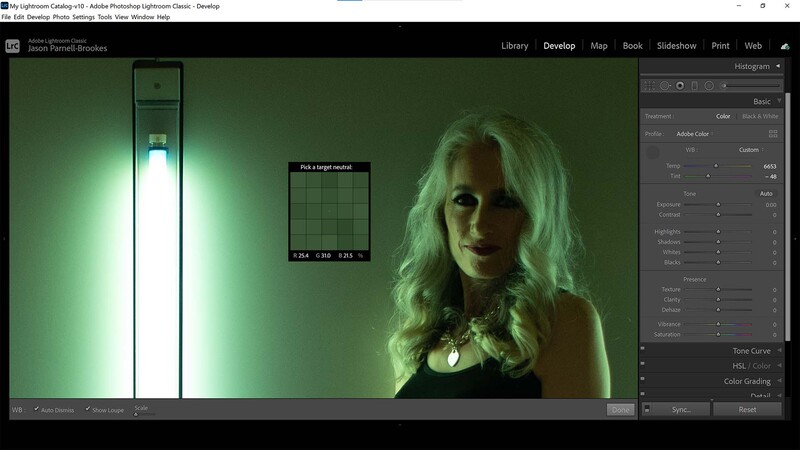
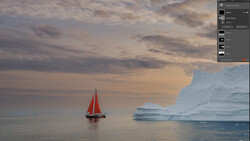
It's tempting to sit there and fiddle with the white balance slider in the Develop module until everything is just right, but there's an easier way. Grab the Eyedropper tool from the top of the panel and click any section in your scene that provides a neutral gray or white tone. That could be the dark side of a cloud, a wall, clothing, or anything else which you determine should be roughly gray or white. Before you commit with a click you can always preview the effect it'll cause in the top-left Navigator box.
Cleaning Noise From Photos
As I said in a previous post, noise in photos is rarely an issue these days. It's more of a problem if you haven't utilized the right camera settings to start with and have to start editing photos to embellish shadows or lift exposure.
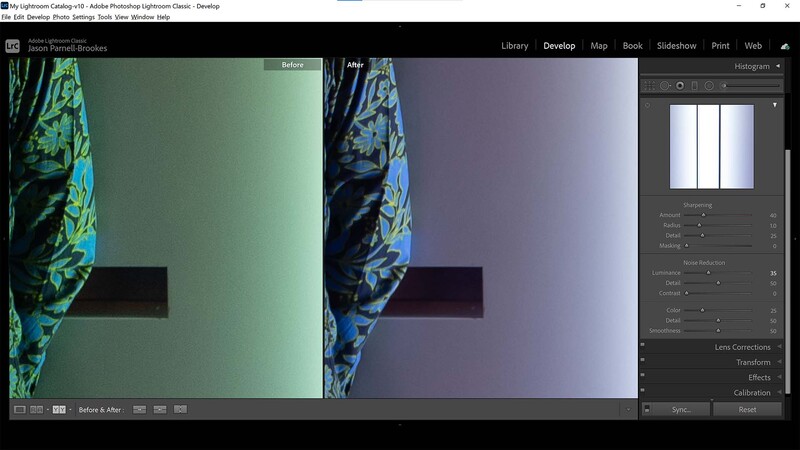
A little slide on the Luminance features in the Detail panel will alleviate most problems, but you needn't worry too much about removing noise. It's better if you perfect the shooting process by either lowering your ISO and using a tripod (if the shutter speed is the problem) or engaging in long exposure noise reduction when photographing.
Running the Same Settings Again and Again
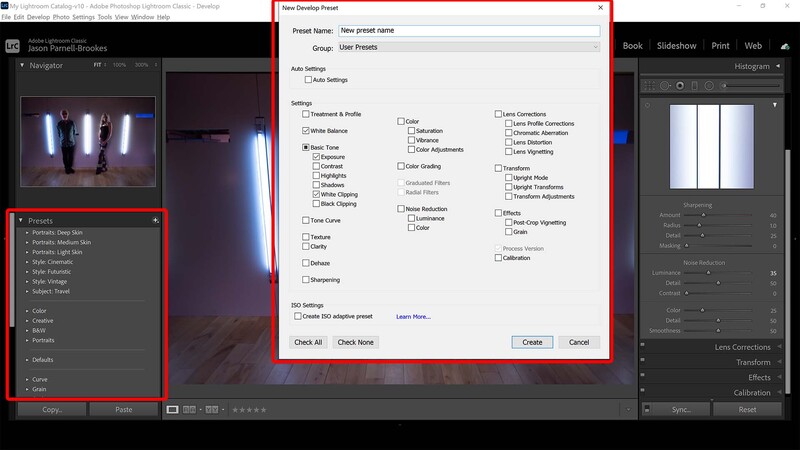
You've run through the whole of the Develop module, dialed in your exposure, calmed down the highlights to reveal more detail, and perfected the curves just so. The photograph is now perfect and you're ready to move on to the next image. You love the style and want to make the same edits to future photos. But you don't need to do everything all over again, just head to the Presets tab on the left of the window and make your own custom preset to apply settings to multiple photos at any time. It might not work perfectly for every shot you ever take, but it'll get you 90% of the way there, and then you can just make little tweaks depending on the type of image you're working on.
Making the Same Edits To Multiple Photos
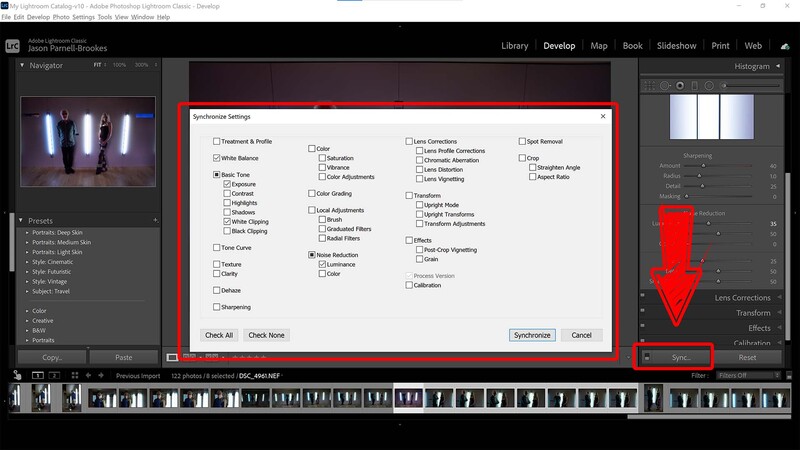
Say you've just imported the latest photoshoot, you have a bunch of shots that are all quite similar to each other. The photos are perhaps covered in image sensor spots or have similar lighting issues you wish to address. Now, you could just race in there and edit everything correctly on the first image, then head to the next and make the same tweaks. Or, you could make those initial edits, then select the rest of the photos in the filmstrip at the bottom of the window (Shift + click), and then hit Sync in the bottom-right. From here you can select to synchronize all settings, so that everything you've done will be applied to the rest of your photos. Alternatively, you could select one, two, or any number of edits you've made to synchronize across the rest of the shoot. Lightroom should process this in a matter of seconds and you'll be all set.
Painting Your Own Vignette
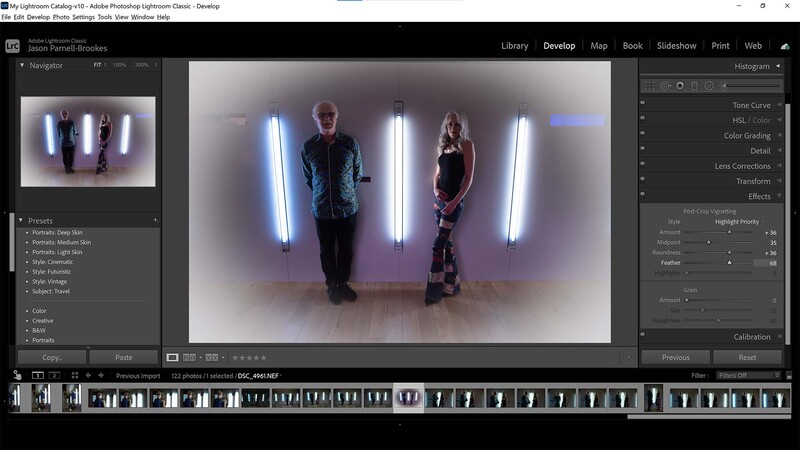
One way to draw focus to the center of a photograph is to use a vignette. Whether bright or dark, a vignette sits around the edge of the frame and pushes focus into the middle of the shot. Some beginners start doing this with the adjustment brush, or perhaps the radial filter. That's a fine way to do it, and will give you a lot of flexibility when it comes to adding in extra detail such as highlights, shadows, color, and more. However, if it's just a lightening or darkening of the vignette that you want, then you might find it much quicker to use the post-crop vignette in the Effects panel in the Develop module. That way, no matter how to adjust the crop of your photo, Lightroom will automatically readjust the vignette so that it fits. This works just as well when combining with the previous step and synchronizing settings across multiple photos.
Keywording Individual Photos
Keywording photos is a lifesaver when you can't remember where your photos are stored. But going through every shot and reinputting the same old words can be time-consuming. Luckily, there's a faster way to do this. Just import your photos to Lightroom, and on the import window add in the keywords. As the files import, Lightroom will automatically attribute the keywords to the photos and you can sit back and relax when it comes to finding that last holiday snap you took in Cancun.
Organizing Your Own Collections
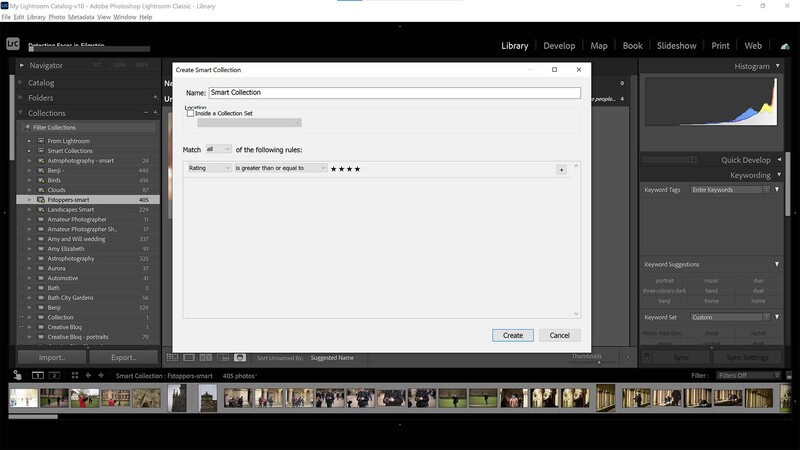
Organization in Lightroom is almost as important as the edit itself. We do this in Lightroom by using Collections which are subfolders recognized solely by Lightroom and are not separated locally on your device. However, just as you can search for certain photos using keywords, you can also have Lightroom automatically add photos to collections based on those keywords by using Smart Collections. Smart Collections allows Lightroom users to add rules to filter shots by, whether using keywords, star ratings, etc. That means no more manual folder-making and time saved organizing your photos in Lightroom.
Main image made in part by Ludo29 & Rama via Creative Commons

Join the Fstoppers community for free
-
Post comments and join in the discussions
-
Browse the site ad-free
-
Share your work and get featured in the community
-
Compete in the photo contests for fun and prizes
19 Comments
8. Read an article of Jason Parnell-Brookes.
:-)
There are many who read the articles on this website who aren't masters of LR, PS, Capture One, or whatever post-processing application that one can use. For them, these articles are quite helpful, and not a waste of time. Jason's articles, in particular, are very instructive to those who are relatively new to the pursuit of photography. I am sure that a seasoned pro such as yourself, can learn nothing new from Jason, but maybe there are others who can. I already am aware of many of the things that Jason writes in his articles, but I often find something that is new to me. I am not a pro, just an enthusiast, and I appreciate the effort that Jason puts into trying to teach.
When I read articles on the website, I humbly consider the words of Emerson, "Every man that I meet is my superior is some way, and in that I may learn from him." The ultimate arrogance to me would be for me to assume that people who don't know what I know are wasting my time trying to get educated.
I read too many articles of this guy which clearly show me he should be a reader not a writer. There are good writers here, he does not belong to them.
Whatever that means. Maybe you shouldn't read his articles. I don't like Stephen King as a writer, so I don't read his books. But a lot of people do, and it doesn't detract from my life that they do. And it doesn't bother me that he continues to write books.
Well, you're right. But after some time I'd like to think things got better and give it another try. But sadly, no progress here.
The trouble with your suggested white balance approach is that an image with a heavy colour cast has no neutral grey tones (just look at your own demo image, for example.). So often the colour cast is THE all-important essence of the image, such as the golden and blue hour hues. Injudicious use, or lack of understanding of the WB tool will filter out these hues, leaving the image looking many miles away from what was intended.
My approach is to see what result the WB 'as shot' gives. Then tweak it if you need. Make a note of the colour temperature, select all the shots in the same shoot and then apply the WB measurement to the batch.
Also, Lightroom will not allow you to select a white area. You will be asked to select a darker area.
What? Just.... what? The eyedropper? Yeah no kidding. You're telling me there are people that DON'T use the eye dropper and just slide those sliders back and forth?? Dear God.....
Don't be mean. Some folks who read this will be newbies to LR and/or photo editing in general. (I've used LR since its incept. I've used PS since 2005. There will always be parts I have never used, but I still browse articles from time to time to see if there's anything I missed or need to refresh.)
Yes, there are people that DON'T use the eye dropper because we know how white balance works. Eye dropper is good if you're just starting out; or, if you want to see a variety of color tones as you hunt-n-peck around the image. Eventually, you may learn what the sliders are doing and you'd be less dependent on it.
The correct and foolproof way to do it is use a grey card or other grey/white photographic standard device. If desired, it's then easy to go to warmer or cooler from that reference point.
Pretty dated. I don't know anyone that still uses those. Think landscape, wildlife, lifestyle, fashion/editorial, weddings, etc. Most folks go with what they feel; or, blindly trust a preset. :D
I have no doubt having a "correct" wb is necessarily for certain types of genre.
"Most folks go with..." How the hell would you know what "most folks" do? Your statement that most folks also "blindly use a preset," I was wondering how National Geo gets those images.
--- "I was wondering how National Geo gets those images."
Well, they didn't have a tiger hold a gray card...that's for sure. Use your head.
Idk I find that unless you specifically shoot a grey card, the eyedropper can be heavily misleading. In reality, clothes that look grey are often a range of hues--perhaps they're printed slightly blue or they're taking on the color cast of a nearby wall or skintone. Just looking at my wall right now, it's a different shade of white than my posters or my blinds. Hell, I can get a bunch of different white balances just by clicking on nearby parts of the same white dress. If you use the eyedropper on every image on various objects in the frame that look neutrally colored, you're going to end up delivering photosets with inconsistent white balance. Even if you copied the same white balance for every image, if you used the eyedropper tool on a shirt collar or something and you don't make a fine adjustment, you're probably using the wrong white balance with every image. Alternatively, if you do make fine adjustments, then you're playing with sliders like everyone you just made fun of.
The way I do white balance is that I consider the lighting, and then I just type in the correct color temperature in Kelvin based on how the image was taken. From there, I might make a tweak to make the image look good to my eye, and then I copy/paste that white balance to every other image taken in the same or similar lighting conditions. I don't think there's any shame in moving the sliders around and going by eye.
Grey card 18% gray; commercial work where color reproduction is crucial the gray card is absolutely necessary.
Yeah if you're in a studio with controlled lighting, the way to go is to pull a white balance off of the grey card and use that white balance for every other shot. Worst case scenario, you can tweak it later, but having that reference is very useful.
If you're shooting an event or somewhere without controlled lighting (say, portraits in a couple's home for example), then if you eyedropper tool off of the wall or something that's not a grey card, you're going to get inconsistent results.
1. Picking too many photo's instead of limiting yourself to the essence.
2. editing to a level no-one but you will notice.
tip: create a workflow like it's a factory. In a factory efficiency is thought out. Personally i work with a music edit console to work with Capture One.
First i do the rotation fine tuning for every photo a-z. Then the same bunch again only for white balance (captures from the exact same spot of course copy paste). Then exposure finetuning, Black point and gamma.
Finally i use 3 standard layers for getting back highlights or lighten up shadows and (3rd) something i created to get more "punch" (which i often use selective). In these 3 i brush in where needed.
Sorry for my bad english.
This is the recipe for big numbers. For that single photo (wether a landscape or portrait) i only do the rotation and white balance part. Go to psd (in 16 bit) for levels and selective adjustments highlights/ shadows / retouche etc.
I often go to ACR from Photoshop to get some detail in some layer and mask it when back in photoshop.
Photoshop stil is THE perfect tool for selective adjustments. No other application i can work this intuitive and fast with. I see when and where my masks are filled and i rapidly put many layers on top of each other or merge them during the proces. Use the right tool for the right job (big numbers in C1 and those selective picked photos in psd).
Oh and also the use of CTO gels for some location portraits helped me a lot for a nice neutral (as possible) surrounding. I know its 3200 i used (/ 2900 / 3800 or without gels in studio 5600K). So i pick the right number for the whole set and finito.
Sorry, but "engaging in long exposure noise reduction when photographing" is certainly not an option for many photographers. I definitely don't want to wait another minute or two (depending on how long the exposure took time) for the camera to take a dark frame for something that can be easily remedied in LR. Losing valuable shooting time is only under a few circumstances an option. If you are shooting timelapses it is an absolute no-go.
Moreover additional heat is also generated when taking that extra frame, thus aggravating the potential problem with noise.