

I have to admit it: I’ve never been on team Lightroom. This may be a bit of a low blow, but Lightroom has always seemed like the sandbox for those who couldn’t play on the big-boy playground: Photoshop, of course.
Even so, I use Lightroom every day. I import my pictures, run them through a basic preset I created, cull, and export my selected keepers to work on in Photoshop. I know Lightroom has made notable changes over the last year, so when I saw the Mastering Adobe Lightroom With Pye Jirsa class, I thought it would be a good idea to pull my sleeves up and make sure I was getting the most out of my software.
Having used Lightroom for about 15 years now, I found I knew most of what was covered in the material. I think this would be the perfect class for photographers learning Lightroom or for those who have a basic knowledge but want a deeper skill set in the software. Even so, I picked up three tips that have been great add-ons to make my editing more precise and faster. There is still one aspect where Lightroom under-performs glaringly, and I will touch on that at the end. First, what I learned.
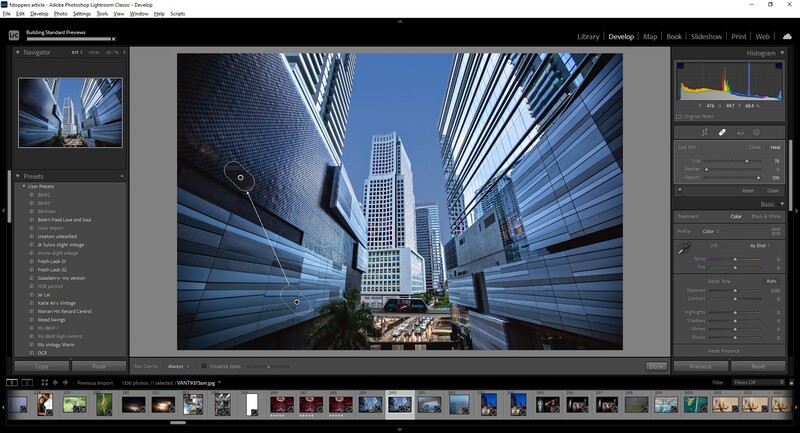
1. Sharpening Using Radius
The Sharpening Tool has four different sliders: Amount, Radius, Detail, and Masking. In the past, I’ve only used the “Amount” slider, and sparingly at that. It’s not too long before the images look overly texturized and grainy. I do more precise sharpening in Photoshop, using High Pass and other adjustments. What I learned in the Fstoppers class was that "Radius" allows you to sharpen the area around the edges. The default value of 1.0 means that Lightroom will apply sharpening over one pixel around the edge. If you increase the radius to 3.0, sharpening will be spread over three pixels around the edge, resulting in thicker, more defined edges. This allows you to get more dramatic edges without oversharpening the entire image.
2. Photo Stitching for Panoramas
You surely know that images can be stitched together in Photoshop to create expansive landscape panoramas and more, but did you know that Lightroom CC released this capability in 2021? It’s shockingly effortless and quick. Here is a video on how to stitch together images in Lightroom.
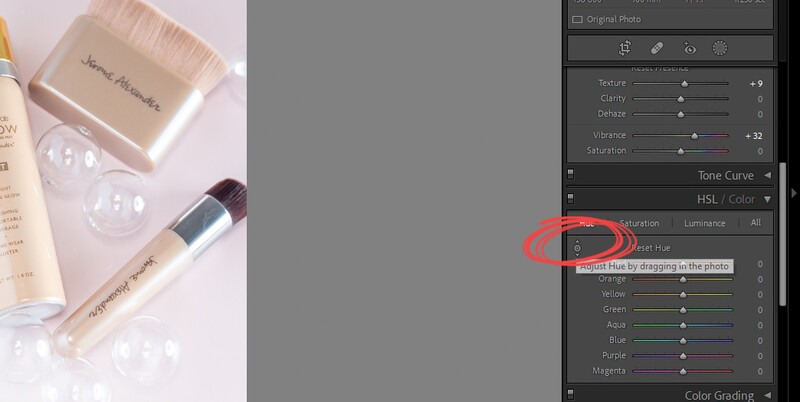
3. Selecting and Adjusting a Specific Color
Do you ever love an image, but the color or saturation are off in one color range? Maybe it was a model wearing a hot pink top, or the grass that looks more yellow than green. If you find yourself in this scenario, there is a tiny dial in the top left corner of the HSL/Color tab that will quickly become your new best friend. You can click it, and using the eye-dropper, select the specific color you would like to adjust.
Now, the one thing I simply cannot understand about Lightroom is its sampling. For all the AI advances Lightroom has made in the latest versions, how is the sampling for spot correction so unintelligent? Here are a few screenshots of where Lightroom chose to sample in these no-brainer scenarios.
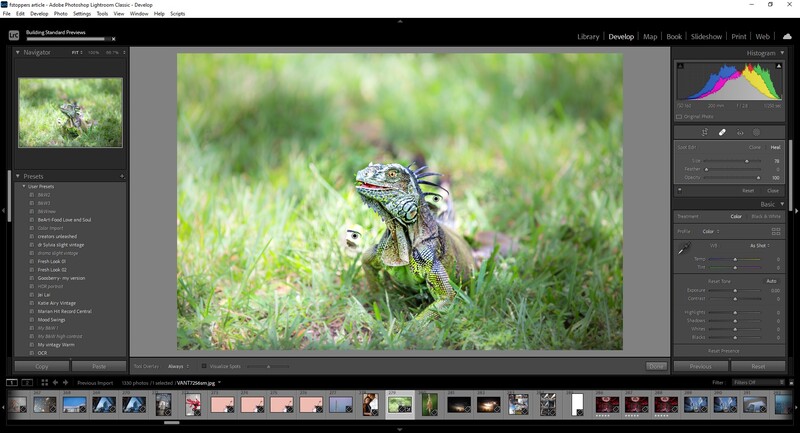
You can see in the image above it chose to sample the edge of the iguana's head instead of the grass.
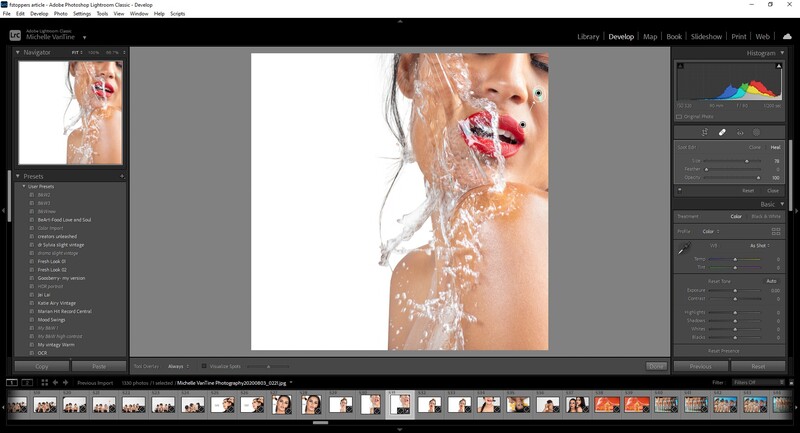
Here again, it chose to sample the edge of the red lip for the skin.
In this shot, Lightroom chose to sample from a completely different pattern rather than the surrounding texture. In the Cloning and Healing section in the Mastering Lightroom class, Pye Jirsa noted: "sometimes, Lightroom doesn't do a great job at sampling." I was vindicated that I wasn't the only one who thought so.
With its new features such as layered masking, subject and sky selection, and more, has Lightroom made enough improvements for it to be a plausible all-in-one stop for editing? For me, not yet. It's just not as precise and intelligent as Photoshop is. It does a good job but not a great job too often. Though, I've started to do more in Lightroom before heading over to the big kids' playground. Lightroom feels faster and better for making broad adjustments over big batches, but in my book, it doesn't come close to measuring up to what I need to take an image from raw to deliverable.
What about you? Do you love it? Hate it? Are you somewhere in between like I am? Are there any new improvements in Lightroom that have revolutionized your editing? How does it compare to Photoshop? Leave a comment below.
Happy editing!


Join the Fstoppers community for free
-
Post comments and join in the discussions
-
Browse the site ad-free
-
Share your work and get featured in the community
-
Compete in the photo contests for fun and prizes
66 Comments
Ingestion of all filetypes compatible with all Adobe software. It's a link between all creative software.
I agree that C1's layers are awesome, and the magic brush tool is... 😙👌 That said, the new masking tools in LR are also pretty great. Selecting subjects and skies with one click is VERY useful.
I think the headline should be “Do you hate Lightroom as much as I do?”. As it stands you’re assuming we hate you!
Thank you for that! I'm always trying to become a better writer. Ironically English is my 2nd language so I appreciate the grammar note. Cheers!
One letter, one number, one emoji: C1❤️
Okay here's a tough one though... C1 vs Photoshop- who wins. Don't break my heart here.
Those are two different applications, I use C1 to tether and then process images while Photoshop is an image editor. If Lightroom wasn't part of the Adobe package, I wouldn't even have it on my computer.
As Tony already said, they have completely different functions.
I like the specific tools and power of PS but it's interface and editing modes are a giant pain in the butt and clunky to me. It's like having to get out a giant machete and put it away for each action everytime you want to put peanut butter on several sandwhiches. I like seeing and working on groups of photos as a whole and many times I toss what I've done and restart. PS is not the tool to do that.
I’ve put up with Lightroom (and now Lightroom Classic) for quite a few years, and I was really excited to switch to Capture One after hearing so many good things about it. I was extremely surprised to find out that I don’t love it nearly as much as I had hoped I would, even after using it for a year or two now.
First, the good: tethering is miles ahead. I shoot Sony, so in order to tether in Lightroom, I have to run Imaging Edge for capture, then set up an Auto Import folder in Lightroom. It’s ridiculously slow if you’re shooting anything where the process requires a steady pace of images (like portraits). You could get by if you’re doing elaborate product shots where it’s a much slower shooting pace.
Also, performance is way better in C1. Doesn’t lag nearly as bad as Lightroom. Not as perfect as I had hoped, but still very good.
Unfortunately, I found some of the editing tools lacking a little compared to Lightroom, which shocked the heck out of me. No masking slider for sharpening? I’m dumbfounded just how useful this is in Lightroom and why C1 doesn’t have an equivalent (at least none I’ve found). The transform tool in Lightroom is also way better, which I use all the time. Syncing edits across multiple images seems to be way more intuitive in Lightroom as well. Lastly, the deal breaker for me: the Camera Calibration tools in Lightroom. SO powerful. I can’t fathom why there isn’t an equivalent in C1.
I still use C1 for tethered shooting (it’s essential) but more often than not I wind up doing the RAW processing in Lightroom (then onto Photoshop for the fancy stuff).
Really the only thing that drives me absolutely crazy with Lightroom is the abysmal performance. It’s maddening. My theory on why some people have issues and others don’t is this: high resolution images (30-40+ megapixels) + high resolution monitor (i.e. 5k) = Lightroom’s Achilles heel. It doesn’t matter what tips and tricks you throw at it… cache size, catalog size, more memory, etc. I think it puts too much of a strain on most CPU’s and craps out as a result. It’s most evident when trying to work between multiple images. The only thing I’ve found that helps at all (though not nearly enough to be acceptable) is to change the default sharpening on all images to 0. Lightroom chokes extra hard when it has to keep rendering images with sharpening applied (default is 25). Either way, it’s stupid that a professional photo editing program can’t handle a professional camera and professional monitor. It’s that type of shortsightedness that makes me wonder WTF Adobe is doing over there.
As an observation and NOT as a criticism of you or your use of Capture One...There is dearth of instructional information for Capture One in comparison to PS or LR. The articles, video, how-to descriptions for PS and LR are legion and you can find something on just about anything you need to do - often with a few variation on technique. But for Capture One you need to learn the program in a different way. Because it started off for feathered shooting and is by some considered to be a "pro" application, the "how-to" component isn't as robust. But, once you figure out how to do things like sharpen, the results are impressive and without the Adobe bloat. You may find that when looking for an equivalent process from PS for LR to Capture One, you'll believe that there isn't one (sometimes true for somethings, e.g. focus stacking). But often it's done in such a different way you'll be surprised to find that it is possible, just not in the way you expected or with the nomenclature you are accustomed to from PS or LR. Capture One has excellent videos on its YouTube channel and there are some third-party instructional videos and tutorials. So I'd suggest preserving with it and see if in time you come to love it more. Just a thought.
Agree that there's not as much in-depth content about C1 out there. But as far as I can tell I've been through every menu / feature and there is no equivalent (or even close) to the Camera Calibration panel in Lightroom, or the masking option for sharpening (more specifically, the masking preview/overlay you get when you hold down the alt/option key).
There's a difference between having to learn a program in a different way and a program not having the ability to do something altogether (sharpening mask preview). Almost as bad is having to adjust at least 5-6 different sliders to almost sort of come close to getting a similar result to what one slider does in another program (Camera Calibration), and that's just for one of the 7 sliders in Camera Calibration.
There's a reason people have submitted enhancement requests for that feature. It's because it's doesn't exist in C1. No amount of tutorials are going to fix that.
Use Bridge for viewing tethered files. Should be quicker, as it's a lighter weight program.
With Lightroom and C1 you can have adjustments apply automatically at capture, as well as easily tweak them while you're shooting. That's a huge part of a tethering workflow. Bridge isn't an editor so you don't have that option.
Don't get me wrong, I use Bridge for culling when I have a large number of files that were shot directly to the camera (I made another comment above about that) but for tethering it's just not as practical.
"Really the only thing that drives me absolutely crazy with Lightroom is the abysmal performance"
I'm not the only one!!!! I'm not crazy! I have the exact same issue which is the whole reason i switched to C1. I'll try your tips and see if helps with performance. My cameras shoot 36mp and 102mp so I hope it helps D:
My go-to for tone and color. I add NR, lens corrections, and sharpening in DXO, then export DNGs to LR for editing. Super quick workflow, as DXO is basically automated (1 preset works equally well for everything), and I have a decent LR preset I've tuned for a while to make most images look decent out of the box. Only exposure, WB, and cropping/straightening are required after that. I can blow through a wedding in under 6 hours, with the longest part being culling (source of all evil). Love LR, though I wish Adobe would hop onto the AI NR bandwagon, and get better lens profiles. DXO blows them out of the water on both, but again, requires near zero interaction.