Removing unwanted objects from your photos is now easier than ever thanks to Lightroom's new AI-powered removal tool. Knowing how to properly use this tool can quickly elevate your editing skills and save you significant time during post-processing.
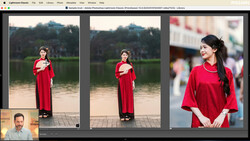
Coming to you from Aaron Nace with Phlearn, this practical video demonstrates the powerful simplicity of Lightroom Classic's new generative AI removal feature. Nace begins by effortlessly removing two assistants from a shot—one holding a diffusion panel and the other a reflector—using just a few simple brush strokes. What's striking here isn't just the effectiveness, but how seamlessly the AI fills in background details once people or objects vanish from the frame. You might have previously relied on the Spot Healing or Clone tools, but Nace strongly advises using the generative AI option instead because it yields consistently better and more natural-looking results.
Beyond basic object removal, Nace guides you through several subtle but impactful editing techniques. After clearing out distractions, he adjusts exposure, lifts shadows, and enhances vibrance to highlight color and detail effectively. More importantly, he demonstrates how using Lightroom's masking tools, particularly subject selection and radial gradients, can significantly improve focus and draw attention to your primary subject. Even though the assistants initially blocked direct sunlight, clever masking techniques restore balanced lighting, emphasizing your subject without overexposing them. Understanding how to control exposure selectively can help your subject stand out, creating a cleaner, more engaging final image.
An additional editing technique Nace covers is the Transform tool, useful for correcting minor but visually distracting issues like skewed lines or slight asymmetry. This feature is especially valuable when your composition has architectural or symmetrical elements, as even minor imbalances can draw unwanted attention. Nace demonstrates how careful horizontal and vertical adjustments can subtly enhance the symmetry of a photograph without looking unnatural. He also shows you how to effectively crop the image afterward, further strengthening your composition and eliminating unnecessary visual clutter.
Throughout this video, Nace consistently emphasizes simplicity. The idea isn't to rely on complex processes but rather to leverage straightforward adjustments that deliver noticeable results. He also shares useful shortcuts—such as using keyboard brackets to quickly adjust brush size or the slash key to toggle between before-and-after views—which speed up your workflow and reduce the time spent editing. Check out the video above for the full rundown from Nace.


Join the Fstoppers community for free
-
Post comments and join in the discussions
-
Browse the site ad-free
-
Share your work and get featured in the community
-
Compete in the photo contests for fun and prizes
1 Comment
I've tried this a few times and it's unreal how well it works. Good video.