
Once, photographers converted their precious raw files into DNG files, which promised to be future-proof. There might be another reason: there is a DNG file format with lossy compression. Could this be future-proof and save disk space at the same time?
In case you didn’t know, DNG stands for Digital Negative, an uncompressed raw file format invented by Adobe in 2004. It should have become the standard raw file format, but camera manufacturers stuck with their own proprietary format.
Adobe claimed the DNG format would be future-proof. That’s why many photographers started to convert their raw files into DNG files. However, there is no true advantage in this, and even the new proprietary raw file formats are supported by every image processing software.
Perhaps there is a new reason to convert raw files into DNG. Although it’s not mentioned or advertised, Adobe has had a lossy DNG format for some years now. This compressed DNG file saves up to 90% disk space. This means a 25 MB raw file will become only 2.5 MB.
The decreased file size might be a reason to switch to lossy DNG because you can store a lot more on your computer. However, the lossy DNG will discard image information. This will lead to a decrease in image quality.
Making a Lossy DNG File
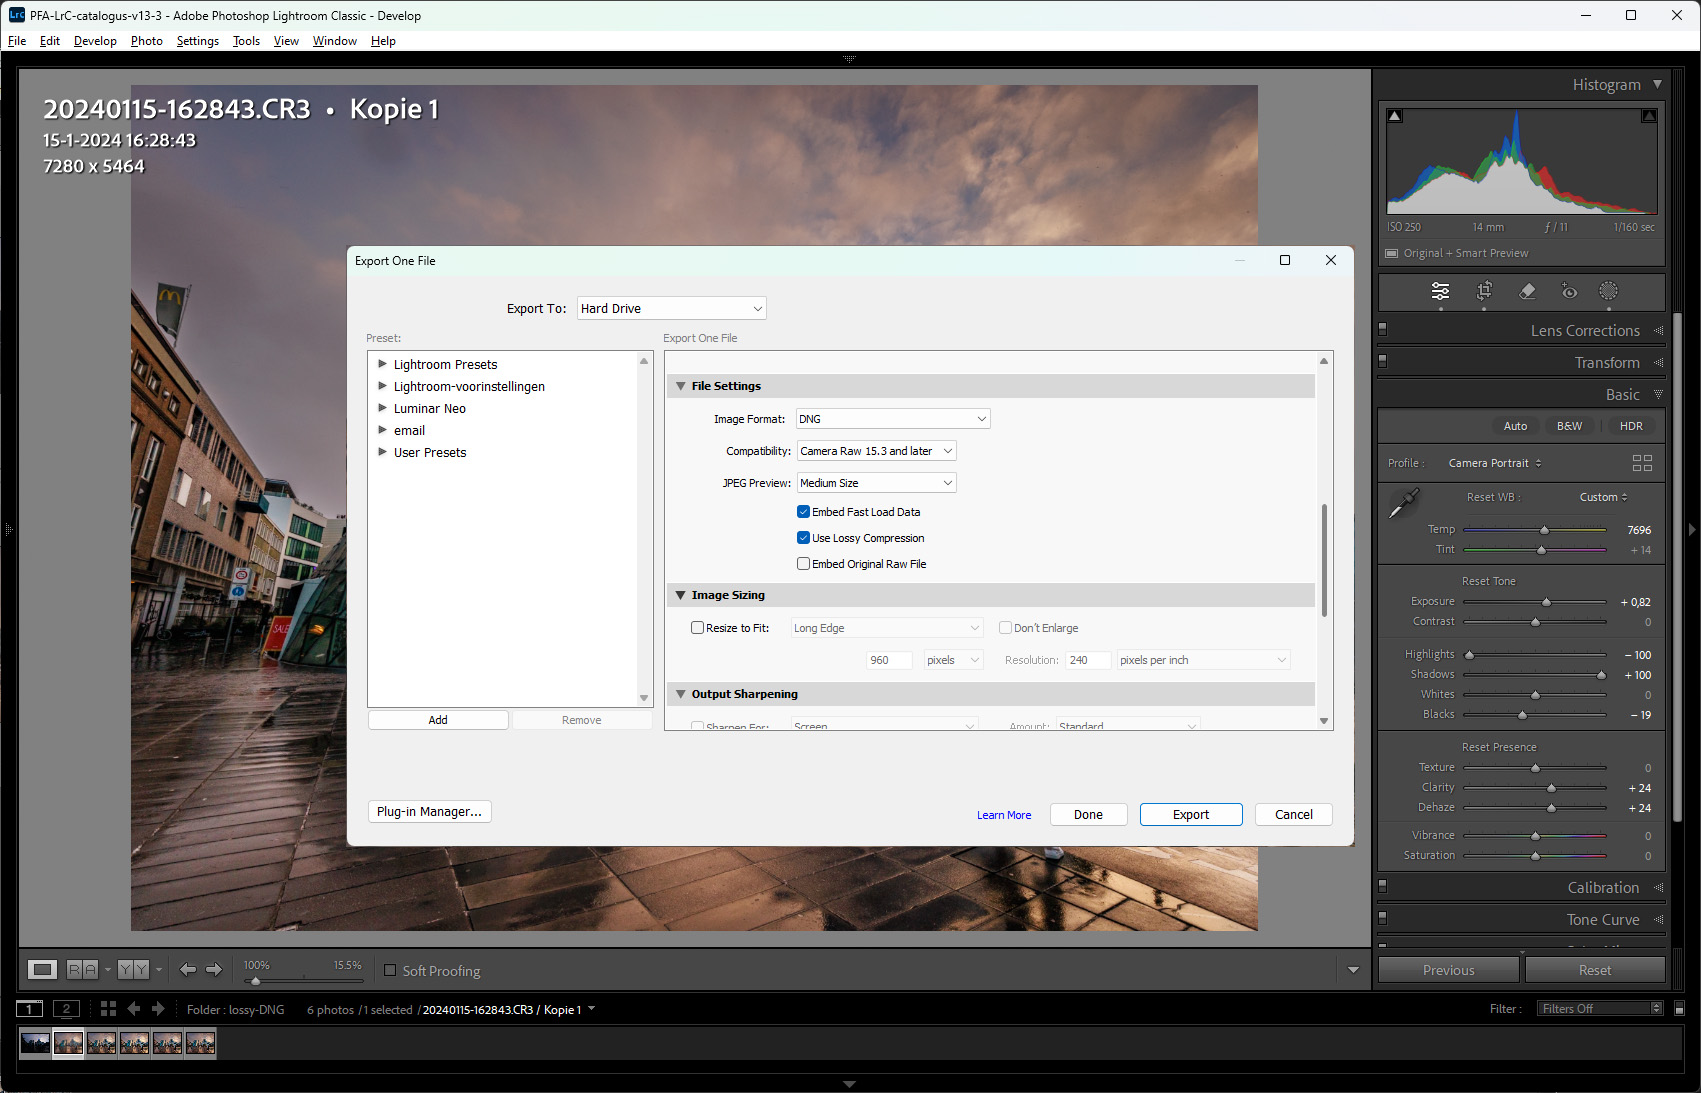
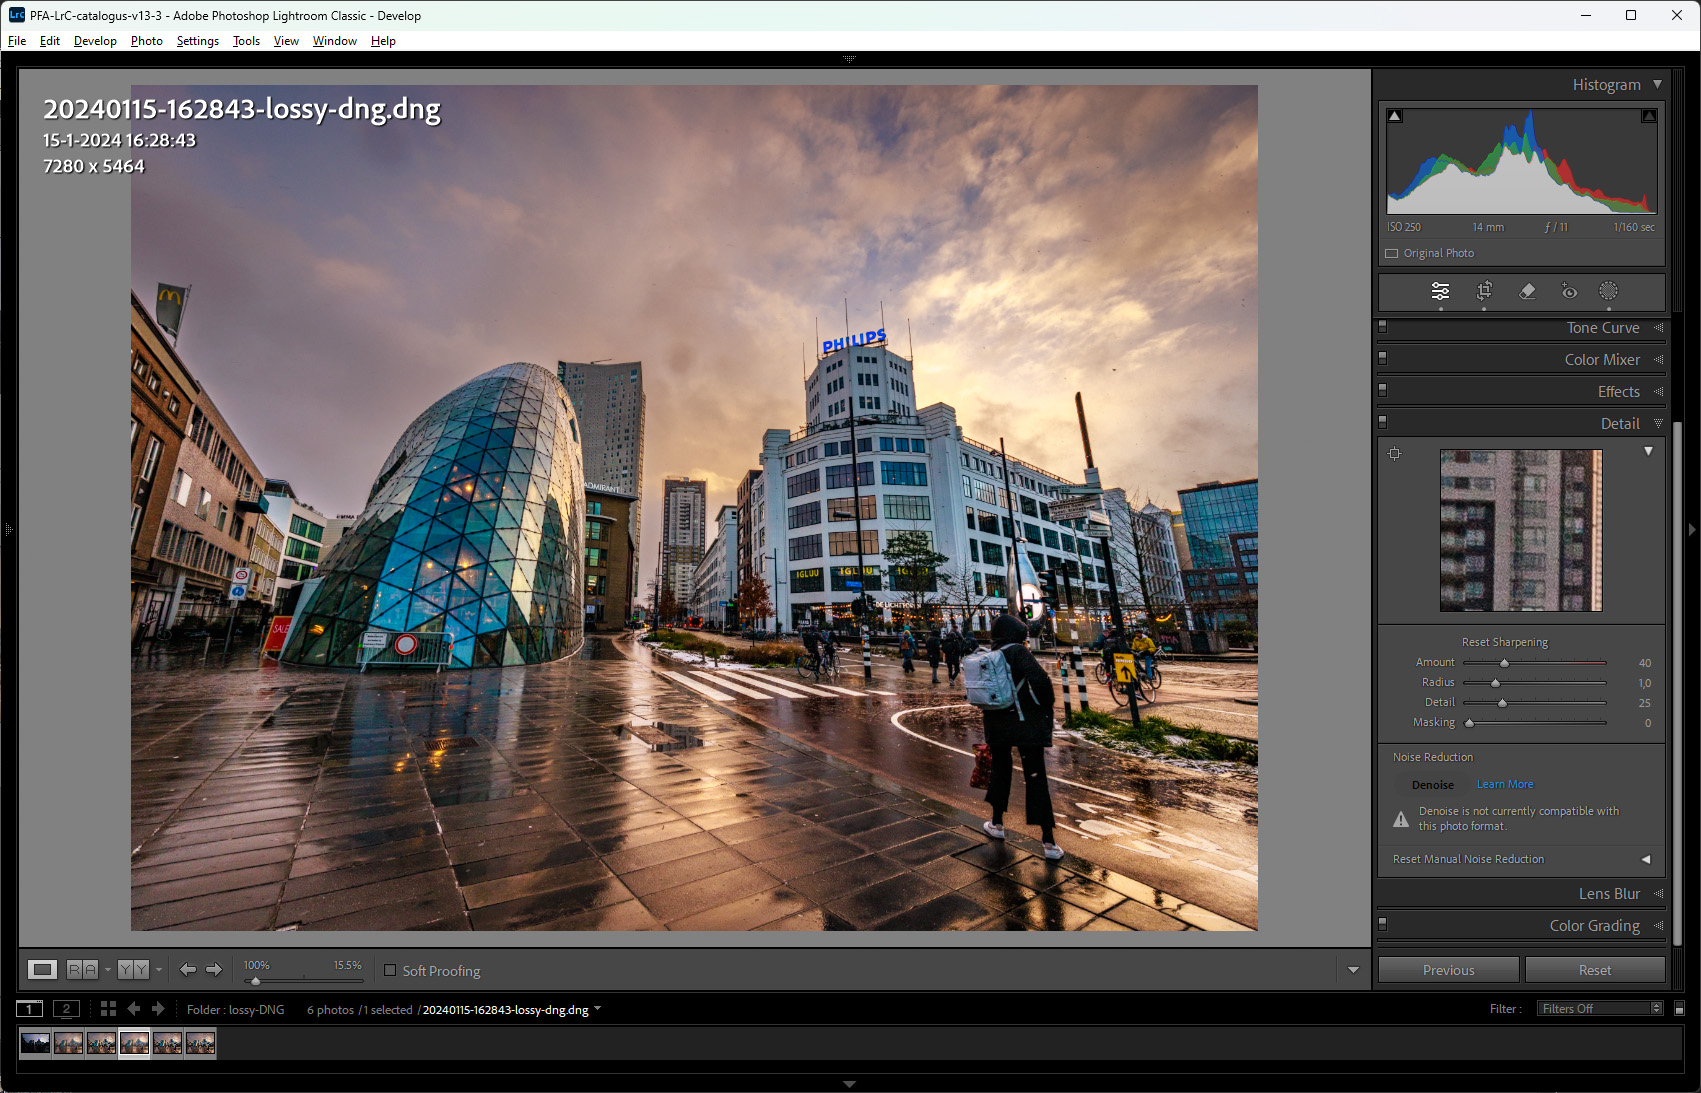
Any DNG converter Adobe makes can convert your raw files into lossy DNG. One of these ways is through Lightroom Classic. You can find the option to convert to DNG in the menu, or you can export a raw file as a DNG file. I use the latter in this example for reasons that will become obvious.
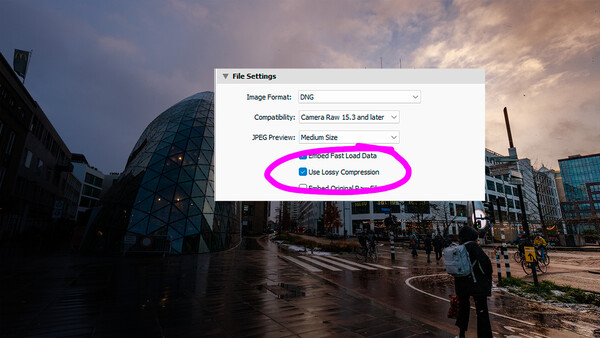
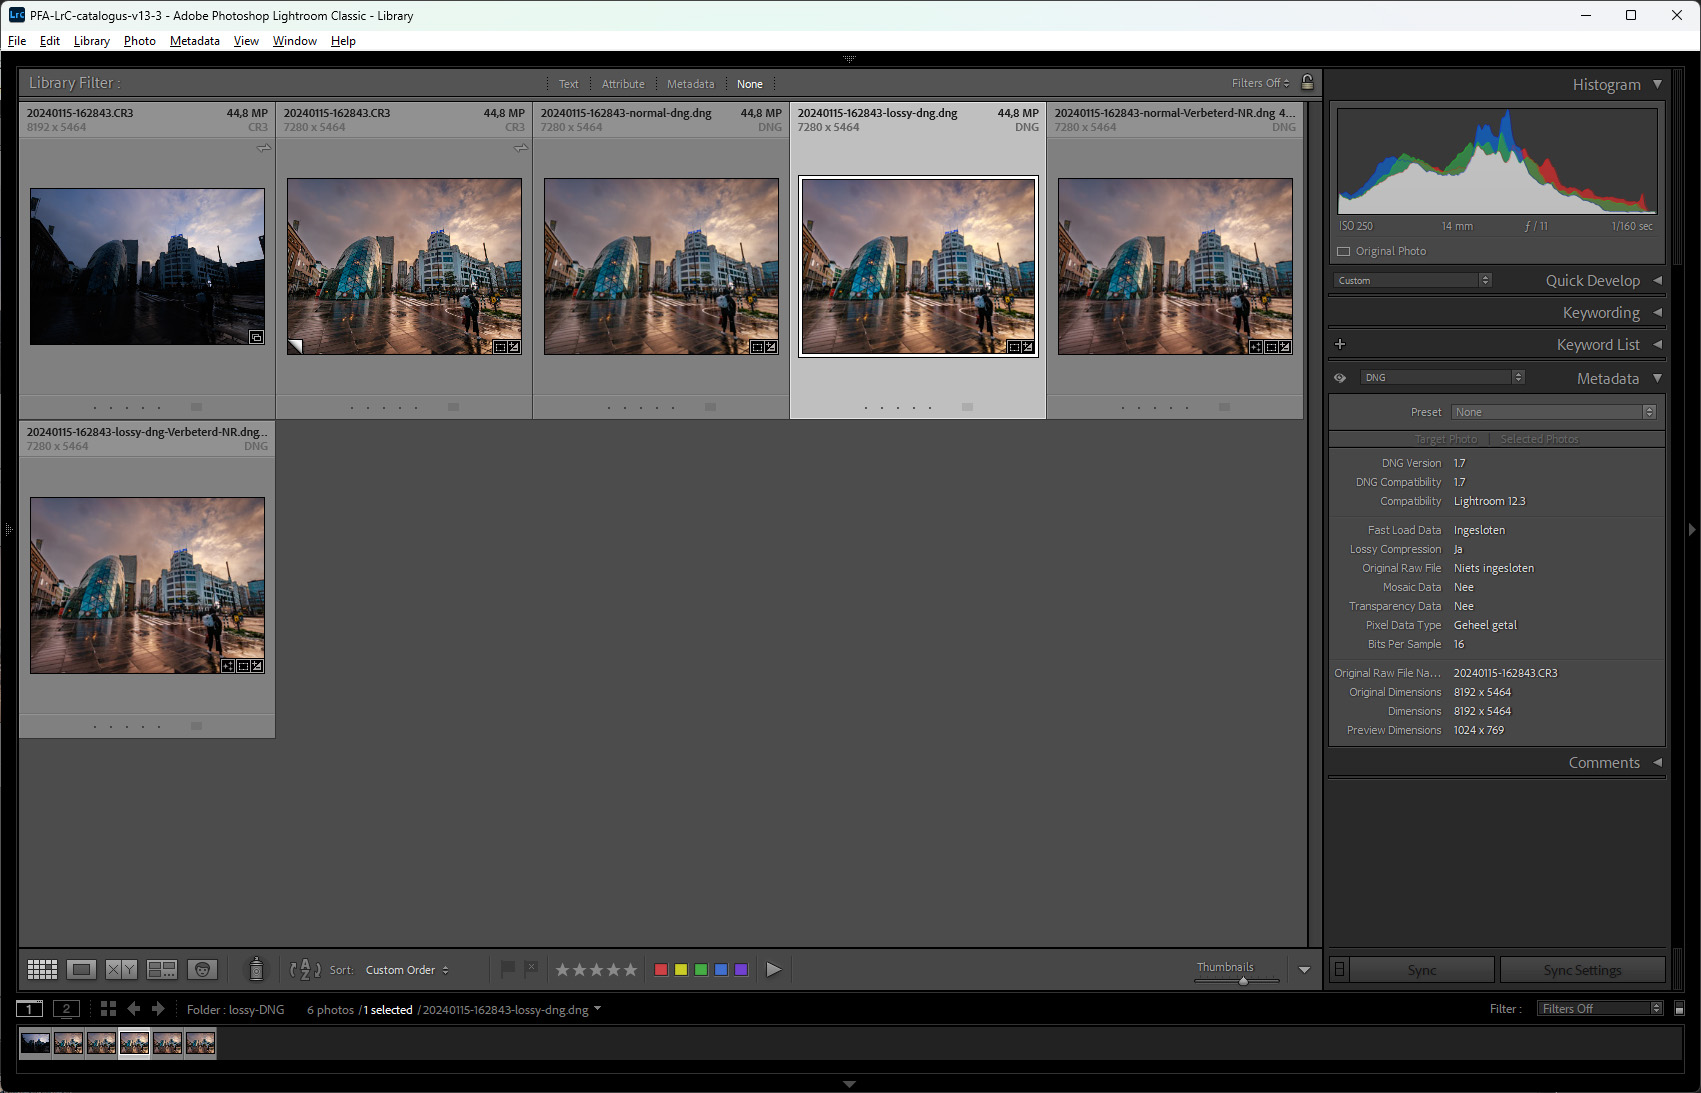
I have chosen a high-contrast CR3 file from my Canon EOS R5 to export as a lossy DNG file. To do this, you need to check the option ‘Use Lossy Compression’. I also exported a regular lossless DNG for comparison.
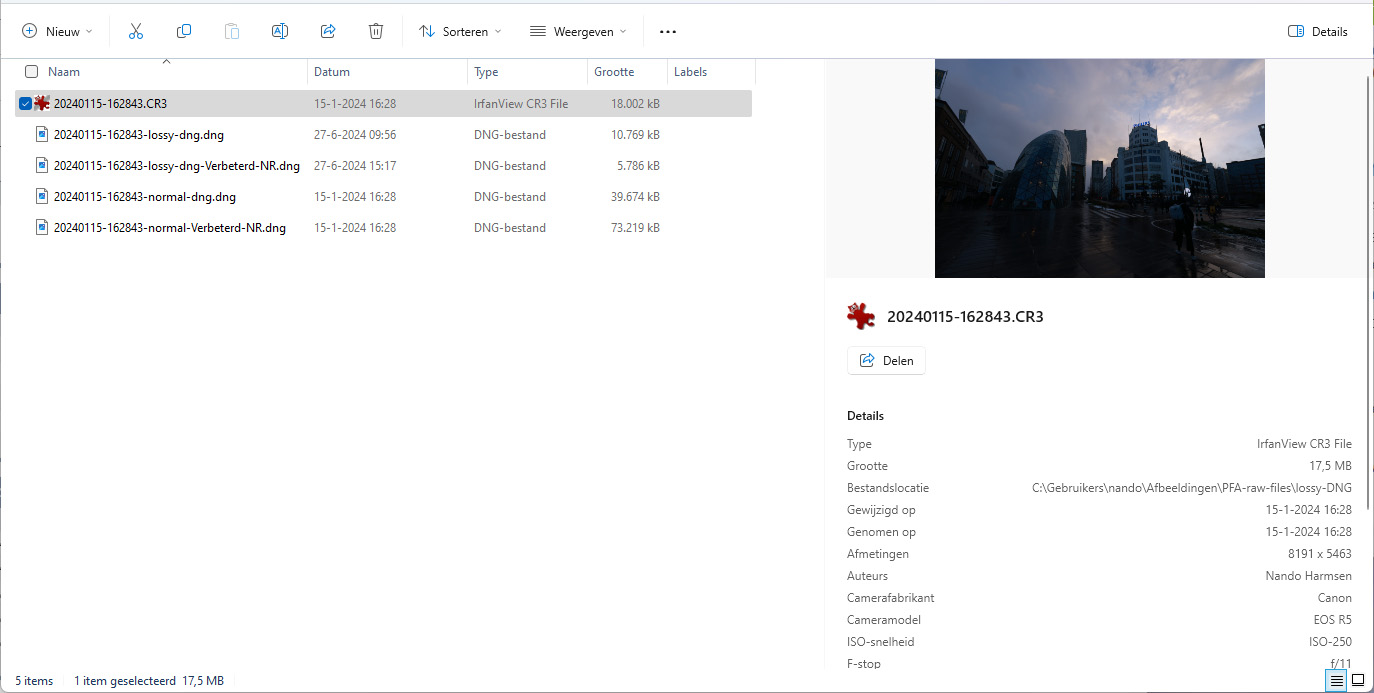
Because I use a compressed CR3 file format, the difference in file size between the original raw file and the lossy DNG is approximately 50%. The difference between uncompressed and lossy DNG is larger, for obvious reasons.
It is important to realize that the lossy DNG file is no longer in raw file format. It’s mentioned in the DNG file information that the mosaic information is removed. In a nutshell, this is the raw sensor data that makes a raw file what it is. The image processing software will no longer recognize the file as a raw file.
The Quality After Post-Processing
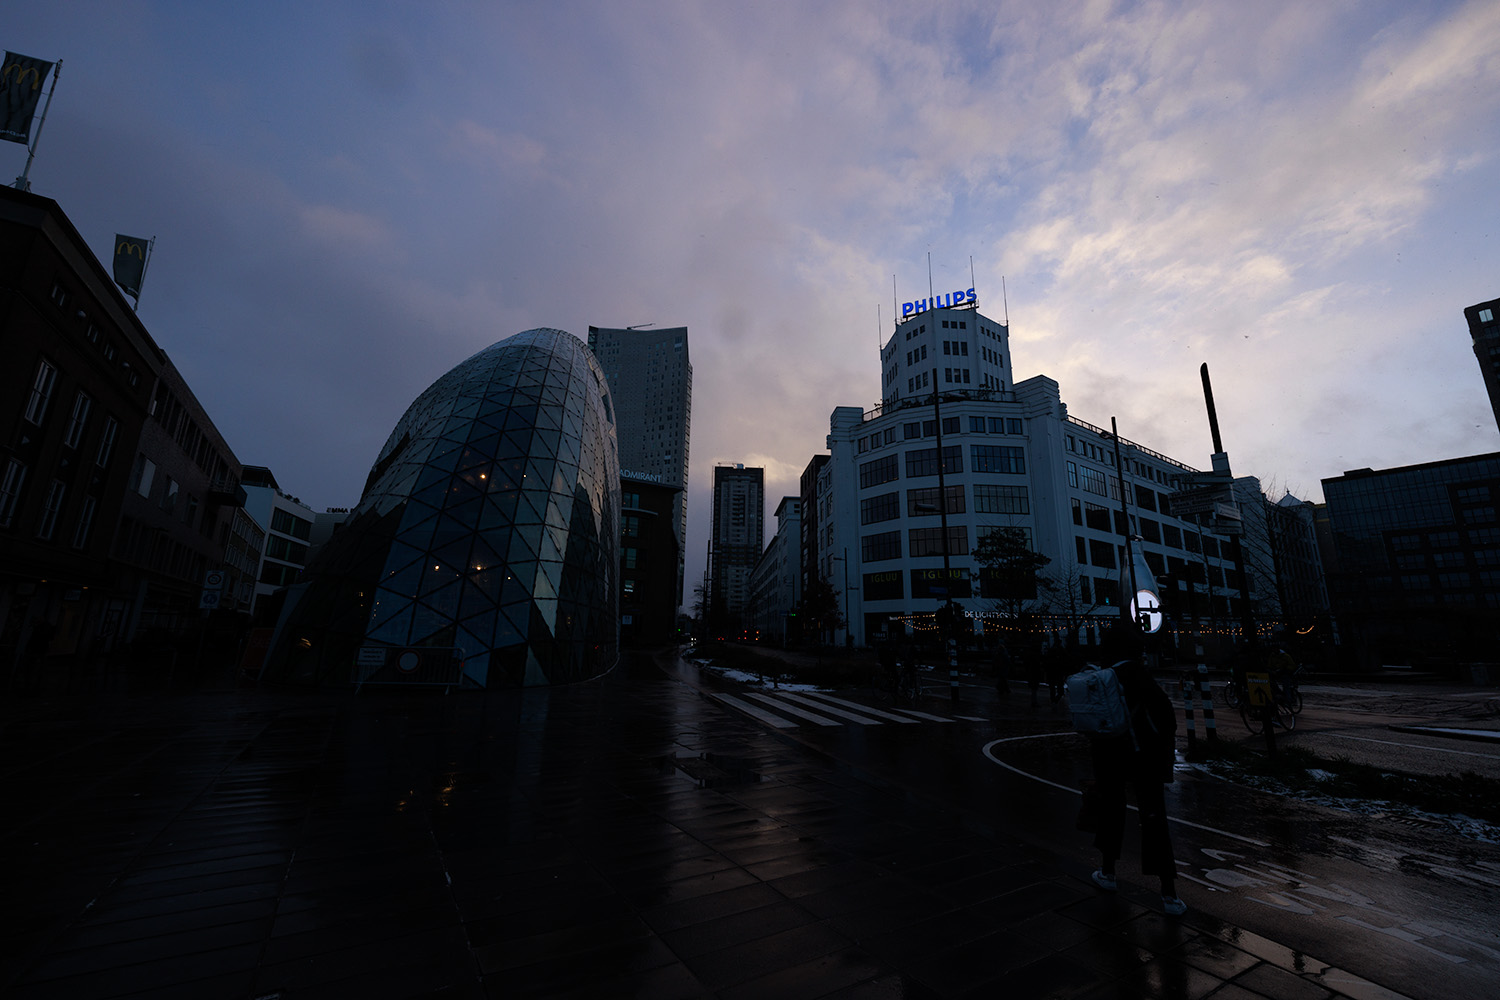
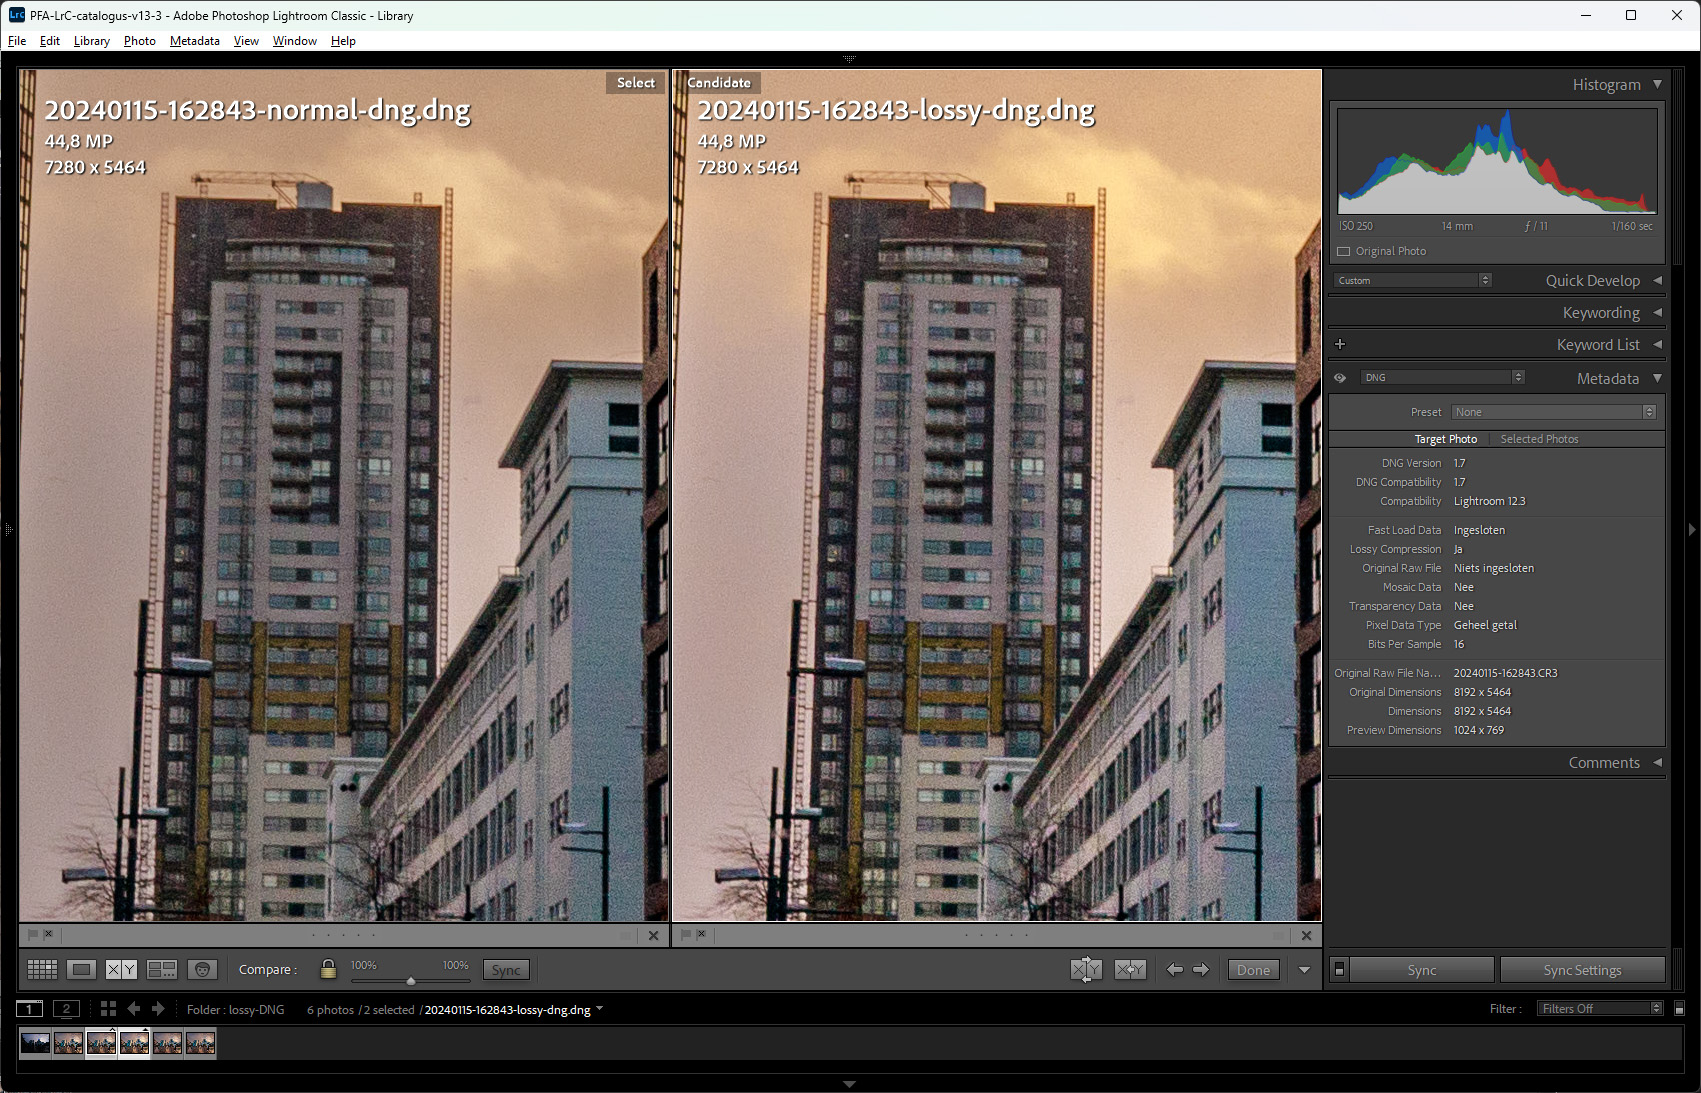
At first glance, there is no difference between a normal DNG and a lossy DNG. The differences become obvious after the image is post-processed. I have lifted shadows a lot and pushed the boundaries of what’s possible. This processing steps are exactly the same for both DNG versions.
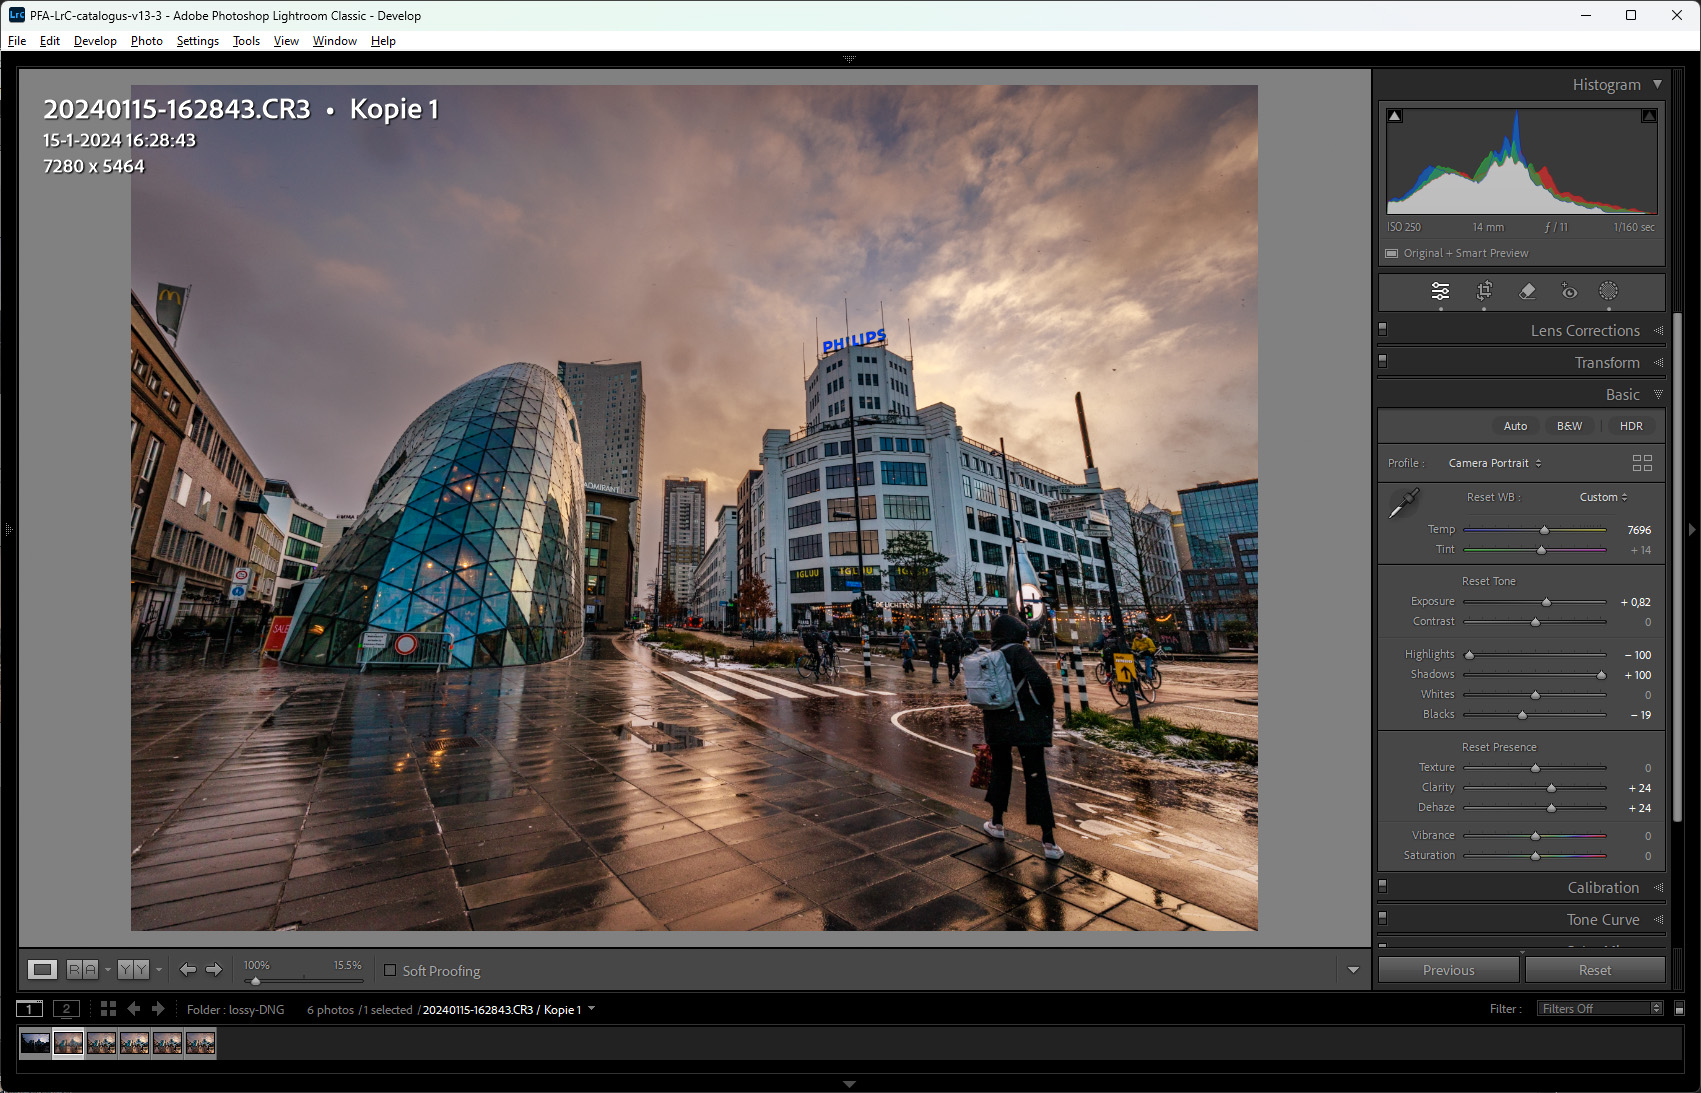
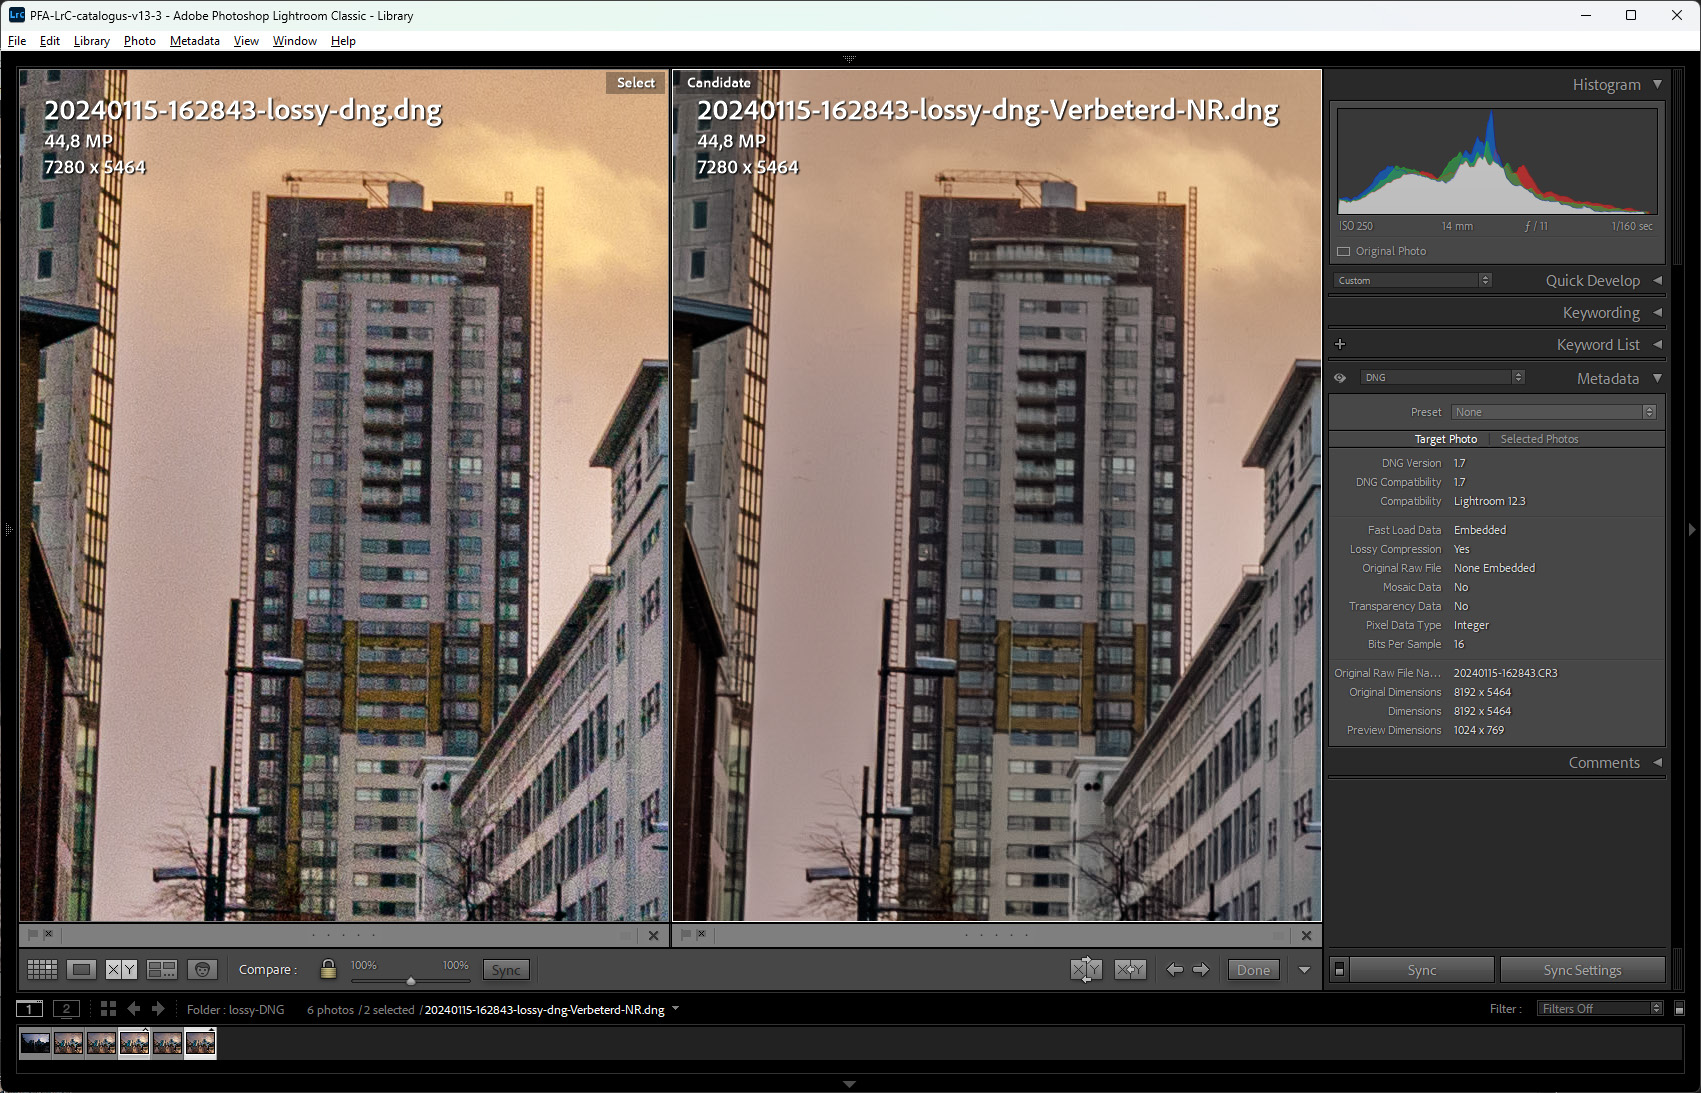
To see the difference, the processed images are exported as a 75% jpeg in a normal web-sized format. Again, the differences are nearly indistinguishable at first glance. This changes when the full-size images are checked at 50% size or more.
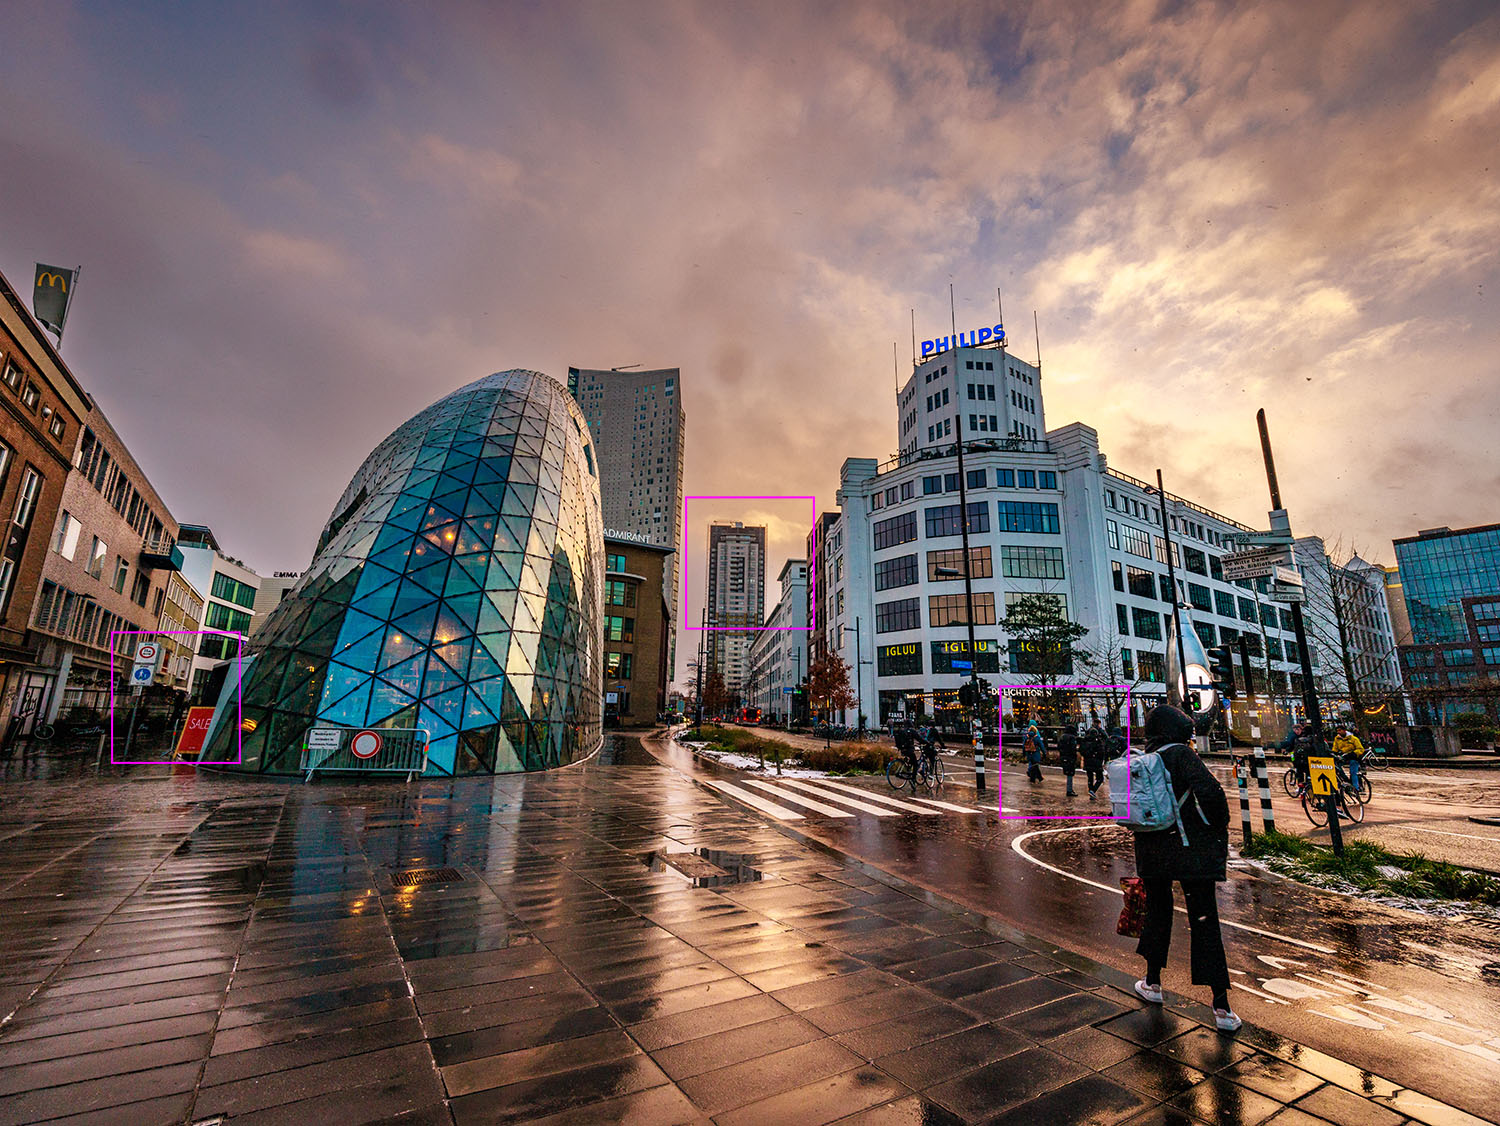
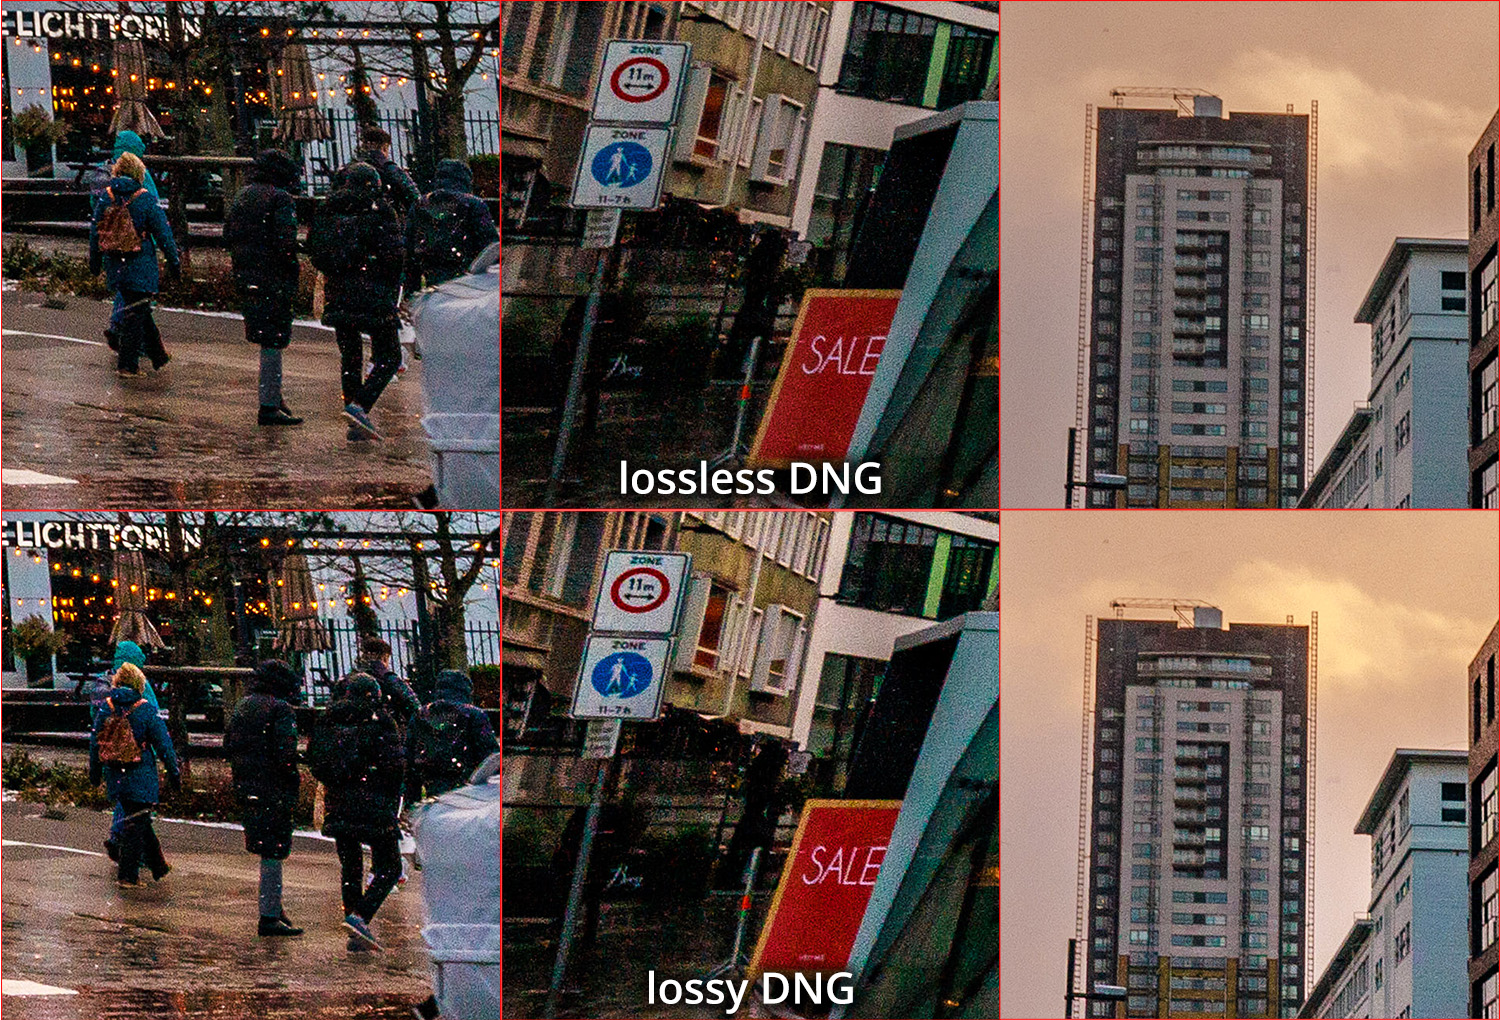
As expected, the lossy DNG shows a deterioration in quality. There is a loss in detail, increased color noise, and jpeg artifacts. The processing, although exactly the same, results in harsher colors and slight oversharpening as well.
Using AI Noise Reduction
One of the recent popular features of Lightroom is AI noise reduction. This new feature is limited to raw file formats. Since the lossy DNG is no longer a raw file format, it’s not possible to use the AI noise reduction feature.
However, there is a workaround. It is possible to perform AI noise reduction prior to converting into lossy DNG. Something peculiar happens. The DNG file that is saved from the AI noise reduction step is almost twice as large, as can be seen in the screenshot of the different file sizes. But when the file is converted into a lossy DNG, it’s even smaller compared to a lossy DNG without AI noise reduction.
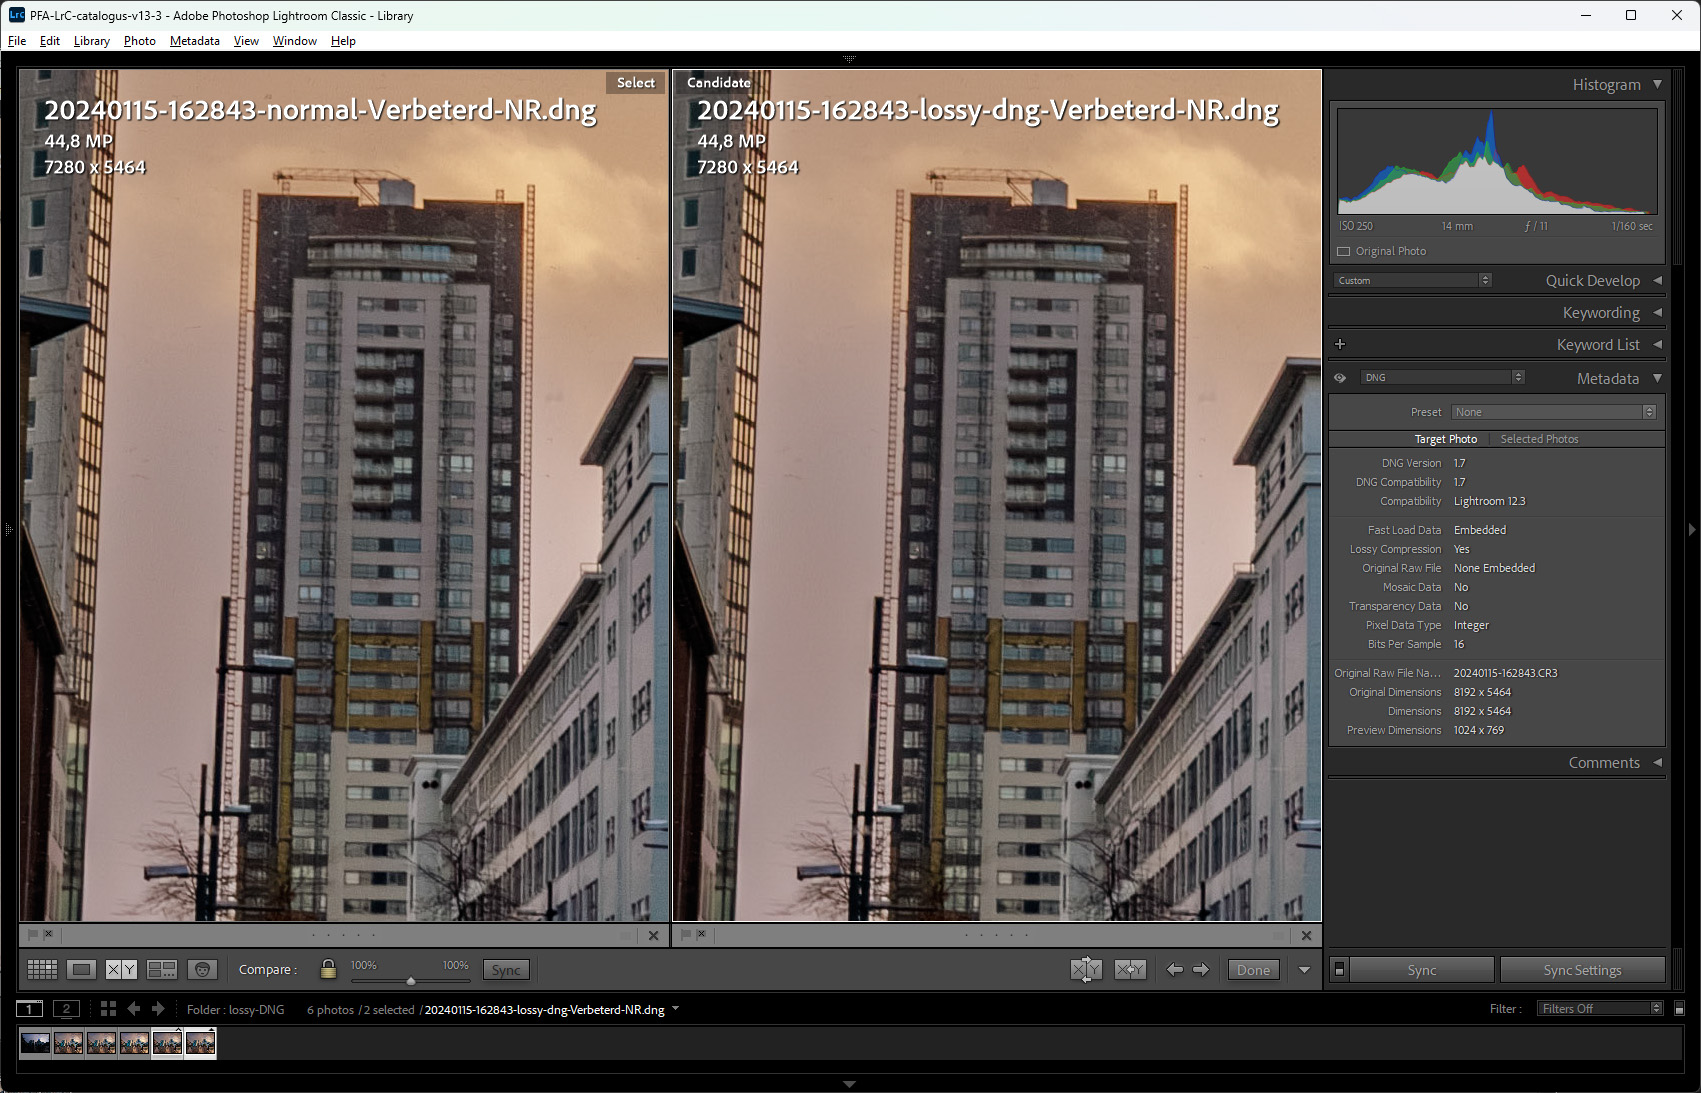
If the image with AI noise reduction is compared to the uncompressed DNG, any differences that were previously visible are no longer there. That’s why I would prefer the export to DNG method instead of a regular DNG converter, or the convert to DNG option in the menu. It allows the use features like AI noise reduction.
Regarding Saving Disk Space
The main reason for using lossy DNG is saving disk space. Although the amount of file size reduction is nowhere near 90% in my example, it is still significant. When compared to uncompressed raw files, the amount of file size reduction reaches the acclaimed 90%.
However, is it worth the time and effort, not to mention the loss in image quality? A small calculation shows what saving disk space truly means. I assume a regular raw file is 25 MB in size. How many images can be stored on a hard disk?
On a hard disk of 1 TB, no less than 40,000 images can be stored. This is approximately 200,000 images on a 4 TB disk. At the current rate, a 4 TB hard disk costs about 100 dollars. If you capture 20,000 images per year, you can fit 10 years' worth of photos onto one 4 TB hard disk. More if you delete the photos that are not worth saving.
Although saving disk space sounds interesting at first, I don’t believe it will bring any benefit in reality. You just end up with smaller file sizes and reduced image quality.
Final Thoughts
I find it surprising how well the lossy DNG files hold up, even after extreme post-processing. Although the quality is reduced, it won’t be visible for regular use like photo albums, social media, or the internet. Even a print in a 30 x 40 cm size will probably be acceptable.
However, there is a reason for shooting in raw file format. It offers the maximum amount of sensor information and the most flexibility in post-processing without loss of detail. Why would you throw that away, just for saving a little hard disk space?
That said, if you find saving hard disk space important, and the use of your images doesn’t require the maximum amount of quality, lossy DNG might be a good choice after all. The loss in quality only becomes obvious in extreme processing, especially if you perform AI noise reduction before conversion into lossy DNG. Just remember, if in the near future new features are introduced that require a raw file for them to work, you can’t use them on a lossy DNG file.
What do you think about the lossy DNG file? Please let me know in the comments below.


Join the Fstoppers community for free
-
Post comments and join in the discussions
-
Browse the site ad-free
-
Share your work and get featured in the community
-
Compete in the photo contests for fun and prizes
20 Comments
I'll stick with RAW. I'm too paranoid. :D Also, typically, per project, I only end up with an average of about 150 images when all is said and done. In the last 12 years, I have about 2.7 TB of raws.
storage is cheap.. i'll keep it simple and just leave it how it is
RAW for me. Even though, as an event photographer, I generate tens of thousands of images each year, the cost of storage is negligible in the context of my overall operating expenses. Also, the amount of time it would take to export all those images with AI Denoise applied is prohibitive. I use DxO's DeepPRIME for noise reduction, in part because it's 8x faster on my Mac Studio.
8x faster is huge! What was your old computer?
My M1 Max Mac Studio is about a jillion times faster than any Intel Mac I owned, and it runs DxO's DeepPRIME 3 5x faster than Adobe's Denoise, even though it has 32 GPU cores. DxO leans on Apple's Neural Engine, while Adobe leans on GPU cores.
A year later, I've changed my mind. In testing lossy DNGs generated with the JPEG XL engine, versus original RAW, I couldn't see any difference in malleability, noise, detail or dynamic range, even when I pushed an underexposed image FIVE stops.
Yes, doing the conversions is tedious - particularly given that Adobe will let you down-rez and replace in place, BUT NOT AT THE SAME TIME, DOH! - and I'm denoising them all in the process. But, I have tens, if not hundreds of thousands of event photos from as far back as 20+ years ago that I'll never need again, and I can queue up a big batch at night and have 'em ready in the morning. I'll keep 'em around just in case I want to use some to refresh my website.
For my personal work - travel & landscapes - I'm keeping RAW files.
I've been using lossy DNG for 5 years now. Haven't noticed any downsides. I have about 3 million pictures since I went digital in 2003 so it's nice to keep them on a smaller number of HD. I read up a few blogs with side by side comparisons and was satisfied. Even after inspecting the side by sides here it's a fine trade off for me. I guess my work doesn't usually center around fine textures etc.
Three million pictures?
Do you keep all pictures you ever took? Even the ones that doesn't pass the selection? For what purpose?
The thing is, the result don't look that different here because both are processed with Lightroom. Lightroom's processing of the raw file here is more or less similar to what it's baking into the linear DNG file.
But if at some point in the future you decide to change the software you use for demosaicing (for instance, if you realize you want DxO's denoising), you can no longer do that with linear DNG files. Even newer Lightroom versions will have better processing features which can no longer be applied to old linear DNGs. Denoise AI itself is a good example of that.
Yeah, if you think you're going to want to reprocess later with improved tools, RAW is the way to go.
I read a book on DNG files some years back and just stayed with the raw files. Mainly because not able to the DNG file on another program. It is kind of like Sony with HEIF to be the new jpeg where processing it can take a while but you end up with a jpeg anyway.
It's all a great study but a cameras raw file is the best to keep. I go back to my very old files a lot just to prove an image from say a point and shoot has good images. I also have my old Vivitar8300s that has the ability to save in a TIF file but even today it is not able to see it or process so happy I saved all in jpeg.
I shoot events in spray and pray style. It generates around 90% garbage and 10% passable photos. I still store garbage as lossy DNG and just wait when HDD where they are stored fails.
I wonder why you would keep the garbage (as you call it). Why bother spending time and effort in keeping those images. Do you have a specific reason?
Not the original commenter but I do also keep all photos. As they are mostly personal I think it's deleting a part of history that never can be recovered. So all photos contain some information so can't really get myself to delete them. Also storage is not an issue so they will live forever on my computer I guess :). Fortunately culling and tagging is a thing so I can filter to show only the best :).
I come from the days of floppy drive storage and have progressed way beyond those long-ago limitations...
With hard drives that are cheap, fast, reliable, large & plentiful, the only file "compacting" I do is to purge out the bad images/files after ingest then get metadata attached to the images including caption, keywords and the boiler-plate contact/copyright info, back them up and then go out and spend more time making photos.
25-30 years ago, hard drives, storage needs were much different, slow, expensive, small and unreliable but those days are long gone. There's little need to spend time and effort today trying to same a small amount of disk space the the trade-off of going out and shooting more or even kicking back and enjoying life in the limited time we have on earth.
It is best to stick with raw and preserve all of the info. As raw interpreters improve it is fun to revisit old raw files to see how much better the new camera raw engines handle them.
Furthermore, storage costs have come down, and most decent full sized ATX motherboards have 6 to 8 SATA ports, as well as 2 to 3+ m.2 slots, thus decent enough expandability to add in a few HDDs, as well as a few SSDs for more local storage.
users can also turn an older PC build into a NAS, and use all of the SATA ports, as well as one or 2 PCIe HBA cards to further expand on how many hard drives can be added. Beyond that, the cheapest solution is to just add more hard drives into your current PC.
A few years ago a friend mentioned he was converting all his RAW files to DNG format. I guess he’d read or hear DNG were more versatile of a format. I didn’t agree and thought he needed to get his file more organized and a better understanding of file management first, and once again don’t delete anything till he’s for sure it’s a duplicate and he knows where the “keeper/original” is.
The only times I have used the DNG format is when I was scanning film. To me this was a double fail safe in that not finalizing the data I would have the option to continue processing that data as my abilities grew and as software advance too.
With this "new" compressed DNG format didn't you say it deletes some file information ... what's the sense? ... file size. Yeah sounds once again like the marketing pitch that CD audio was better and more durable than vinyl and we see which way that pendulum is swing these days.
A few years ago a friend mentioned he was converting all his RAW files to DNG format. I guess he’d read or hear DNG were more versatile of a format. I didn’t agree and thought he needed to get his file more organized and a better understanding of file management first, and once again don’t delete anything till he’s for sure it’s a duplicate and he knows where the “keeper/original” is.
The only times I have used the DNG format is when I was scanning film. To me this was a double fail safe in that not finalizing the data I would have the option to continue processing that data as my abilities grew and as software advance too.
As to this “New” compressed DNG format didn’t you mention it deletes some file information, sound like back in the latter days of analog photography were the attempt to double the frames of a 35mm film roll you could shoot 1/2 frames, don’t know if it ever left the drawing board of it did it went to the round file. Or it would equate to shooting 35mm with a view camera. To take a RAW file of 25mb and reduce/compress it to 2.5mb sounds like a “Big” negative to me equal the might as well just have shot it as a super fine quality jpeg. Sound like the sale pitch that CD music was better and more durable than Vinyl and we see which way that pendulum is swinging these days.
Sounds like the digital negative designation would be more political correct ;) but too big of a negative for me to convert an original raw file format. As Triumph the Rottweiler would say "to poop on".
"Although the quality is reduced" plus additional time consuming steps, all added work just for less is how it sounds for me.
Really no loss when converting?
It seems all has been said before but I do think on a technical level converting to another format is the same as (unintentionally) losing original information that existed in the original format. This is just a feeling but I can't really buy that all RAW information put in by the camera manufacturer is preserved when converting to a DNG. As I read manufacturers use custom format metadata to store EXIF data would this get lost either? (https://en.wikipedia.org/wiki/Exif).
Upgraded RAW processors:
Also what has been said is that RAW engines / camera profiles are evolving and so therefore best to keep all originals in RAW to reprocess them years after shot with an upgraded RAW engine.
Conclusion:
So based on my gut feelings converting will lose data one or another way or hinder reprocessing with a newer RAW engine in the future. Storage is cheap so I would not recommend to convert but thanks for revisiting and discussing this possibility.