Editing in dramatic black and white images can elevate the impact of your shots significantly. It’s a way to strip away distractions and focus on the emotions and details that make scenes compelling.
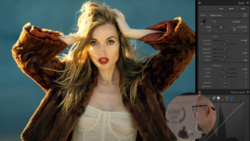
Coming to you from Andrew Lanxon Photography, this practical video offers straightforward advice for creating striking black-and-white street photos using Adobe Lightroom. Lanxon highlights the importance of initially shooting in both raw and JPEG, with the JPEG set to monochrome, allowing you to instantly visualize scenes in black and white. This method helps you assess composition and lighting directly from your camera screen. However, keeping the raw file ensures you retain maximum detail for editing later, especially useful when adjustments in shadows or highlights are necessary.
Lanxon demonstrates how effectively built-in Lightroom profiles can simplify converting color images into high-impact monochrome shots. Rather than relying on purchased presets, he advises exploring Lightroom’s default black-and-white profiles to achieve varying degrees of contrast and tonality. He particularly recommends profiles like Black & White 3 and 4 for their robust contrast, ideal for scenes with distinct textures or dramatic lighting. Lanxon also emphasizes the advantage of adjusting these profiles' intensity to subtly fine-tune the final look, ensuring the result aligns precisely with your vision.
Selective adjustments play a significant role in Lanxon's approach, as he illustrates using masks and gradients to guide the viewer’s attention effectively. Subtle adjustments in exposure, shadows, and highlights, applied selectively, can emphasize your subject, making them distinctly stand out from busy backgrounds. Lanxon walks you through techniques like radial gradients to subtly highlight your main subject, enhancing their prominence without artificial-looking edits.
A key takeaway from Lanxon’s approach is his attention to detail in subtle tonal shifts using Lightroom's color mixers. Although working in monochrome, manipulating the individual color channels—especially oranges and yellows for skin tones—can dramatically enhance or soften specific details within an image. He demonstrates this vividly with street portraits, adjusting the orange channel to gently brighten faces without affecting the overall contrast and impact of the image.
The tutorial also covers valuable tips on using the curves tool for more advanced contrast and tonal control, allowing you to add depth and dimension selectively. Lanxon advises careful adjustments, particularly in the shadow and black points, to avoid overly harsh contrasts that can distract rather than enhance your subjects. Check out the video above for the full rundown from Lanxon.


Join the Fstoppers community for free
-
Post comments and join in the discussions
-
Browse the site ad-free
-
Share your work and get featured in the community
-
Compete in the photo contests for fun and prizes
No comments yet