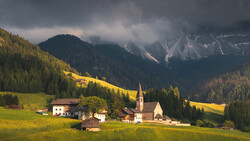
Adding infrared emulation to your landscape images can create a unique and striking effect. This tutorial demonstrates how to transform a regular landscape photo into one that mimics the ethereal qualities of infrared photography using only Lightroom Classic.
Coming to you from Christian Möhrle - The Phlog Photography, this detailed video shows you how to emulate infrared photography in Lightroom Classic. Möhrle starts by adjusting the basic settings of the image, changing the profile to Adobe Standard to reduce contrast, and tweaking the tonal sliders. Lowering the highlights reveals more detail in the bright areas, while reducing the shadows and increasing the whites add contrast without overexposing the image. Adjusting the blacks prevents overly dark areas, creating a balanced base image. These initial steps are crucial for preparing the photo for the more specific adjustments needed for the infrared look.
Möhrle then applies selective masking to set the scene for infrared emulation. Using a color range mask, he targets the sky to darken it, mimicking the deep blue typical of infrared images. Linear gradients are used to darken the foreground and add structure to the water, enhancing its texture. Adding a radial gradient introduces a subtle glow, increasing the brightness and making the image more dynamic.
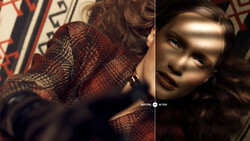
To achieve the infrared effect, Möhrle uses the Calibration panel in Lightroom. By drastically altering the primary color hues, the image begins to take on the distinct look of infrared. Lowering the Blue Primary hue and reducing the Green Primary hue while raising the Red Primary hue are key steps. These changes shift the foliage colors toward the classic pink and orange tones seen in infrared photography. Further adjustments in the Color Mixer panel refine these hues, particularly focusing on making the foliage appear more vibrant and accurate.
Fine-tuning the colors involves careful manipulation of the hue, saturation, and luminance sliders. Möhrle adjusts the yellow and orange hues to bring out the infrared effect in the foliage, while also tweaking the red hue to correct any unnatural tones. Reducing the saturation of the oranges balances the overall color intensity, and adjustments to the luminance sliders enhance the brightness of the foliage.
Finally, Möhrle uses additional masks to enhance specific areas. By selecting the foliage with a color range mask and raising the exposure, shadows, and blacks, he brightens these areas to match the desired infrared look. Adjusting the hue within the mask introduces more pinkish tones, fine-tuning the overall color balance. After completing these adjustments, he applies sharpening to enhance the image's details and removes any distracting elements, such as sensor spots or unwanted objects, using the healing tool. Check out the video above for the full rundown from Möhrle.

Join the Fstoppers community for free
-
Post comments and join in the discussions
-
Browse the site ad-free
-
Share your work and get featured in the community
-
Compete in the photo contests for fun and prizes
3 Comments
Reading this is too depressing. Photography was once an art and an exercise in diligence and craft. Now it's anything but when it comes to editing. I use a full spectrum IR Pentax and also a Panasonic converted camera. The joy is in composition and envisaging how this will look once I get to editing. It's also, always, a mystery. Now it's down to a fingertip enhancement and all I have to do is point and shoot. Surely we are above this.
Don’t read it if you get often depressed
Your charming advice is probably wise.