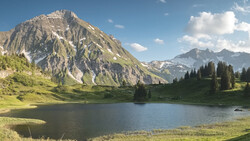
Landscape masking isn’t just another feature buried in your editing software—it’s a direct way to control where the viewer’s eye travels, what they notice first, and how your image feels. If you’re working with scenes that have complex skies, fields, or multiple subjects, learning to harness masking and adaptive presets matters because it lets you guide your edit instead of settling for what the camera captured.
Coming to you from Mickey Pullen of Eastern Shore Photo Instruction, this detailed video gives you a step-by-step demonstration of a full edit using Lightroom’s new landscape masking tools. Pullen starts by addressing a question he often receives: how to apply these advanced features to a complete photo edit, not just isolated adjustments. The approach begins with basics—correcting lens distortion, cropping for composition, and removing distracting elements with the generative AI remove tool. He doesn’t rush this stage, instead making sure the image is set up cleanly before any major adjustments. The focus then shifts to dealing with image noise, especially for high-ISO shots. While Pullen mentions he often uses DxO or Topaz Photo AI for denoising, here he demonstrates how Lightroom’s built-in noise reduction can be effective enough to hold its own, depending on the image.
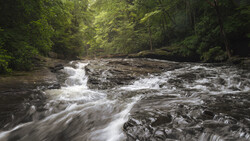
There’s a careful, methodical logic to how Pullen tackles the next steps. He uses Lightroom’s adaptive color profiles, favoring them over default settings like Adobe Color or Adobe Landscape because they offer a better starting point for nuanced color control. As the demonstration progresses, he makes a point to address dust spots and distractions, using the visualize spots feature for thorough cleanup. He breaks down the masking process: when to use Lightroom’s AI-driven landscape masks, when to create your own, and how to quickly remove any auto-generated masks that don’t apply to the scene. You see him weigh which areas benefit from automated selections and which require more hands-on refinement, especially with vegetation and water.
What stands out in this video is the balance between automation and manual control. Pullen doesn’t rely blindly on the software’s decisions—he constantly evaluates, adds, or subtracts from masks, and demonstrates how to use radial masks for targeted brightness or contrast changes. Instead of generic edits, he layers adjustments to the sky, grass, and water, paying attention to transitions and subtlety. The use of intersecting masks and point color targeting shows how you can isolate even similar-looking elements (like green grass from muddy earth) and apply changes only where needed.
The workflow includes a variety of adjustments that you might overlook if you’re only skimming features: using different brush flows for subtle changes, balancing clarity and vibrance for a soft glow, and adding selective vignetting to control focus. He discusses decisions like when to enhance texture versus reducing clarity to introduce mood, or how a slight spot exposure in the center draws attention where you want it, not just wherever the brightest part happens to fall. Each adjustment comes with a reason, not just a button push. If you’re tired of edits that feel generic or flat, seeing these layered decisions in action is instructive.
If you’re serious about bringing out the best in your landscape images, the demonstration offers practical insight into a flexible, thoughtful process. Check out the video above for the full rundown from Pullen.
And if you really want to dive into landscape photography, check out our latest tutorial, "Photographing the World: Japan II - Discovering Hidden Gems with Elia Locardi!”


Join the Fstoppers community for free
-
Post comments and join in the discussions
-
Browse the site ad-free
-
Share your work and get featured in the community
-
Compete in the photo contests for fun and prizes
No comments yet