
There was a time when file limits were considered near impossible to reach ceilings. Each was designed many years ago for photos made by cameras with single-digit resolution. Times have changed, and unfortunately the formats have not. We now are faced with file size limits that are becoming more and more restrictive as cameras collect bigger and bigger chunks of data with every photo.
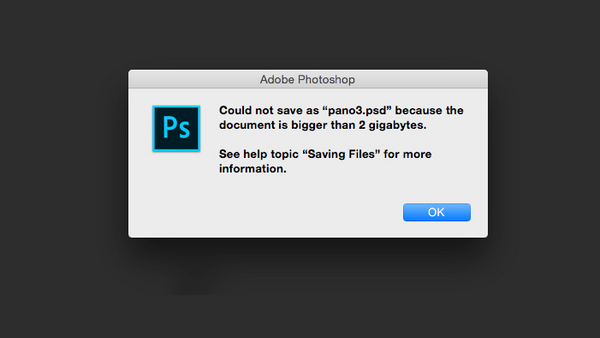
Nearly everyone can sympathize. You just finished working on what may be your coolest photo ever. After spending many, long painstaking hours diligently working in Photoshop you are greeted with the horror that your file cannot be saved because it's too large. This is a problem that photographers are continually faced with that can become insanely annoying. You aren't alone. All is not lost, however, there are some pretty easy strategies for eliminating this problem without having to flatten your working file into destructive nothingness.
1. Choose the Right File Format
The first step to keeping your files at a manageable size is in choosing what format you should actually be saving your files in. The three formats Photoshop offers that preserve all your working data are Photoshop Document (PSD), Large Document Format (PSB), and Tagged Image File Format (TIFF). Each has its own merits so I have constructed a handy little table below to compare them.
PSD PSB TIFF Max File Size 2 GB 1,000,000,000 GB 4 GB Lightroom Support Yes No YesThe first, and most obvious conclusion we can draw from this comparison is that PSDs appears to be objectively worse than a TIFF file as both are supported in Lightroom but the PSD offers a far smaller ceiling. The distinction isn't quite as clear-cut though as PSD seems to do a better job compressing small images. For example, I opened one of my photo stitch files that enjoy a healthy 10,000 px by 6668 px resolution and saved both. The results can be seen below:
PSD PSB TIFF File Size 123 MB 246 MB 254 MBIn this situation PSD offers much better efficiency when saving the same file. PSDs dominance in efficiency, however, appears to diminish as the file size increases. With a larger, multi-layer file that approached the PSD limit you can see a much different story:
PSD PSB TIFF File Size 1.982 GB 1.983 GB 1.02 GBThe best conclusion that can be drawn is that PSD is certainly more efficient at smaller file sizes while quickly becoming a worse option at larger ones. TIFF, in contrast, is least efficient at smaller file sizes but as your file size grows it becomes the most efficient. I should note that ZIP layer compression was used for the TIFF which has an unfortunate side effect of making the save time much longer. An RLE-compressed TIFF saves much faster, but in the above experimenting had the largest file size by clocking in at 2.06 GB. PSB seems really only worth using if your file is so huge that it is the only option. However, if you want to always be safe and never have to worry about not being able to save your file, it quickly becomes the best option (assuming you don't care about it working in Lightroom and won't be making any exabyte sized images).
2. Delete Pixels That You Aren't Going to Use
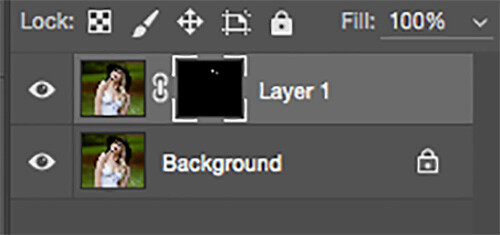
There are so many actions and tutorials out there advocating the use of complete stamp visible layers to edit a tiny portion of the photograph. For example, in the shot below you can see a clone of the background layer is being used to increase the contrast of the eyes via a blend mode. The layer was maxed to hide everything except the eyes.

3. Delete Data That Is Outside Your Frame
Another brutal culprit for giant files is when a layer actually is much bigger than the bounds of your document. Obviously the data that is hiding beyond your crop has no impact on the image itself, so why keep it? The most common reason this happens is when a massive texture is layered onto an image. For example, below, a smoke texture has been brought into the image to add some haze.
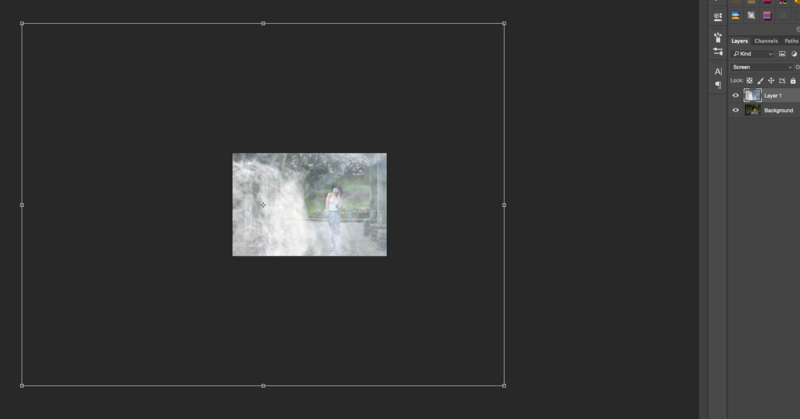
Notice how the bounding box for the vastly extends beyond the edges of the image frame. If this file was to be saved it would save thousands of pixels that are completely unnecessary. A quick way to fix this is to select your texture layer, hit command-a (control-a on Windows), then hit command-j (control-j on Windows) to duplicate the layer. Because you created a bounding box around the edge of the frame with command-a before duplicating only pixels actually inside the frame will be cloned. You can then simply delete the other layer so that you are left with the now much smaller texture layer that only contains relevant pixels.
Conclusion
Photoshop file management is an art form in itself. There are an endless number of strategies that can be brought for the task of keeping your files small. These tips are only the tip of a large iceberg so keep experimenting. Shrinking your file size can offer both a tremendous savings in hard drive expenditures as well as a nice hefty boost in Photoshop performance while you edit. I'd love to hear about some of your favorite file shrinking techniques in the comments below.

Join the Fstoppers community for free
-
Post comments and join in the discussions
-
Browse the site ad-free
-
Share your work and get featured in the community
-
Compete in the photo contests for fun and prizes
16 Comments
A few that I do:
Grouping layers with the same masks
Deleting all blank masks for global adjustments
Using vector masks over layer masks when possible
Honestly, I'm starting to care less and less about these optimizations. HDD storage is so cheap these days and performance isn't an issues in most scenarios.
Personally, I find the biggest thing and motivation for me to keep it size down is to get under that TIFF limit of 4gb. I don't want to be forced into PSB because I manage my photos in LR.
Great suggestions!
Nice article Ryan, great Photoshop tips. I put a lot of these into practice myself. You're right Photoshop file management is definitely an artform within itself.
I love LR, but I'm still not quite sure why Adobe has not added .PSB support? Makes no sense to me. In those cases, I switch back over to Adobe Bridge to view PSBs
Ya, has always seemed like such an obvious oversight. I would have expected them to support PSB before TIFF. There must be some sort of limitation that makes supporting PSB a huge challenge.
No idea, I just hope that add PSB support in an update sooner than later
Here's a biggie that sometimes saves me HUNDREDS of megabytes on a file. Add a layer with a solid color fill to the top of your document before saving. I guess it has something to do with photoshop generating a preview but it helps immensely. I was just working on a 750 MB file and doing this dropped it to under 600.
You can actually configure photoshop not to generate the preview files to save yourself having to do that one.
I´ll try it.
I have found that saving as a "large document format" lets you save any size file you want. :-)
Large Document Format = PSB
It's a terribly incompatible format, that pretty much only Photoshop is able to open/edit (Affinity Photo lists opening but no mention of editing/saving. Haven't tried that yet).
Yes of course but we are talking about photoshop file sizes. I save the edit file (Large format doc) and a flattened finished file (TIFF) to be opened in whatever you want.
Great article Ryan, I'd like to add another tip;
if a client asks for a layered psd/tiff, turning off the layers (by deselecting the eye icon on the layer) saves some space too.
Instead of creating a duplicate of an overlapping layer to crop it, just make that select-all selection and crop the whole document to the visible boundaries. This is more efficient when you have several dozens or even hundreds of layers, without knowing which layers take up space outside of the canvas dimensions.
Personally I'm not a huge fan of this whan working on a comp because there are certain layers, such as the main subject, that the client might ask to be repositioned so I don't want to delete any of the extra pixels on that.
The main image? You still have that in LR and can just re-export another TIFF should you need the full size again. But whatever works best for you.
Good stuff, Ryan. Thanks for sharing.
Here's one:
I have a PSD that will not save because it says it exceeds 2GB.
That's all fine, so before I do anything I look to the bottom left corner to see how large the document currently is. And here's the kicker: It's 1.2GB.
Yes, preview saving is turned off, so a blank layer on top won't change anything (but it's a good tip!)
Any and all advice is welcome. I've been to multiple forums but can't get a straight answer. :)