
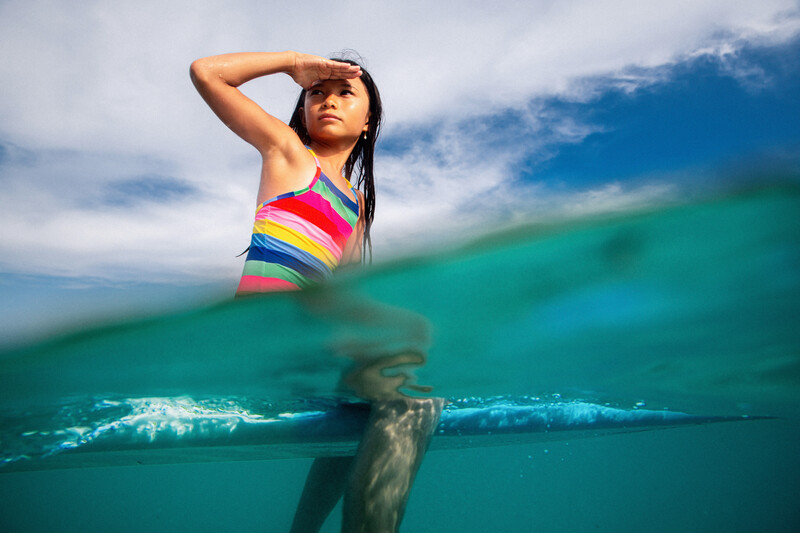
One of the things I love most about photography is the challenge of creating something new and refreshing. In today's behind the scenes video, I thought it would be fun to try to capture some family photos with a split view above and under the water.
Obviously any time you set out to take photos in the ocean, a multitude of things can go wrong. Water destroying your gear? Yep, been there. Strong currents that make shooting near impossible? Definitely! Murky waters that prevent any sort of visibility under the surface? That's usually a given. I can count no fewer than 10 different challenging elements that can cause a photoshoot in the water to go wrong, but it's those challenges that often make for the best results and the greatest of stories. In this instance, my goal was to take a series of over-under or split-shot images that show both the action above the water and some elements underwater as well.
For this particular photoshoot, I wanted to revisit one of my favorite camera accessories that I bought early in my career. The Ewa-Marine U-BXP100 underwater housing is a great starter camera housing if you are interested in getting into underwater and above water photography without investing thousands of dollars immediately. It's not the best housing for true underwater photography because it's not rigid enough for the pressure that comes with deep diving, but it does hold up well enough a few feet underwater. If you want to shoot right on the surface of the water, this housing is great because it can protect your camera for just a few hundred dollars. Of course, I also love this glorified water proof bag because it also allows you to mount a speedlight on top of your camera without having to buy any specialized underwater strobes.
The setup I used in this video is pretty interesting. For my main camera, I had a Nikon D850 mounted with a Tamron 24-70mm f/2.8 lens. This combo works well in the Ewa-Marine bag, and the Tamron lens is still small enough to fit in the housing while also giving me a pretty good range of focal lengths. For the lighting, I had Lee use a Panasonic GH5 camera in a second Ewa-Marine bag. This camera had double duty as it was used both for behind the scenes video but also acted as my remote flash. By placing a Profoto Air Remote on my camera, and a Profoto A1 strobe on top of the GH5, I could easily trigger the off camera flash and direct Lee into the perfect position. Everything remained waterproof which is obviously of top concern when shooting in the ocean. To help replicate the color or an early morning sunrise, I also attached a Profoto Warming Gel to the strobe to give it a more dramatic color that would be seen earlier or later in the day.
Overall I think the images turned out amazingly! I probably shot photos for 30 minutes and came away with at least 5 shots that I feel really excited about. One thing to keep in mind when shooting through any kind of glass port near water is that many images will come out blurry because of the water droplets that accumulate on the glass. Some people recommend using a product like Rain X to repel the water droplets but I've always had the most success simply dunking the camera underwater right before I press the shutter. There are a lot of good articles online about using these "dry" and "wet" methods when shooting in an underwater housing.
Something else to consider is the focal length that you use and how it affects the overall image. If you shoot ultra wide, you will increase the chances of capturing a frame with both an underwater and above water element, but the wider the lens the more distorted your subject will look. I prefer the style of my images around 35mm to 55mm but you should definitely play around with your particular lens.
After I captured a handful of images with each of the kids and as well as some with their dad, the final step was to edit them to bring out the most detail possible. Our friends over at Skylum liked the concept so much they sponsored the video and asked me to edit all of the images using their raw editing software Luminar 4. I've used Luminar a lot in the last year or two and have found it to be a great alternative to much more expensive software, and I've found some of their tools like AI Sky Replacement to be such a big time saver that I've added the Luminar Plugin into my permanent workflow. Here are some of the final edits of the images taken.
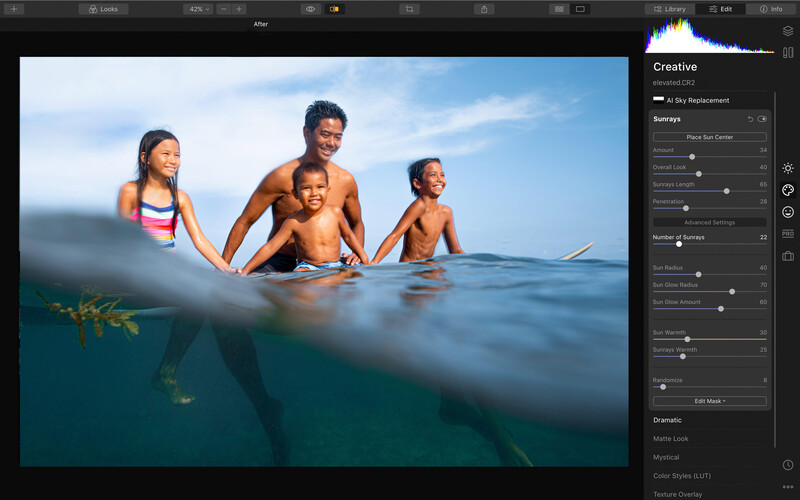
If you want to try Skylum's Luminar 4 for free, click on the Fstoppers Luminar link for a free trial. You can also use the discount code "Fstoppers20" to save $20 if you wind up buying a license. This discount is only good for the next 2 days but if you miss the deal, you can always use "fstoppers" to save $10 anytime.


Join the Fstoppers community for free
-
Post comments and join in the discussions
-
Browse the site ad-free
-
Share your work and get featured in the community
-
Compete in the photo contests for fun and prizes
10 Comments
One tip I can offer if you really like shooting the over/under style images is to get the water farther away from the lens, it allows you minimize how much of the frame the "transition" takes up. I have a buddy that swears in the value of a dome in front of the lens for over/under. It also allows you to get the edge of the water in focus.
Getting splits w/o a dome is – in my opinion – not worth the effort. And the larger the dome the better. Most of all the dome minimizes the magnification effect. But it additionally gives you much more surface area to "split"
https://oceanity.com.au/blog/view/understanding-flat-port-and-dome-port…
Wow, that's a super interesting article Chase. Thanks for sharing. In my next video I attempt a similar split view but with an aquarium and you can also see the magnification there too. Sounds like I need to get a dome for my housings now!
I'll save you a little research. SeaFrogs is the most economical. All the other players are very expensive (at least for me, someone who wanted to just play around every once in a while). Its the difference maybe $600-800 for a housing+dome, and $4000-6000 for a professional kit. https://seafrogs.com.hk
I did a brief look to try and find a bag + dome combo (so I could use both my camera bodies), but I wasn't able to. Maybe you'll have more luck.
Do they really not make housings for Nikon?
Ouch. That's a strange omission. They support Olympus + Panasonic too.
They have the A73 + GH5 housings, which I'm pretty sure you guys have. But what I forgot to mention was that you need to make sure you get the right dome/extension for the lens(s) your planning on using. So maybe you don't have the same selection of glass on those platforms.
I'd be curious to learn why they're neglecting Nikon altogether.
Don't take my word for it, but I believe this company is from the same manufacturer.
https://meikon.com.hk/collections/underwater-waterproof-camera-housing-…
edit:
I just looked at the cameras they support. And it's only the one P&S body.
21:35 And there we go you can see how perfect this mask is. Did anyone else notice we're back to the original sky? Don't get me wrong it looks better than the replacement anyway, but you made such a big deal about replacing the sky and then didn't.
It’s isn’t the original sky. I hit the luminosity mask and it did alter the original mask (prob should have it that option first). The final sky I used is a bit of a mix between the two which worked best in this example. The original sky was completely blue with no side light directionality.
OK looking again I do see that it is a mix of the two skies. I saw the same cloud come back above the boy and thought it was back to the original with just some color and luminance changes.