
For the last month I have shared a useful tip in Lightroom each week and I look forward to continuing the series. For this week I show you how to use the often overlooked color sliders to control the hue, saturation and luminance of each color in your photo. In the short video I also show how to get those mint saturated greens that are currently very popular.
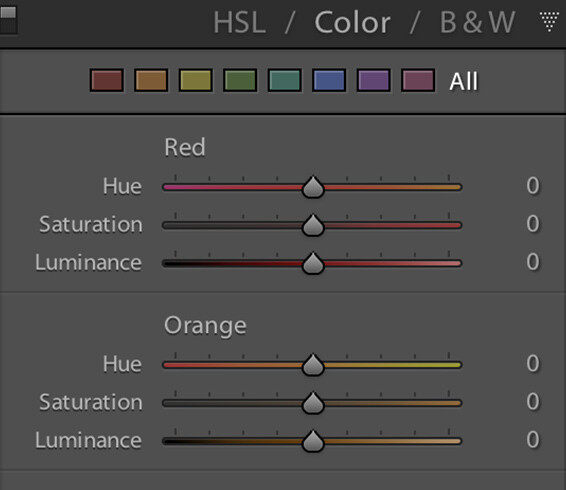
Often I'll see photographers using Lightroom to edit exposure, white balance, contrast, shadows and highlights but pass over one of the most powerful menus in the program, the "Adjustments" menu. This menu has three options along the top menu bar, HSL / COLOR / B&W.

HSL stands for Hue, Saturation and Luminance. By clicking on this menu you can see all the main colors, each divided up in the three sections based on the title. B&W of course stands for black and white and allows you to really spice up your black and white photos by adjusting the luminance of each of your colors in your black and white picture. This is especially useful for landscape photographers that want to add contrast to their scene by adjusting the luminance of the different sliders in their black and white image.
In the video posted today however I focused on the "Color" menu that is located in the middle of the "Adjustment" menu bar. When you open this menu you are presented with the primary colors and a slider below each one. These sliders allow you to fine tune the hue, saturation or luminance of each of these individual colors.
Check out the video above where I show you how I use these sliders to enhance photos of reflective products such as wedding rings, get rid of ugly room light, make your skies more rich and how to get the nice saturated mint greens that are currently very popular. Be sure to take advantage of this powerful and little known way to effectively manage your images colors in Lightroom.
Join the Fstoppers community for free
-
Post comments and join in the discussions
-
Browse the site ad-free
-
Share your work and get featured in the community
-
Compete in the photo contests for fun and prizes
17 Comments
I think one of the most useful ways of using this is to go to the HSL panel, then use the little round circle in the upper left of the panel. Click on it (be it for hue, saturation, or luminance) and then go over to your image and click on a color and then drag up or down to add or subtract that value. It will even move multiple sliders if your color is somewhere between the range of adjustment of the primary values. You can do the same thing with curves adjustment as well. This is very similar to the little "finger" with the arrow adjustments you can do in Photoshop for HSL or curves as well.
Yeah Matt I love that little tool. I mention it for a few seconds about 34 seconds into this video but I thought I would save that for a different video in the future.
Matt, that's called the Targeted Adjustment tool (TAT).
Awesome! Thanks for the tip!
Thanks Elizabeth!
Little known?
That's the main way of handling colours individually.
You miss the camera calibration menu
Right?
Right.
Camera calibration just allows primaries.
Lens correction also permits some adjustments and to remove aberrations
Camera calibration is an easy to use for for quick results. I mainly use lens correction for the Canon 16-35 2.8L to help with distortion and CA. The built in profile for the 16-35 doesn't fix vignetting properly though, at least for me.
Use main vigneting
...better try cheating the program with some other lens
Your comment makes me smile.
Never is late
great video. i used to use this a lot and has kind of fallen out of my workflow... but will have to play around with it some more.
Appreciate it Jason. Lightroom is quite powerful providing all different ways of making things happen. It can be difficult to remember and use them all.
Impresionante
I'd be so happy if the HSL adjustments could be used as a brush. Please Adobe, add this in a future Lightroom update!
little known for those who have never bothered to move their eyeballs down, passed the basic panel.