The Adobe Camera Raw Adjustment Brush is one of the fastest ways to shape attention inside a frame without wrecking the rest of the tones. If local light, texture, or color keeps slipping away during edits, this tool is often the missing piece.
Coming to you from Colin Smith, this methodical video breaks down the Adjustment Brush inside Adobe Camera Raw from the ground up, starting with what it actually does: it paints a mask, then your sliders affect only that mask. Smith begins in Adobe Bridge, opens a Sony .ARW raw file straight into Adobe Camera Raw, and keeps the workflow visual so you can see exactly where the edit will land. You’ll watch the overlay appear as you paint, then disappear so the change reads like part of the original light. The big shift is treating the brush as something you can keep editing, not a one-and-done pass that forces you to start over.
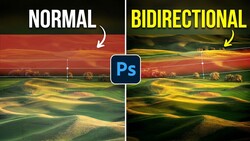
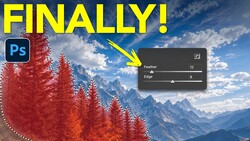
Once you’re in that mindset, the video gets into the settings that make the brush feel controlled instead of sloppy. Size and hardness are covered, but the practical takeaway is how to adjust quickly with bracket keys so you stay focused on the edge you’re trying to respect. Auto Mask gets a clear, honest demo: it can “snap” to edges and help you stay inside lines, but it can also miss areas when the detail gets busy. Smith shows two cleanup approaches that matter in real edits: temporarily switching into erase mode with Alt/Option, or using the dedicated Eraser so you can trim without losing the rest of your work. Feather comes up as the difference between a cutout look and something that blends, especially when you need the transition to look like it belongs on skin, clouds, or distant terrain.
Flow and density are where a lot of people get confused, and the video draws a clean line between them. Flow is how quickly the mask builds as you paint, which changes whether you work in slow layers or lay it down fast. Density is the cap, which means repeated passes don’t keep stacking past a ceiling, so the brush behaves differently than the way you might expect from Photoshop. That one detail changes how you dodge and burn large areas, and it also changes how you “fix” a pass that got too heavy without repainting a whole section. There’s also a small-but-critical edge behavior Smith points out when refining shapes with Auto Mask, tied to what part of the brush circle crosses the boundary.
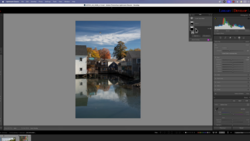
Then the tutorial shifts into a real edit so you can see the brush choices play out under pressure. A dark foreground gets opened up without making the entire image look washed, and a separate mask targets the mountains so you’re not forcing one adjustment to do two jobs. Smith uses highlights and exposure in a restrained way, then uses the eraser with soft settings to blend away the telltale border where many local edits fail. You also see a case where Auto Mask is the wrong tool at first because it avoids internal gaps, followed by a better two-step approach that starts broad and finishes tight. The low-contrast edge problem shows up too, where the mask needs help because the subject and background are too close in tone. Check out the video above for the full rundown from Smith.


Join the Fstoppers community for free
-
Post comments and join in the discussions
-
Browse the site ad-free
-
Share your work and get featured in the community
-
Compete in the photo contests for fun and prizes
No comments yet