AI masking gives you a fast way to separate subjects, backgrounds, skies, and landscapes without fighting with manual selections. If you care about controlled lighting, clean focus on a subject, and efficient editing inside Photoshop, this is one of the tools that changes how you work.
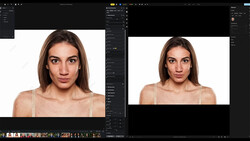
Coming to you from Aaron Nace of Phlearn, this practical video walks through how to use AI masks inside the Camera Raw filter as part of a non-destructive workflow in Photoshop. Nace starts by turning the background layer into a smart object so you can open the Camera Raw filter, build complex masks, and still come back later to adjust every setting. Once inside Adobe Camera Raw, he shows how the masking panel can instantly detect a background, build a mask, and let you darken it with simple exposure changes so the subject stands out. He then subtracts a radial gradient from that background mask to carve out a soft halo of light behind the subject, using shortcuts like Y to show overlays and V to move pins without clutter. You see how a single mask with a smart subtraction can reshape where the eye goes, rather than stacking a dozen clumsy adjustment layers.
The walk-through does not stop at a basic subject-versus-background edit and that is where it starts to get more interesting. Nace uses the landscape options in the masking panel to automatically target the ground, then darkens it slightly so the subject feels more grounded and separated from the environment. He builds additional masks for the subject, lifting shadows, adding a bit of texture and clarity, and then targets clothing specifically using the people masking options, brightening it so outfits read clearly without looking artificial. A final radial gradient over the face nudges exposure up just enough to keep attention locked where it should be. In the second example, the video shows how the landscape preset detects sky, mountains, and water as separate components, each with its own mask, so you can pull back sky highlights, add a cooler temperature to the water, and give the mountains a touch more green and clarity while leaving the rest of the frame alone.
What makes this worth your time is how it ties AI detection to small, controlled moves rather than dramatic “before and after” tricks. You see AI build the first pass of a mask, then you refine it with a brush, add a bit of road into a mountains selection, or adjust feathering so a radial highlight blends into the scene instead of screaming “effect.” Because everything lives inside a smart object, you can double-click the Camera Raw filter in Photoshop, reopen every mask, and push the background darker, lighten it, or create a new mask long after the original edit. The video also shows how this works just as well on non-raw files, so you can run the same AI masking workflow on JPEGs or layered PSDs when needed. Nace touches on handy keyboard shortcuts, overlay controls, and mask organization, but there are still more nuances, combinations of AI masks, and fine-tuning steps in the full tutorial that go beyond what you read here. Check out the video above for the full rundown from Nace.


Join the Fstoppers community for free
-
Post comments and join in the discussions
-
Browse the site ad-free
-
Share your work and get featured in the community
-
Compete in the photo contests for fun and prizes
No comments yet