
People may be scrambling to find the automated AI holy grail of one-touch, realistic, high-end skin retouching, but you can have my dodge and burn technique when you pry it from my cold, dead Wacom tablet.
Granted, it’s not the right tool for every project, and yes, it takes time, but if you want unimpeachable quality, this dinosaur of techniques is still the way to go.
And don’t take it from me, a journeyman photographer—you’ll hear the same in online instructional videos from retouching superstars like August Dering, Pratik Naik, Michael Woloszynowicz, or from Katrin Eismann, Senior Product Manager, Digital Imaging and Photography at Adobe (which barely touches on her accomplishments).
I mean, this isn't something I would do for a snapshot of, like, the people I play golf with that’s going to go on Instagram. This is really a technique where you're going to be seeing the face, like at a point of purchase at the cosmetics counter or in advertising full-spread ads where you're like, ‘Wow, that is beautiful skin.’

Skin Deep
There are a lot of advantages to the dodge and burn method. Mainly, it leaves skin texture unaltered, so it looks natural and, when properly done, undetectable. “We can recognize bad retouching very quickly,” said Eismann. “We try to sneak up on the image, like a little bunny rabbit, and you don’t want to notice that rabbit coming at you. It’s much more challenging to recognize good retouching because we're not supposed to recognize it.”
You may be thinking, “Ha! I can do this in two minutes with frequency separation.” While frequency separation is useful and important, it has a pretty easy-to-spot look. “Because overused frequency separation makes people look like they have the skin of an orange,” said Eismann.
You need to achieve the dodge and burn level of subtlety to do high-paying commercial work, beauty work, and boudoir, for a start. It does take more time, but you get paid for your time, right? Bonus—it will confound pixel peepers.
First, Save Face
You do have to prepare the photo with a cleanup layer. “Retouchers will, before they do dodging and burning, get rid of big blemishes—that pimple that we don’t want to talk about but always shows up on the day of a photo shoot,” says Eismann.
If you really want to cover your retouching tracks, make an empty layer to work on. Then, use the spot healing brush but set the blend mode to darken or lighten for the first pass, then switch to the other blend mode for the second pass. It should look more randomized than just using the brush in normal mode.
Gimme Some Skin
There are several ways to do this, but I’ll just give my favorite, which I like because it’s easy to fix if (when?) I overdo it.
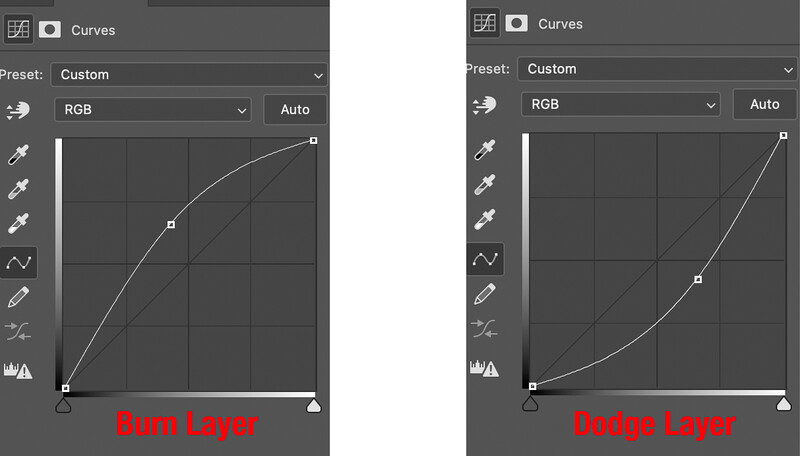
You will need to make two curves layers—one for dodge and one for burn.
For the dodge layer, which will lighten the image, grab the curve at around the midpoint and pull it up, as you see in the illustration.
For the burn layer, which will darken the image, grab the curve at around the midpoint and pull it down, as you see in the illustration below.
Make the mask on the right of the curve symbol black (Command + I for “inverse” on a Mac, Control + I on Windows).
One advantage of this method is that later you can adjust the curve up or down to strengthen or weaken the effect across the entire image if needed. On your first tries, you will probably need it. By having separate dodge and burn layers, you can also adjust each effect individually, and you can do it at any point in your editing, even late in the game.
Now comes the part that requires some practice to master.
Set a brush to white (I prefer a soft round). I set opacity to 100 percent and flow really, really low—two percent to start. Then, build up the effect bit by bit.
I find it best to start with the burn layer, darkening highlights (thanks for the tip, August Dering). If I start by lightening the dark areas to blend into the bright areas, I almost always overdo it.
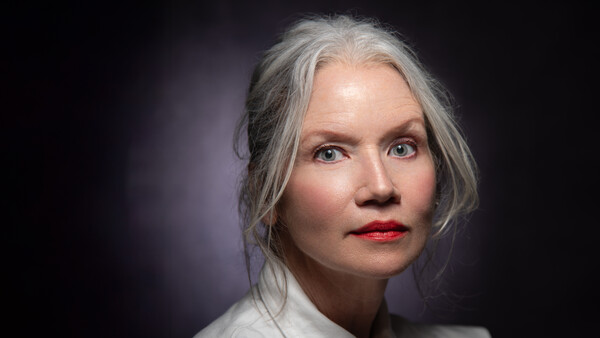
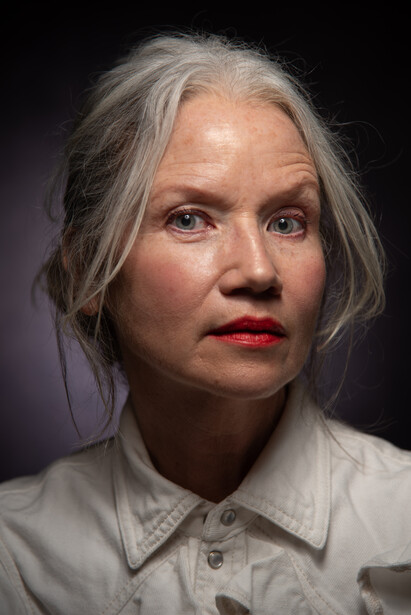
Don’t try to make the darks and lights perfectly seamless right away. That’s the perfect formula for overdoing it. Think of it as reducing the difference between the darks and lights, not eliminating them. One word of warning—dodged and burned areas can shift slightly in color. You can deal with this later in a number of ways, chiefly using a hue and saturation layer adjustment. I did not make this adjustment to the example images of the woman in the white top.
Skincare Secret
What took me a long time to realize is how much effect tiny changes have—and how much time and attention should go to tiny irregularities. I often spend the majority of an edit working with a three-to-five-pixel soft brush set at a flow of two … and I sometimes turn that down to one.
So, the secret sauce is patience.
www.youtube.com/watch?v=jMisjSYElkI
Look at this seven-minute time-lapse of a Pratik Naik skin retouch (elapsed time, two hours and eight minutes!). Check out how small the imperfections he addresses are.
www.youtube.com/watch?v=jMisjSYElkI&t=2s
These horror masks show just the painting on the dodge and burn layers so you can see exactly what was done.

Botched Surgery
Here is one of the charms of this method. If you have gone too far, there are numerous ways to make corrections without starting over. If all of the dodge or burn is too strong, you can just go to that curve and move it back to the center to lower the effect.
If there is just one spot that is too strong, you can make your soft round brush black and, still at a low flow, spot-reduce the effect by painting over the area where it is too strong.
The Real Beauty?
Clients are generally pretty chuffed over how naturally fetching they look. (A recent comment: “Wow! I really looked good that day!”) That’s a big plus—more business, more income.
But once you get moderately good at it, it becomes relaxing. Meditative. Much like those adult coloring books—only you get paid to color.


Join the Fstoppers community for free
-
Post comments and join in the discussions
-
Browse the site ad-free
-
Share your work and get featured in the community
-
Compete in the photo contests for fun and prizes
4 Comments
Yep, dodge and burn is my only method of smoothing the skin. I call it smoothing the skin without smoothing the skin. I've been using this method since 2017ish, if I recall correctly.
And, yep, D&B can take a long-ass time per image. This is why I use Retouch4Me Dodge and Burn to do about 80% or more of the work. This plugin pretty much does whatever I would have done…almost. Then, using my experience, go in to cleanup here and there. It's such a timesaver.
IMO and observation, the days of spending hours per image just doing D&B are gone. No doubt, there's that select few use cases. But, in general, none would be the wiser whether you spent 2 hours or 2 minutes. With plugins and the new crop of AI apps, they can help speed up the process and look just as good. As the saying goes, "Time is Money".
Indeed, still the best technique. But man it's time consuming when doing by hand.
Unnecessarily time consuming and I've yet to see a meaningful difference between this and a properly done frequency separation + spot healing tool. The FS method takes only 30-45 minutes and there's literally no difference unless you go overboard.
There is a point at which retouching becomes misrepresentation. Only edit out the blemishes that will be heal themselves in a week or so. Everything else is how the person looks. The plastic Barbie face isn't what anyone should want.