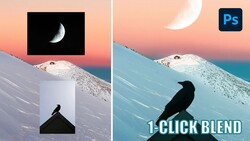
I'm sure most of you have taken one look at the lens flare filter in Photoshop and decided to quickly over look it. Well I am here to say that you might want to reconsider and give it a chance. With the right steps and processing one can actually make it look decent. Now I'm sure there will be a few people that will still think adding flare is asinine, and to that I say to each their own.
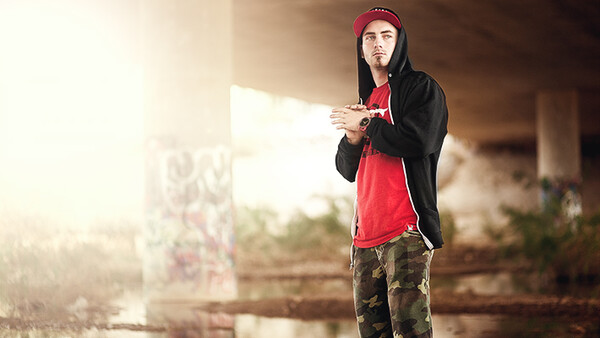
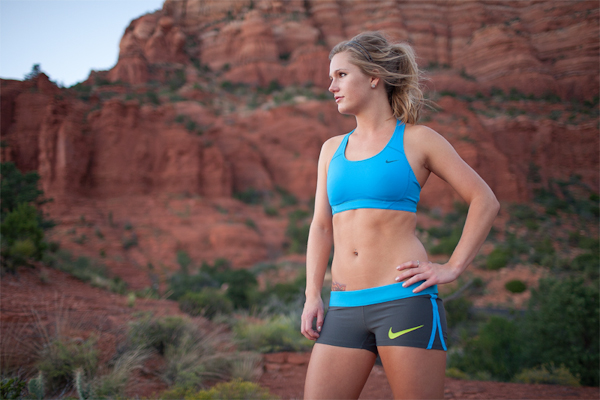
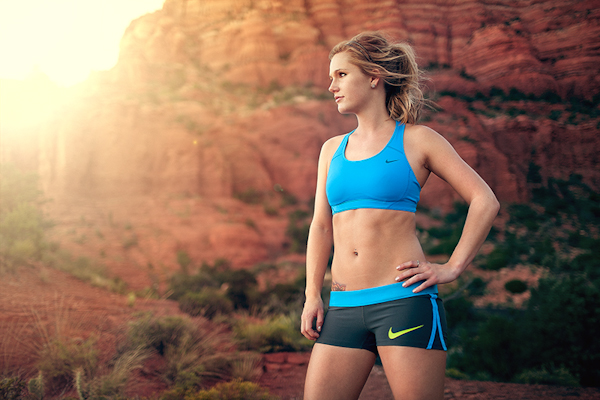
Before you start this process you should shoot or choose an image that would already look believable having had flare. Make sure there is a directional light source that you can exaggerate with the flare. I see a lot of lens flare that is irrationally added and the image will tend to be very "cheesy" for lack of a better word.
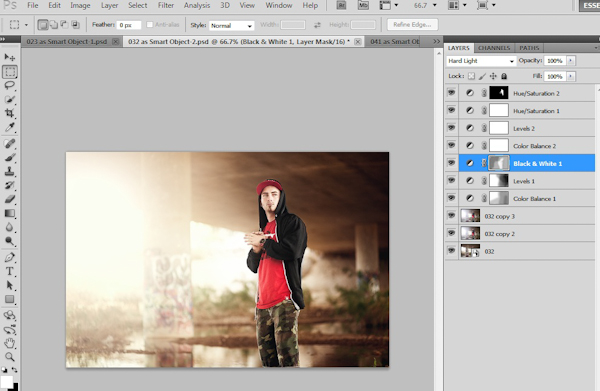
Once in Photoshop always make a duplicate layer. Then go to Filter-Render-Lens Flare. Choose The 105 Prime. I feel that the 105 prime is the best choice of the lens flare filters due to the lack of cheesy orbs the other ones add. I usually have the brightness between 140 and 170. Place the lens flare in accordance to the light that is already hitting the subject. Now create a layer mask for that layer and use a large super soft black brush at a low opacity between 1 and 10% to erase the orbs. You can change the brush size to erase some of the flare off the subject to make them pop out.
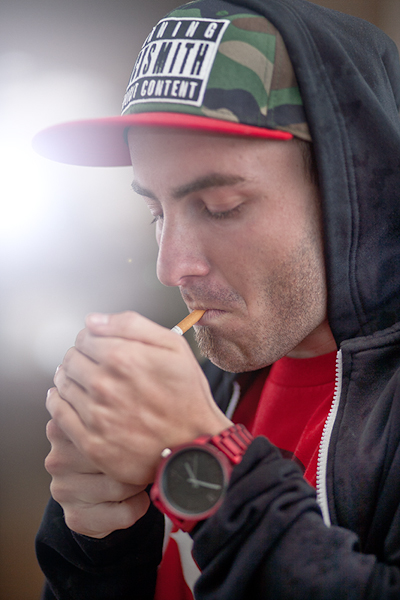
So now you have this flare but it is a blueish light that probably does not match your subject. Open up the color balance adjustment layer and under shadows, midtones, and highlights add a bit of yellow and red on each slider. Don't go over board, you should not be + or - more than 10 to 20, especially on the highlight sliders. The image's color balance will still not match up at this point. Take a large super soft black brush at a low opacity around 15% to gradually erase the colors around the lens flare so its mainly just the flare that is being effected by the color balance adjustment layer. Open the levels adjustments, change the RGB to Blue and move the output slider to the left. (Its the bottom slider that starts off at 255, move down to around 245). Follow the same masking process as the color balance adjustment. Remember White reveals, black conceals for layer masks.

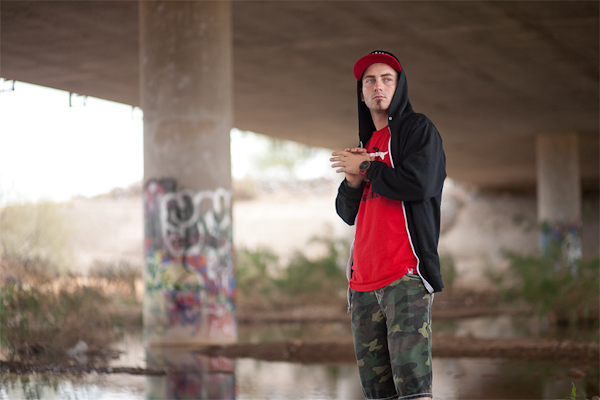
It is now where i do all my dodging and burning and selective sharpening.
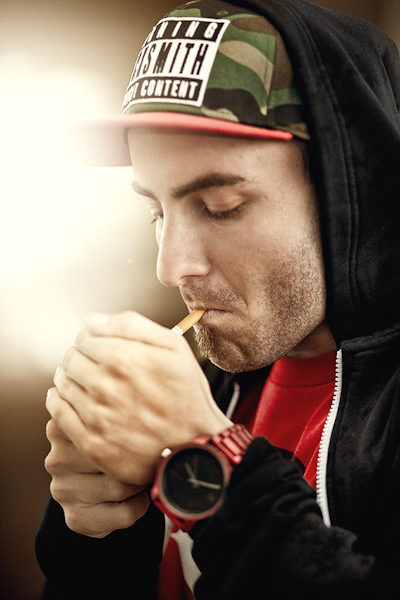
Depending on what sort of processed look you want you can add a Black and White layer and change the blending mode to "soft light" or hard light".
This will add a bit of contrast while being able to control the luminosity of each color. After that I will open another color balance and levels adjustment layer and fine tune the tones of the entire image. I sometimes have several color adjustment layers effecting different parts of the image. The final step for me is adding several hue/saturation adjustment layers. With these I will fine tune the skin tone, color of the clothes, background, and anything that needs to be corrected. In my Opinion the hue/sat slider are one of Photoshop's most useful tools. This is how you can get better skin tones, change clothes colors to match the photos color pallet, ect... Remember to always play around with the opacity of each layer. I rarely leave it at 100%.

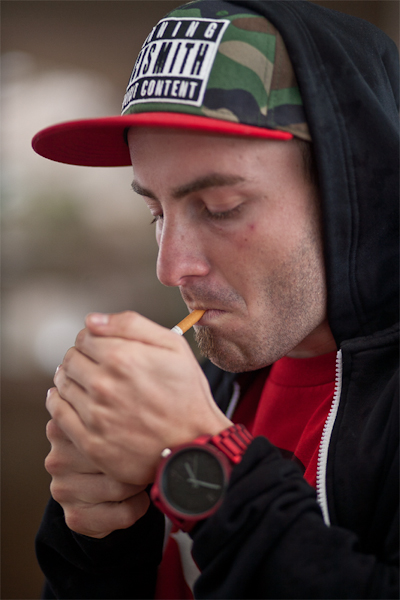
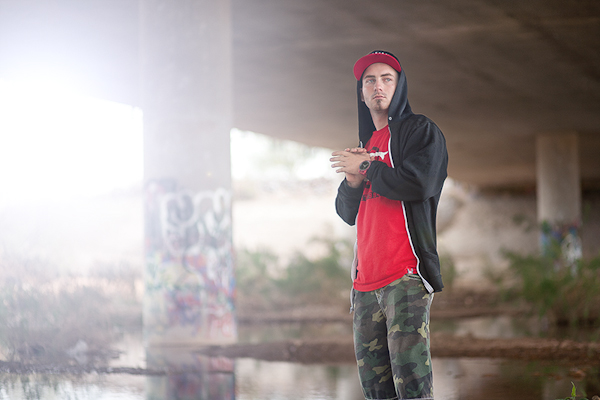
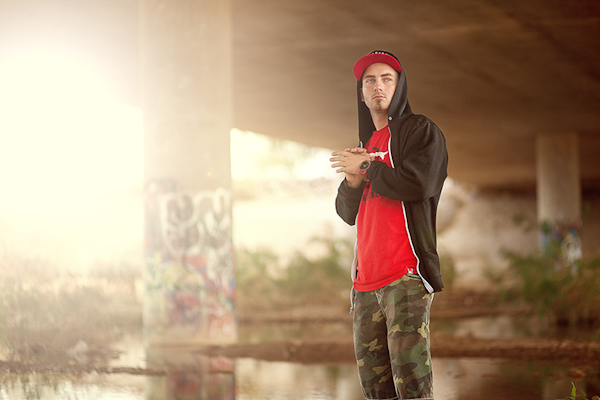
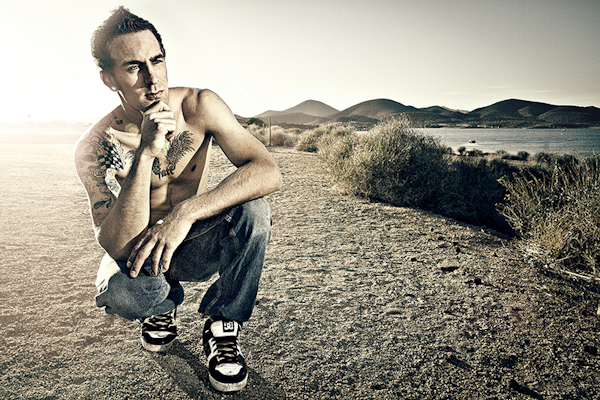
Here are some more before and afters. All images on this page were shot in natural light except the very last before and after. Hope I was able to teach you something and if you have any questions please don't hesitate to ask. I am more than willing to help.


Join the Fstoppers community for free
-
Post comments and join in the discussions
-
Browse the site ad-free
-
Share your work and get featured in the community
-
Compete in the photo contests for fun and prizes
74 Comments
Great Post Thomas
Nothing like doing it the right way first. Capture the image with actual lens flare. No photoshop.
Except that with this method you can pull much more detail and contrast out of the image. Don't get me wrong natural lens flare is beautiful, but not always doable in every situation. Its people like you that take this post out of context.
I actually like the photos above compared to Patryk's posted photo.
Thats fine. I was simply showing the natural way. I'm not trying to compete with this photography.
Agree. Its not best in every situation. It is fun though to capture it in natural light. I can appreciate this post fyi.
I'm with you. I am an experienced photomanipulation artist using Photoshop, but my honest opinion is this:
If it's a photo, use post to bring out that is already there, rather than put something false in it. But if it's a manipulation, that is a completely diffferent story, but then, don't call it a photo. I make manips to create things that are impossible, or not existing in reality, in other words, to make the imagination true. But I don't use it to falsify something I could capture for real.
Unless you're shoooting editorial journalism, who cares whether it was already there or not?
You can't manipulate the sun, you can only anticipate it. Sometimes it just doesnt hit the scene the way you want it to. Maybe you want to add warmth to your photo, is that so wrong? I always advocate "getting it right in camera, " but that rule has its limitations.
The trick is not to make it look cheesy as the author said. You can't click Lens Filter and call it a day. Make it look *believable* and then when all is said and done, if you make a great image and can't tell that it was added in post, then congratulations: you're on your way to becoming a successful 21st century artist.
I agree with both of you guys. I started in film and we did our best to make in camera count the most. In addition to picking the right film speed and white balance. You need to love your work!
i agree :) here's some 100% natural lens flare--no photoshop :)
http://www.flickr.com/photos/herosjourneymythology45surf/8505057233/
:)
Except you are wrong because there is no light hitting the lens so its not lens flare, just light rays through the atmosphere
actually there is light hitting the lens. most of my photos have light hitting the lens. and yes, many of those light rays travel through the atmosphere. :)
Nice Picture !
NIce post man. It really adds a lot to the photos.
Lol, I actually thought this post was gonna be about photography. How silly of me.
Please please please tell me how this does not relate to photography? Don't be so narrow minded that you let the world pass you by. People use photoshop,especially in commercial photography. As a photographer you should respect any creative aspect of photography. I see that you are more of a Photo journalistic/ fine art photographer. I respect that, but don't think that it's your way or the highway.
lol, it's like saying Lightroom isn't related to photography. How silly of me.
yes, how silly of you.
this is like saying, Ansel Adams wasnt a true photographer because he developed his unique look in the darkroom (the zone system)
wtf. this is 2013. how is post production not related to our photographic process? this was a great post. I personally learned some new things to make me a better photographer... you know someone that delivers completed images that I photographed and edited in post to a client.
You people need to learn the difference between a photo adn a photomanipulation. The point of a photo is to capture what is there, the point of a manipulation is to create something that would be impossible to capture. I do that - but I don't call it a photo.
- a photomanip artist
So basically, you do not call what Ansel Adams did "photography" (as Sonders pointed out), right?
Get over yourself (not just you, people in general), Photoshop/Lightroom/Aperture/whatever else, is just as much part of photography today as darkrooms where in the film days (and just like with darkroom work, it can be done right, or taken too far), this was a nice post about post processing to fix or enhance
Yes, please kindly quit pontificating about "real" photography.
Ansel Adams dodged and burned with his hands, Joel-Peter Witkin scratched negatives and bleached prints, yet if we use 21 st century tools we suddenly aren't "real" photographers? ?
Get over it.
Don't be discouraged Thomas. There will always be those who think their particular skill set is more worthy than someone else's. Great post, great tips, keep up the good work.
You people need to learn the difference between a photo adn a photomanipulation.
The point of a photo is to capture what is there, the point of a
manipulation is to create something that would be impossible to capture.
I do that - but I don't call it a photo.
- a photomanip artist
You've posted this comment about three times now (at least) except this is your OPINION of what photography is.
Does this mean all photography should be taken straight out of the camera?
What about lighting/strobes/flash etc.? That's manipulating "what is there". Where exactly do you draw the line on what's acceptable and what isn't and why should everyone else be forced into your view of what their art should be? (Not to mention the possible commercial uses for the technique taught here)
With the possible exception of photojournalism, your narrow view of what photography should be does not allow for much creativity and does not hold true to the history of image creation. Photography serves the world in ways beyond just documentation.
**AnselAdams2013 Submits photos where he dodged and burned things to get cool clouds**
COMMENTS:
Get it in Camera you big faker!
Another dodging and burning post,,, ugh...thats just great! wheres the real photography!?!?
Real photographers wait for the clouds to burn themselves ahole!
Yes even this technique is a part of the photography tool kit... if you get everything in camera then you probobly dont need to read this... or discourage him from doing it... Poor Ansel Adams would have been torn to peices lol I think the answer is... there is no right way... this guy can make lens flare in photoshop AND in camera... its like being bilingual. nothing wrong with learning a little Spanish...
You people need to learn the difference between a photo and a photomanipulation.
The point of a photo is to capture what is there, the point of a
manipulation is to create something that would be impossible to capture.
I do that - but I don't call it a photo.
- a photomanip artist
Well, in-camera, fake, photoshopped or not, I kind of like it. in my opinion, it is even less non-natural looking than many over-enhanced skinns in fashion/beauty photo's.
Tip: Put the lens flare on a black layer first and retouch away those ugly extra rings.
You may also apply a strong gaussian blur to the black layer on which you did the lens flare. That will take care of the rings. Though it might diminish the the opacity of the flare. If so, simply duplicate the flare layer.
Can you post the PSD file to see it in detail ?
Enjoyed the article! Thank you
Nice post, although I'm not a fan of the last photo processing, but thats just me. I respect different taste ;)
Warmer color with flare really makes pictures more appealing to me and that's the point, so great job ;)
Great post and thanks for working on the grammar! :)
Add lens flare the right way.... Through the lens...
But to be fair, if your going to fake it, do it like this, it looks good.
Wonderful post, great to see the techniques to add what you sometimes just can't capture.
Love this, great tutorial, have Pixelmator so have replicated the technique in that :) Many thanks
I was not aware that that was considered a lense flare. I thought a lense flare was about light infracted on the lense and thus causing those coloured light circles.
You might be right, but if you are you better call up Adobe and tell them to change the name of that filter in Photoshop.
I appreciate this post, the art and artist behind this. Thank you for sharing! It's just heart breaking having to read comments that are disrespectful.
You should do this tutorial in a video format!!
people sometimes need to learn post processing a bit ....it s helpful in most of situation as long it doesn't go overboard
if you are in the right time, right place with sun flare....yeah why would i spend more time doing it in photoshop but still you will tweak it if you know HOW ...
but are you gonna wait for sun flare to come out to create the atmosphere ?
people who usually disrespect this kind of post don't know how to do it....sigh
Am i wrong or is this not at actually "lens flare". The lens flare creates an artifact. Nice tutorial but I don't think that you are accurately defining what you are doing...?
Adobe calls it a lens flare filter so I call it a lens flare
I see what you are saying. When i clicked on the link originally i was thinking... oh shit... have my lens flares been "imperfect". I guess it is just semantics on this one :P
Convert the image to a smart object first and then you can do all the tweaking and masking without adding layers. You can even go back and adjust the sliders of the lens flare filter.
Do it properly! No post and in camera! Keep it real!
Why are you telling him what to do? Is it a power thing?
Should i shoot film too and call photoshop users sinners?
I really don't understand why I'm always reading comments on here with people B****ing about "real photography" or that using editing software is somehow cheating. It's kinda like youtube, you can't post a video without some a-holes getting into a 'comments section' argument over the internet. But seriously, what is the big deal about touching up or adding effects? granted, you could argue it goes from straight photography to digital art, but the majority of the medium is still photography. I don't see any shopped dear heads or flying geometry shapes in these pictures, cause they're not graphic design. I love this website, everything they post here is great. it helps me grow as a photographer.
furthermore, if using post processing to spruce up your images is cheating then you're not drawing the line in the correct place. because what about jpeg? its using curves and contrast and saturation to change the look. or RAW, no one alive uses RAW and then exports without any adjustments. Do people forget they are shooting digital? the image you see is made up of PIXELS. If they're such "photography purist's", then they don't have any business shooting anything but film and certainly don't have any business on this website.
rant over.......loosing faith in humanity....thats all. thanks Fstoppers.