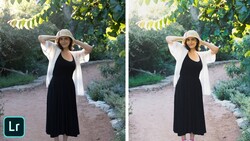
Three-dimensional "pop" is a sort of nebulous thing that portrait photographers often chase in certain lenses, as it can take an inherently two-dimensional representation of a person and make it feel more lifelike. You can also contribute to the effect through your editing, and this fantastic video tutorial will show you how to do it through some clever though not difficult use of Photoshop.
Coming to you from Justin Laurens, this great video tutorial will show you how to give your portraits some 3D pop using color grading in Photoshop. This characteristic is something that is often raved about in Zeiss and some upper-level Canon portrait lenses, but of course, if you don't shoot with the proper mount or do not want to drop a lot of money on a specific lens, you might be out of luck. As you can see in this tutorial, however, if you understand a bit of what gives the illusion of depth in a photo, it is something you can recreate (at least to a degree) in the editing process. Just like anything involving color work, though, just be sure to not go overboard, lest you end up with a gaudy result. Check out the video above for the full rundown from Laurens.


Join the Fstoppers community for free
-
Post comments and join in the discussions
-
Browse the site ad-free
-
Share your work and get featured in the community
-
Compete in the photo contests for fun and prizes
1 Comment
The difference between those two images is not color grading, as much as it is fixing exposure. The left image is way underexposed. Just fixing that alone accomplishes most of the change.