If you edit a lot of video, the most tedious part of the job isn't the creative color grade. It's getting the footage adjusted so that you can add the color grade. One shot is too bright, the next too dark, one camera leans green while another leans warm, and you end up crawling through the timeline clip by clip trying to make everything look like it belongs to the same production. On a real project, that takes hours, and nobody bills for it.
Imagen thinks AI can do that part for you. I spent the last few weeks testing how this software works on my own footage, and today I want to share my results.
From Photos to Video: What Imagen Actually Is
If you're a photographer, you've probably heard of Imagen. Their photo editing suite studies your previous edits, learns your editing style image by image, then applies it across an entire new shoot. For wedding shooters, where ten consecutive frames can often look completely different, Imagen Photo can be a genuine time saver. I did a review of this software last year, and several Fstoppers writers have tested it themselves.
Imagen Video is the company's first move into video, and in my opinion, video presents a harder problem to solve. A photographer might tell a story in five images. With video, each clip might only stay on the screen for 2–10 seconds, and therefore each one relies on the others to tell a compelling story. In other words, the continuity between video clips in a final production is more important than in a photo series.
Imagen Video spent roughly a year in beta before it was released publicly earlier this year. It has gone through a few big updates recently, which made me feel this was a good time to finally try it for myself.
Why a LUT Alone Never Fixes This
This is the part worth understanding, because it's the whole argument for the software.
Color is really two separate jobs. The first is correction. You need to get every clip to a neutral starting point with correct exposure, accurate white balance, and realistic skin tones. This has to be done even if you aren't planning to add any sort of stylized look to your footage. The second step is adding the overall stylized look. This can be adding teal to the shadows, pushing the highlights to a warmer tone, and giving your footage that creative signature you are known for in your work. This second step is where a LUT lives.
Here's the problem: a LUT is a costume. It sits on top of whatever is underneath. If the clip underneath is two stops overexposed and a little green, the LUT doesn't fix that. Instead, it just puts a costume on a clip that's far from perfect to begin with. If you drop one LUT on 100 clips shot under 100 different conditions, you will always get 100 different results. Because of this, using a LUT preset never quite delivers.

Imagen is attempting to solve this problem. It first corrects each clip individually by adapting to that clip's own lighting, camera, and exposure, and then applies the creative look on top of an already-consistent timeline. It tackles the correction first, and then adds the costume second. By doing it this way, Imagen generates a unique LUT per clip rather than one blanket LUT, which is the technical reason it holds together across cameras that disagree with each other.
How It Works in Practice
Anyone who knows me knows I'm super picky about software being intuitive and easy to use without having to watch a tutorial. With Imagen Video, you tell it what kind of project this is, such as commercial, podcast, or wedding. Then you either choose an Imagen AI Profile or your own custom LUT. Next, you let Imagen know if you are editing in Premiere Pro or DaVinci Resolve.
If you aren't sure what profile you will like, you can upload your own clips to see the effect each profile will have before committing. Imagen also has an "Adjust AI Profile" panel that lets you nudge exposure, saturation, and highlights, then save that as your own custom version. If a profile consistently runs hot, you fix it once and reuse it.

Then you point it at your sequence and hit Correct Color. Your computer builds low-resolution proxies, uploads them, and the grading happens on Imagen's servers. What comes back is a new Premiere Pro project, with the corrections either directly on the clips or on adjustment layers above them.
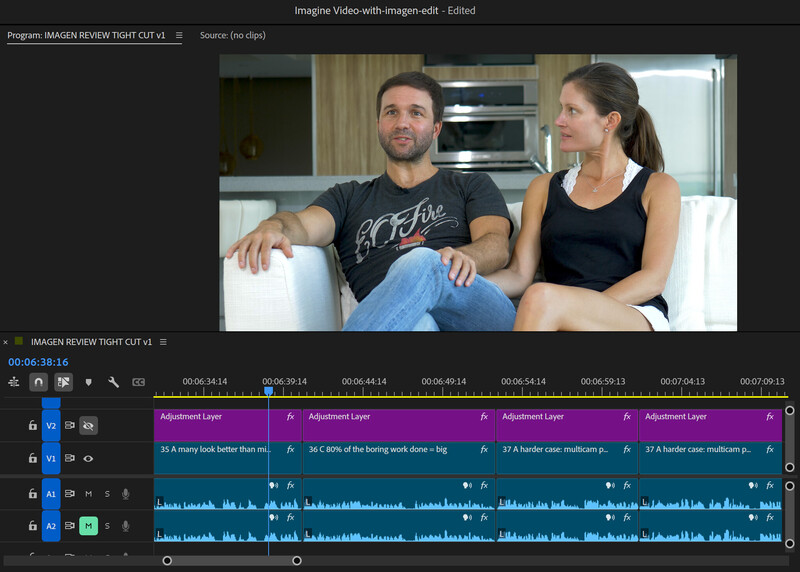

I prefer the adjustment layers. You can toggle the whole grade off for an instant before and after, and if one shot needs help, you tweak that layer, copy it, and paste it onto others.
Test One: A Multi-Camera Commercial
My first test was a real commercial we shot in Puerto Rico, and I picked this project because it's a mess in all the right ways. We shot it on multiple GoPros, the Fujifilm GFX 100, a Panasonic GH5, a Sony a7 IV, DJI Mavic drones, and even some iPhone footage made the final cut. It was filmed over the course of a month and includes shots taken at every hour of the day. This project is possibly the most tedious I've ever worked on. You can view the original video below.
For better or worse, none of the footage was shot in log. Instead, every clip is baked-in Rec. 709 straight out of the camera, which is how a huge amount of our YouTube and client work gets shot. This is interesting too because this footage should prove to be a harder test, not an easier one, because there's no extra latitude for the software to lean on.
For this test, I stripped every Lumetri adjustment we made manually, so Imagen saw the "raw" footage with nothing on it. Then I started a timer and told Imagen to do its thing.
It took about 35 minutes. Grading that project by hand originally took us days, and there are still shots I'm not entirely happy with color-wise.


Many of these clips came back looking better than what I'd done myself. You can use the slider above to see the before on the left and the after on the right. A few shots looked noticeably worse, such as an underwater shot, but that was taken under genuinely strange light, and we wanted the water to look more blue and tropical than the yellow cast it naturally displayed. Overall, the results were really good, with only 20% of the clips needing significant work done after the Imagen process. If I can get 80% of the boring work done automatically and then tweak a handful of shots, that's a massive amount of time back, even accounting for the cleanup.
Test Two: 3 Cameras, 1 Room
The commercial is the easy version of this problem, because every shot is so different that small inconsistencies hide. The harder version is a multi-camera shoot in a controlled space, where your eye catches a color shift instantly.
So I went back to our Coronavirus Journal projects, where we had a three-camera setup in our old Puerto Rico studio. These podcast videos had cuts between me alone, Lee alone, and a two-shot with both of us sitting next to each other. Depending on when we filmed, the ambient light from the window often slowly shifted behind us. We shot those almost daily for a hundred days and barely graded them at all.
This is also where I watched the update land. I'd trimmed the episode from over an hour to 18 minutes, and Imagen quoted 54 minutes of coloring (three cameras at 18 minutes each). Each source file runs over an hour, so the old processing behavior would have required Imagen to make proxy files for three hours of footage. Instead, it only processed what was on the timeline. Earlier in my testing, before this update, a large project took close to four hours, and this one finished in under 40 minutes.
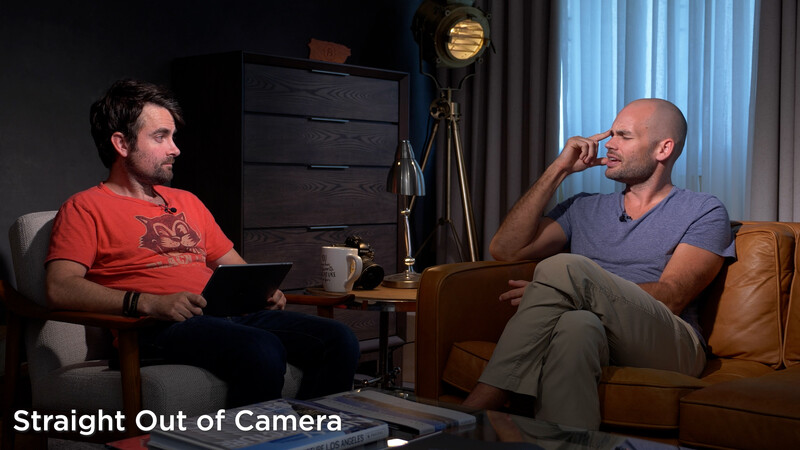

The results genuinely impressed me. The footage we uploaded to YouTube years ago was slightly underexposed with a blue-magenta cast. The graded version keeps the mood of how we actually lit the set, the skin tones hold up, and cameras A, B, and C now look more consistent between cuts.
The above before-and-after shots show the corrected footage with Imagen's Harmonica preset added. This preset mutes some of the reds in our skin tones while adding a little bit of contrast to the overall scene, which I personally like.
However, if you aren't a fan of this specific profile look, you can easily switch to a different AI Profile once the initial project has been processed. Imagen does not charge you anything for reprofiling your entire video, so I ran this project a few times until I found the profile that I personally liked the most.
Where It Struggles
It's rare for any digital editing program to work perfectly, and Imagen Video has two honest weaknesses.
First, it leans hard on your computer. Building those proxies is a local job, and it uses your CPU, so a big project can tie up your machine for a while. I'd recommend running Imagen Video during downtime, or making it the last thing you do before bed so you wake up to a finished project. I ran much of this on an older XPS laptop, which was slower than my workstation. Imagen has acknowledged this on its roadmap and has hinted that we should expect significantly improved render times soon as it tweaks the way your processor and GPU render these proxy files.
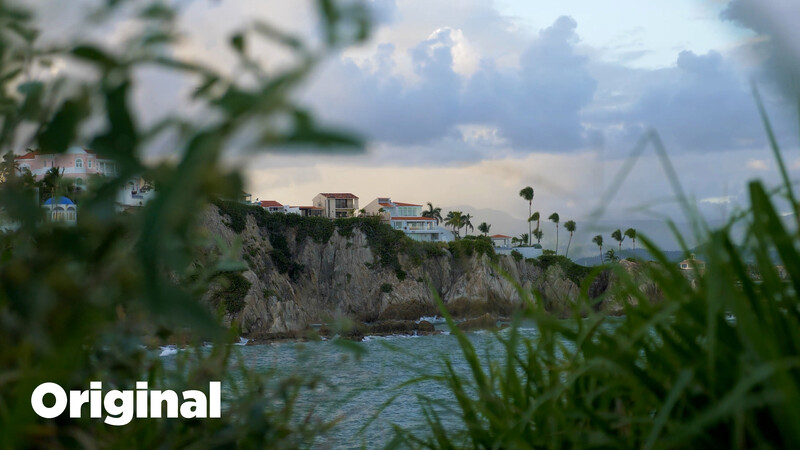

Second, every single clip isn't perfect out of the gate. Roughly one shot in five still needed personal attention. The encouraging part is that it was almost always just the exposure or white balance slider, and once nudged, the footage looked great. You can see in the before-and-after shots above that the final clip processed through Imagen Video was slightly overexposed in the sky. I love the contrast and colors, but the adjustment color layer still needed just a little tweaking to bring back some of the cloud detail.
Pricing
Imagen charges $1 per minute of color correction, and what that costs you varies enormously by project type.
A single two-hour interview with no B-roll is cheap to grade by hand, so paying per minute makes little sense. But a one-minute sequence containing 30 different shots is 30 separate corrections, yet that still costs you only a dollar. So for complex projects that have tons of short clips displaying in a relatively short time, Imagen Video gives you a lot of bang for your buck compared to a slower, more simple production where a single camera angle might remain on screen for 10–30 seconds.

There's also a $30/month plan that includes 50 minutes, which works out to about 60 cents per minute. If you're producing several videos a month, that's the better route.
Who This Is For and Who It Isn't
If you're a professional colorist, this software is probably not aimed at you. You have a workflow, you're hired specifically for your eye, and handing your trained skill off to a trained AI agent isn't the goal.
But there's a much larger group of creators who shoot their own videos, edit them, and then also have to color them. This includes wedding filmmakers, small production companies, YouTubers, corporate videographers, photographers starting to take on video, and people like us at Fstoppers. For that group, color correction isn't something you want to spend hours perfecting. It's the step between you and delivering the project.
If Imagen Video gets an entire timeline edited reasonably close in under an hour and you only fix the exceptions, that's where it becomes genuinely compelling. It also becomes a no-brainer on client work where the cost can easily be added to the invoice.
Try Imagen Video for Yourself
If this is something that seems like it might save you time in your own workflow, I'd urge you to download Imagen Video and try it for free right now on one of your own projects. Please don't judge the capabilities of this software strictly based on my own footage or a polished demo reel. Try taking a project you've already graded by hand, running it through Imagen, and comparing the two. Then ask yourself if saving hours of time for client or personal work would benefit your entire workflow.
If you try it, let us know in the comments where it worked and, more usefully, where you managed to make it fail.


Join the Fstoppers community for free
-
Post comments and join in the discussions
-
Browse the site ad-free
-
Share your work and get featured in the community
-
Compete in the photo contests for fun and prizes
No comments yet