The process of color correcting and color grading in filmmaking is an art of its own. Even if you do not work with video, such techniques can bring your photographs to the next level. The goal of this short tutorial is not creating an orange and teal look, but rather teaching you how ambient light affects highlights, midtones, and shadows of the skin. Knowing this technique you can color grade visuals the way you see them in many films.
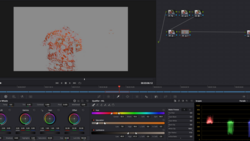
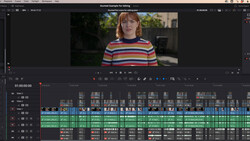
Avery Peck shares a great advice on color correcting skin tones in DaVinci Resolve. Known for its great color features, the software can help you achieve a very cinematic look relatively simple for a single scene. But if you need to color grade a feature film, you know why it costs so much. As I said above, you can apply that technique in Photoshop or in any other software that supports color selecting and masking. The basic idea is that shadows are always more saturated and have a little bit of red in them. The midtones are the reference point to the color we want to be on display, while the highlights contain the majority of the ambient light color. In order to color correct or grade the skin, we need to apply those principles when working with the color channels. In order to apply the hue changes only over the skin you need to make a, so called, qualifier. This is the same as making a mask based on a color. The adjustment nodes then are told to use this qualifier to apply the filter on the right places of the image.
For more tutorials like this, visit Avery Peck's YouTube channel.
Join the Fstoppers community for free
-
Post comments and join in the discussions
-
Browse the site ad-free
-
Share your work and get featured in the community
-
Compete in the photo contests for fun and prizes
7 Comments
That was a really cool technique!
Yeah, indeed.
I couldn't get DaVinci Resolve working on my POS computer - sad! I'll tinker with Hitfilm and see if I can get a similar effect.
Strange you couldn't get it working there. Anyway, you can achieve a similar effect in HitFilm.
Every time I tried to start editing a video in DaVinci, it'd crash. Initially I thought it was my POS computer, but I found a comment where someone with a better computer had the same issue. So...I dunno. I should try reinstalling it and see if that fixes things.
Anyway yeah, Hitfilm has some color correction options. I'm still learning video editing, and haven't tackled that yet. Last weekend was devoted to figuring out keying and simple animations. I got text to wobble! Woo (/end sarcasm).
Do DaVinci engineers know about this?
About HitFilm: maybe you already know that, but achieving a similar effect is by creating a mask by keying the skin tones, and setting the view to "Matte". Then using that mask with a "Set matte" effect on a duplicate of the original layer and applying the color correction over the skin tones there. If you want to add color correcting to the background, you make yet another copy and invert the mask. You will have 4 duplicates of the base video in total. The base mask, the original video, the skin selection, and the backgruond (in that order).
IIRC the post I found was on the DaVinci's forums. I didn't report mine, though -- I'm using the freebie version atm, and figured they wouldn't really care for an uncommon issue.
As for the rest -- Did not know that. But thank you for writing an explanation; I'll fiddle with it this weekend. Masks are on my list to figure out, yep.
Because these are basic vlogs, I'm not sure I *need* to apply advanced edits right now. I'm signing (ASL) these vlogs, and it's important for them to be well lit and easy to see. But it's good practice for the future, for when I kick it up a notch. I have big plans!