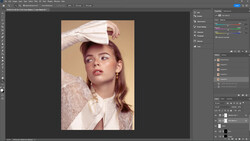
As a retoucher, an issue I have to fix at times is light falloff that occurs in studio. This can happen when the light modifier used isn't ample in covering the model fully. Thankfully, there is an easy fix that allows you to correct this problem. Prior to, it was a little more difficult without being able to harness the power of the raw file to fix it naturally. Once you get used to the process, you can use this technique to correct other exposure issues as well.
I hope you found this tutorial I made useful to you. There are of course other methods of fixing it too, but I really found this to be the most natural way with the most control available.
I also prefer using this method over using the Lightroom or Camera Raw adjustment brushes because it allows for much more control as it's completely adjustable as you go forward as well.
In this example, the falloff wasn't so major so other methods do work in a pinch. But when the falloff is so intense that you see clipping, the raw data will save your file.
A special thank you to Christopher Lua for the file.
In case you liked this, I will also be teaching a few retouching classes at the Fstoppers Workshop in the Bahamas this May. I'll be going over my workflow and techniques that I use on a regular basis. Check out the details here: https://fstoppersworkshops.com/pratik-naik/. Come out and spend some time with us, you need that break! Check out the promo video on what you can expect at this year's workshop!


Join the Fstoppers community for free
-
Post comments and join in the discussions
-
Browse the site ad-free
-
Share your work and get featured in the community
-
Compete in the photo contests for fun and prizes
20 Comments
Orrrrrr you could just grab the dodge tool and be done in about half the time.
Layer masks are non-destructive unlike the dodge tool. Hence the benefit of layer masks.
Do you not know how to use it non-destructively?
Nathan, for Non-Destructive Dodge/Burn technique using Curves and Layer Masks, here's what you need, a simple action I just upped for you. http://www.mediafire.com/download/o9694bbwkupzzg7/Non_Destructive_Dodge…
New 50% gray layer set to Overlay. D&B on this layer
OOhh that's cool, never knew you can open the RAW as smart object... Probably not going to use it in most cases, but it's great to have the option when needed.
Same here
Once you do it you'll probably do it more than you'd think. I've used this technique in some way or another for things for years now. Even for something as simple as brightening highlights in hair, etc.
Wow, Lightroom has brushes for this.
The brush isn't precise. It's useful for non precise work but by bringing it into photoshop, having layers, masking and blend modes available opens up a lot more options and control.
Isn't precise... how?
Do you know how to use it?
Wow, some people are not familiar with Lightroom just like you. So for someone who use photoshop often, this technique is wonderful.
Wow.
nice, I'm gonna share this
The quickest fix would be to learn how to light properly.
Nice ...... i like it ......
Brilliant Tutorial my friend. Another way of doing this is through Lightroom's amazing ability to paint on different exposure settings. And, yes it is non-destructive. For someone who does not have Lightroom though, this is perfect. :)
In photoshop CC you can do that without duplicate the smartobject and save filesize. Just use camera raw filter and a layer mask.
Some of these comments really make me scratch my head. Look, there is always a number of ways to achieve the same or similar results. Pratik however, broke it down for us the way that he prefers to do it and has found success doing it. With his reputation, I'm going to trust in his methods. Thank you Pratik for the tutorial and for sharing your retouching wisdom with the FStoppers community.
Brilliant.! Is it possible to open as a Smart Object direct from Lightroom?