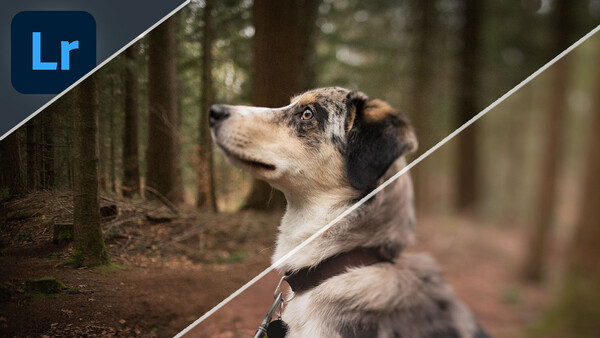
Whether you're wistful for the good old days, or want to recreate an analogue feel in your digital photos, this Lightroom technique will help you adorn your photos with that vintage feel.
Too often digital images can feel so clean, measured, and exact. Modern cameras are now so good that noise isn't really that much of an issue anymore, automatic modes can detect the correct white balance in a shot, and nailing the right exposure is now easier than ever thanks to built-in processors that analyze scenes in an instant.
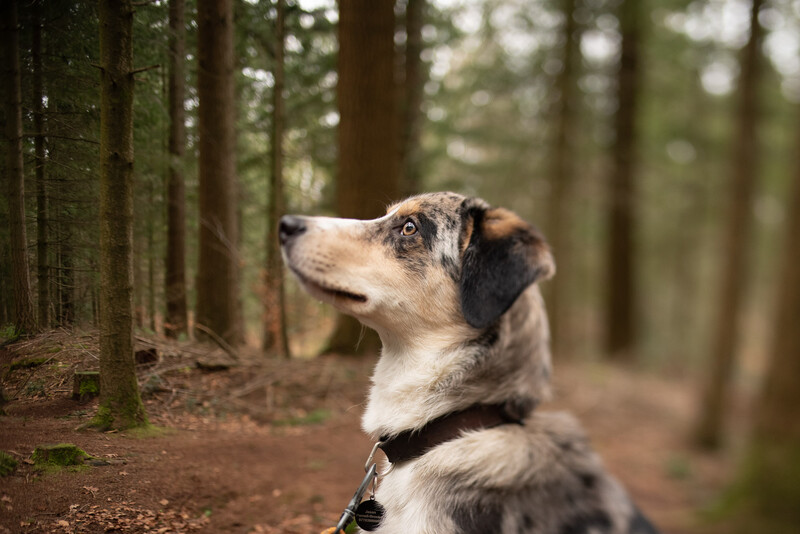
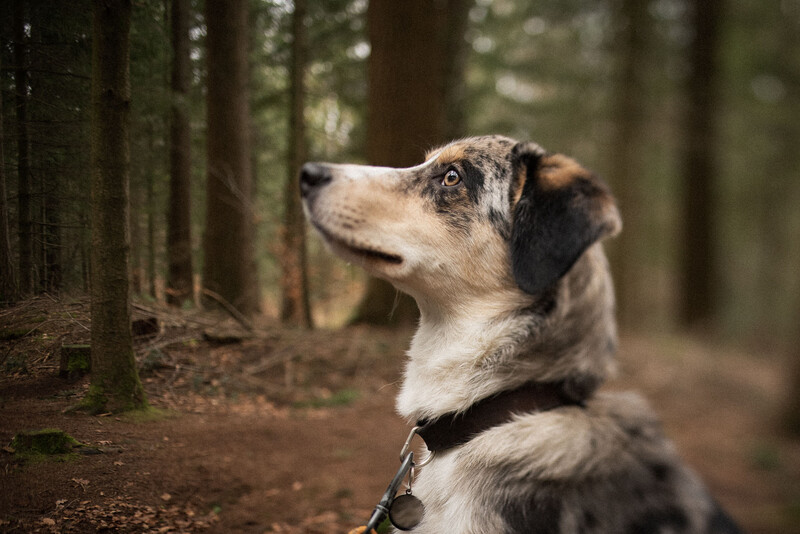
In order to breathe some originality into your shots it might be worth borrowing from the styles of yesteryear and aim for a vintage/retro look. I decided to apply a vintage look to a portrait I took of my dog Benji while out for a walk in the forest. The original photo was nice and had some lovely earth tones but it felt like the image lacked conviction. So follow along as I show you how to introduce a vintage look to your photos.
Choose a Preset
Choose a Vintage Profile Treatment that closely emulates the effect you're going for
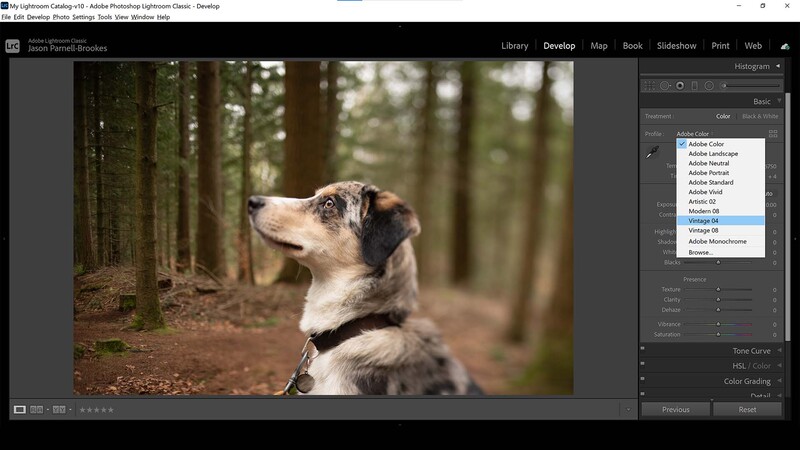
After opening my desired image in Lightroom Classic I navigated to the Develop module to start my edit. From here, I first started by clicking the Profile drop-down box. By default the photo renders with an Adobe Color profile, but I want to set my tonal foundations differently right from the start. If you already have your favorite profile treatment saved in the drop-down list then choose the preset you want to use now. If not, head to the next step.
Search for More
Can't find the preset you want? Head to the Browse button under the Profile Treatment drop-down menu and navigate from many more options
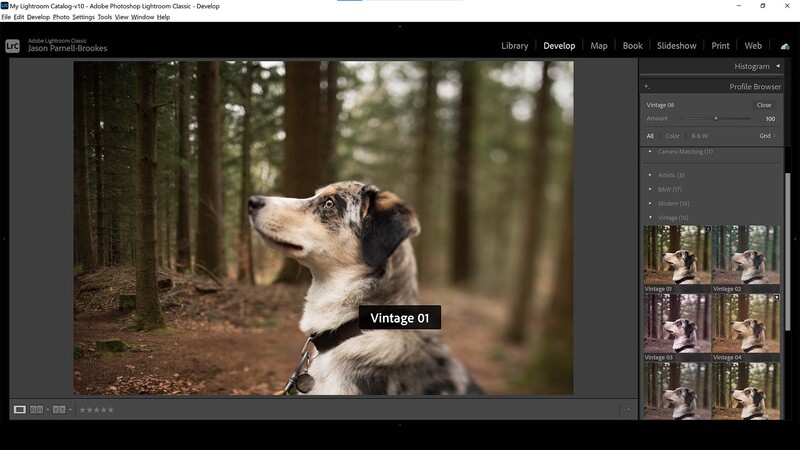
I headed to the bottom of the aforementioned drop-down menu and clicked Browse. Another panel opens up and displays a whole range of different profile treatments. What I love about choosing a preset treatment from this panel is that each preset is given a thumbnail in which to view how the preset affects the photo I'm working on. This saves me time cycling through each and every one until I find the style.
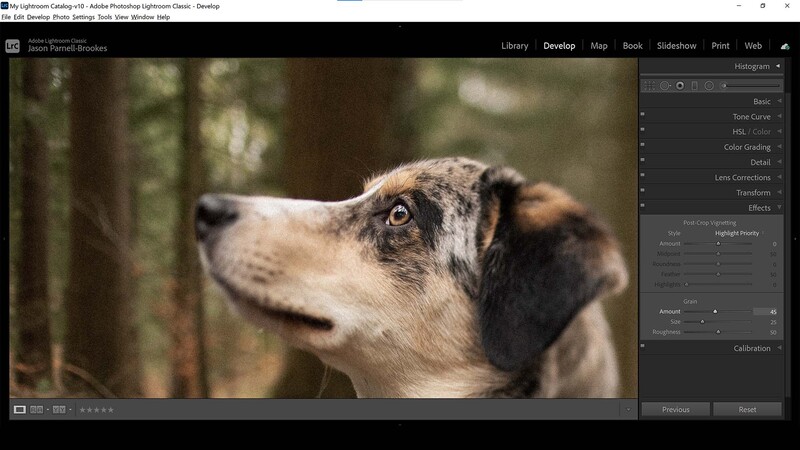
Since I'm going for a vintage feel I headed to the Vintage tab and clicked the small arrow next to it to reveal my options. Depending on the style of the photograph, the colors, and tones involved in your shot might call for a specific preset. For me, I was happy with the Vintage 01 profile treatment as it had a slightly desaturated look, flattening the tones across the frame but was also faithful to the original image in respect to color range.
Drop the Highlights
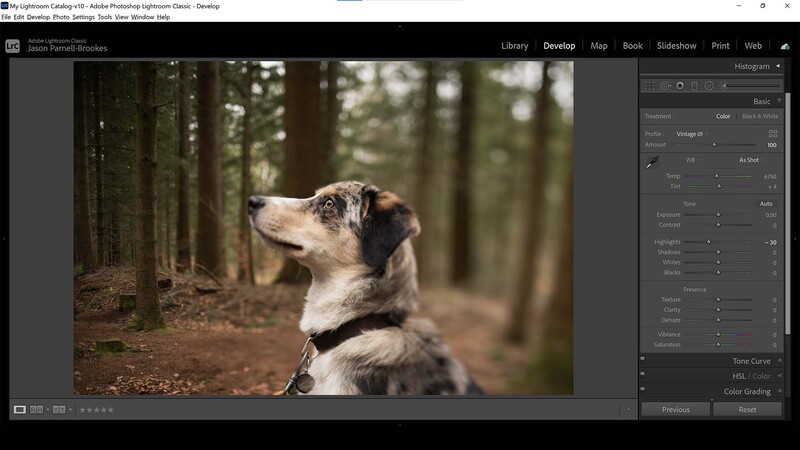
I toned down the highlights in the image which revealed more detail in Benji's brighter patches of fur
Now the stylistic foundations are set I like to take a quick pass through the Basic panel, and pay particular attention to the Tone tab. The exposure on this photo, to my eye, looks great. However, the lighter white sections on Benji's fur were too bright. To correct this without affecting the rest of the photo I could use an adjustment brush to tone down the exposure in these areas, but it's much simpler to lower the Highlights slider. I lowered the Highlights to -30. This allowed more detail in the fur texture to come through and was much less distracting.
Add Some Noise
Next I added some Grain under the Effects panel in the Develop module to more closely mimic a filmic style
Now that my profile treatment and tonal controls are done I wanted to move on to adding other effects. The vintage look I'm aiming for is to instill a sense of analogue to my digital image. With that comes a certain degree of grain or noise in the photo. So in order to emulate this rather more filmic characteristic I moved down to the Effects panel and bumped up the Grain slider. I clicked on the photo to zoom in to 100% as I wanted a clearer view of how the introduction of the grain would affect the final image.
I increased the Amount slider until I was happy that the grain was visible but not distracting from my main subject, Benji. It's more difficult to notice the grain in his fur because of the complex markings and rougher texture of the hairs, but look to the forest behind and you can see the rough granular look that's applied to the photo.
Make a Crop
I cropped the photo down to remove the bright bokeh distractions in the top-right of the image
One of the last edits I want to make to this pet portrait is to crop the shot slightly. The top-right of the frame is a little too bright and is taking my eye up and out of the frame, away from Benji. So I cropped in using the same aspect ratio as the original photo to remove the top-right, making my subject bigger in the frame simultaneously. This is a handy step for cleaning up the edges of an untidy background or simply to correct composition issues in the original shot.
Remove Edge Distraction
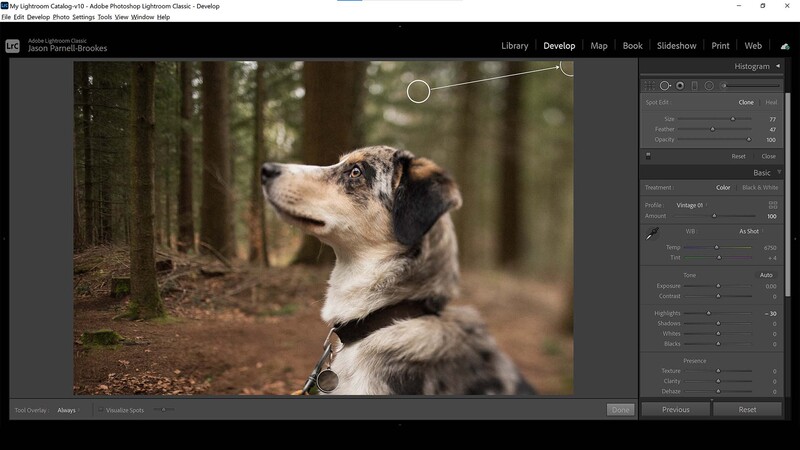
I used the Spot Removal Tool to remove the distracting bright element in the top-right corner of the frame
I noticed after the crop that there's a small bokeh of light in the top-right corner of the frame. I like to eliminate distractions on the edge of the frame as you know, so that my eye can rest firmly in the center of the frame, or on my subject. So I used the Spot Removal tool to remove this. After resizing the brush with the square bracket keys [ and ], I clicked on the offending area and Lightroom automatically sampled a selection from elsewhere in the photo and overlaid without issue.
Create a Rounded Vignette
I added a round, spherical vignette to darken the edges of the frame and help draw attention towards the center of the image
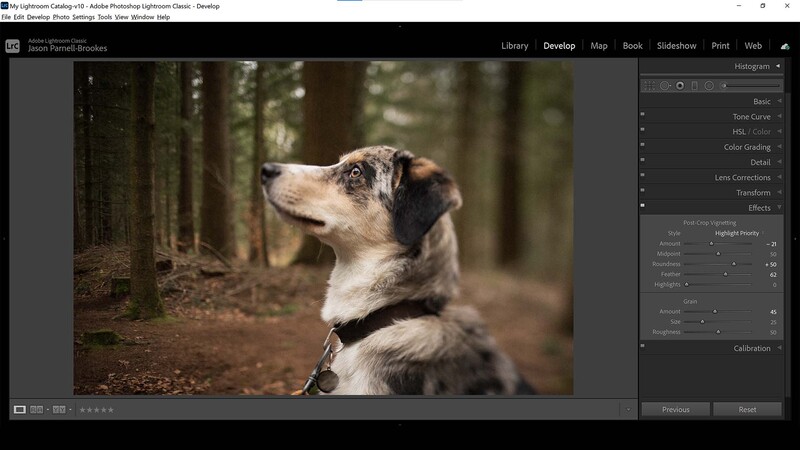
Finally, for a bit of extra polish I added a vignette to darken the edges of the photo. I turned the Post-Crop Vignetting Amount slider to -21 and then altered the Roundness slider to +50 in order to make the vignette more spherical than oval in shape. I also increased the Feather slider for a softer gradient, allowing the vignette to fade into the center of the photo. Use the before and after slider below to see the difference between the original image and the vintage style edit I created using Lightroom.
After a short Profile Treatment, I then adjusted the highlights in the photo before moving to the effects panel and introducing some grain to mimic a film style. I finished up by cropping the image down slightly, removing a distraction with the Spot Removal Tool, and then added a vignette for greater depth in the center of the shot.


2 Comments
"spherical" vignette?
Unless cropping is part of the tutorial, it's nicer to make the crop before the article so the before/after comparison lines up. Handsome dog!