A few weeks ago Pat, Lee, Lauren and myself went to the Bahamas to get ready for the upcoming Fstoppers Workshop. While we were there, we wanted to film some kind of architectural photography tutorial video, and we're happy to share that it's finally ready. The Atlantis Resort is giving us an all-access pass to photograph anything at the resort for the workshop, and here's a sample of what we could be shooting if you decide to come.
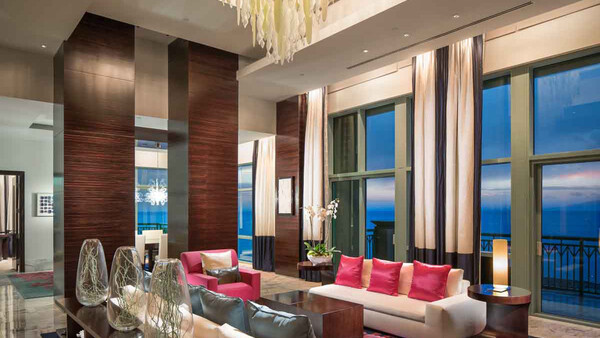
Being an architectural photographer myself, I have seen some pretty incredible locations throughout North America and Europe over the past few years, but I have to say that the penthouse suite at The Cove (a part of the Atlantis Resort) was one of the most impressive. At $15,000 a night it isn't cheap, and it makes a perfect location to teach plenty of techniques when it comes to architectural photography. The last time we did one of these videos, we focused on a twilight exterior photograph in Scottsdale, Arizona. This time we're on the other side of the country and we'll be doing a twilight interior photograph - which shares many of the same techniques and post processing tricks.
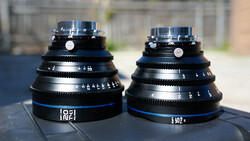
For this shot, we spent a lot of time deciding on a composition and ended up choosing to use a tilt shift lens to create a stitched vertical panorama that captured both the floor and ceiling without using an ultra wide angle lens. This is a pretty easy technique that allows you to capture wide fields of view while not losing image quality due to being too wide. This also makes for a pretty massive file with plenty of detail. I usually do this with a 24mm Tilt Shift Lens and 1.4x extender, which surprisingly enough works on Canon's fantastic TS lenses.
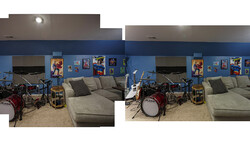
After we chose the composition, we got to work moving furniture and adding light. You want to make sure that everything is just where you want it during the twilight period - so that when the light outside is balanced with the light inside, you're ready to take your photographs and add the light if you want to. In this particular room, there was plenty of overhead lighting which was visible to the naked eye, but not to the camera. In order to add some of that sparkle and drama back to the image, we added a little bit of light with a speedlight and Photoshop.


My favorite thing about this image is the tiny amount of gear we used. With just the camera, lens, speedlight, tripod and CamRanger, we were able to create what I consider a pretty stunning shot of a grand location. If this is something that interests you, I highly recommend that you consider making the trek to the Bahamas for my upcoming workshop with fstoppers. I'll be there with 9 other photographers teaching in an intimate setting with a limited amount of students. We'll have unfettered access to these incredible shooting areas - and I'll be able to answer any questions you have about architectural photography, from lighting to composing to getting your business off the ground.
And if you're not able to make it to the workshop, check out 'Where Art Meets Architecture: How To Photograph Real Estate, Architecture, and Interiors', a 7+ hour long tutorial devoted to walking you through nearly every situation I encounter on an architectural photoshoot. You can learn more and check out some of the reviews by heading to the Fstoppers store.

Join the Fstoppers community for free
-
Post comments and join in the discussions
-
Browse the site ad-free
-
Share your work and get featured in the community
-
Compete in the photo contests for fun and prizes
20 Comments
Awesome work, Mike!
amazing!
Mike, I am always baffled, flat-out flabbergasted by the amount of persistence (and patience) these images of yours command. If the resort should use these on their website and marketing materials, I foresee booking rates for the penthouse to triple! Thanks for sharing.
Awesome as usual Mike (and Fstoppers). I had one question about doing the "stitch to panorama" first. When stitching to panorama first, does photoshop "move" "line up" the layers at all or does it just specifically mask them together? More clearly asked, when stitching before adding the light painting layers, do you have any problem with lining up the light painting layers at all with the original layer? Do they line up perfectly when shift dragging them into the document or do you have to nudge them into place layer by layer? Long winded question but I hope you understand what I'm asking. =) Thanks!
Totally understand. MOST of the time it does it perfectly. Occasionally it screws it up just a little bit, in which case I add all the lighting first, and then create the stitch, and then take the stitched frame and merge them together. I then move it under the original base layer and brush out the part that I won't use, which creates a smooth transition between original base layer with light and stitched base layer which catches the ceiling/floor/whatever. Hope that makes sense. Sometimes you have to mess with it, but in many cases it's fine. I usually find the ones that take patience are when I use the 1.4 extender because it introduces a little barrel distortion into an otherwise perfect lens.
Awesome, yes makes sense! Thanks Mike!
Mike Fantastic work. Great tip using LR I've never used. Your DVD is exactly what I needed to learn about for years. I haven't been this inspired in a long time. I'm buying it today. What I'm not exactly clear about with regard to the light painting, is when you are personally captured in each frame with the strobe as you paint, do you just paint yourself out to leave only the light or is your camera setting such that it only registers the flash in the subsequent frames/layers? Do you explain that fully in the DVD? Thanks!
Great work as always. When you are going around the room and painting with your speedlights how are you triggering your camera and flash? Is that where the Camranger comes in?
Yes, camranger
Mike, a question, if I may. I see you are light-painting the scene with your flash holding an iPad (shuttersnitch?), but I don't see you holding a trigger. Do you use something like the EOS Camera remote on your iPad to trigger the camera? And what triggers your flash then? Oh and PS: Love the process! First time I've seen a stich by shift, really interesting and great result!
CamRanger does all the triggering. Thanks for the kind words!
This is actually not a true shift stitch. You are shifting the lens not the camera introducing paralax artifacts. If there is not much in your foreground, this will work well (which it does here).
Business question: Since Atlantis hooked you up with access to the rooms and everything, were they expecting to have full (commercial) use of the images you created in them? It didn't seem like Atlantis was a client and I assume your primary reason for shooting this room this was to promote the workshop and make bit of a tutorial. But I'm sure any of your images would be of interest to Atlantis, so if they did indeed want usage of the images, would you concerned with being compensated based on their potential usage of them, or would you just treat it like a trade? Kind of like,"Thanks for letting us stay and use your facilities, feel free to do what you want with the photos we take." Sorry for the drawn out question, I am currently figuring out how to work out payment for shoots that are beneficial for both me and the owner of the property.
No. Fstoppers is paying them a ton of money to throw the workshop down there, so I would expect full compensation for the images if they were to use them. It costs them nothing to let us in to a vacant room for a couple hours.
Amazing work Mike, but one question? Do you edit the files as just straight up 16bit DNGs in photoshop? Ive tried some shots like this and while the results are amazing, I was making 8-10 gig photoshop files because it was 60+ layers of files. Should I not be exporting and trying to edit 16bit DNG files but something a little easier to manage or maybe I just need to upgrade my computer (it currently works fine just slows down from time to time and saving takes a while when working on these massive files).
I use 8 bit files for this. Even with a spec'd out 2013 iMac it gets slow. 50 or so raws will choke any computer I think
Mike Fantastic work. Great tip using LR I've never used. Your DVD is exactly what I needed to learn about for years. I haven't been this inspired in a long time. I'm buying it today. What I'm not exactly clear about with regard to the light painting, is when you are personally captured in each frame with the strobe as you paint, do you just paint yourself out to leave only the light or is your camera setting such that it only registers the flash in the subsequent frames/layers? Do you explain that fully in the DVD? Thanks!
Mike, you never cease to be an inspiration! I couldnt be happier to have the opportunity to learn from you :)
Mike, how do you do when using long exposure shots like 3~10 seconds and the speedlight painting technique?
Do you expose to get only the desired part exposed right and the rest under exposed?
So awesome.