
Almost four years ago I began a new journey in my photography career. At the time I was still bartending part-time and concentrating on building the headshot side of my business, when hospitality photography came and slapped me upside the head. As it goes with most other good things, it all started over a few drinks with a friend, and has spiraled into a full second stream of income from photography.
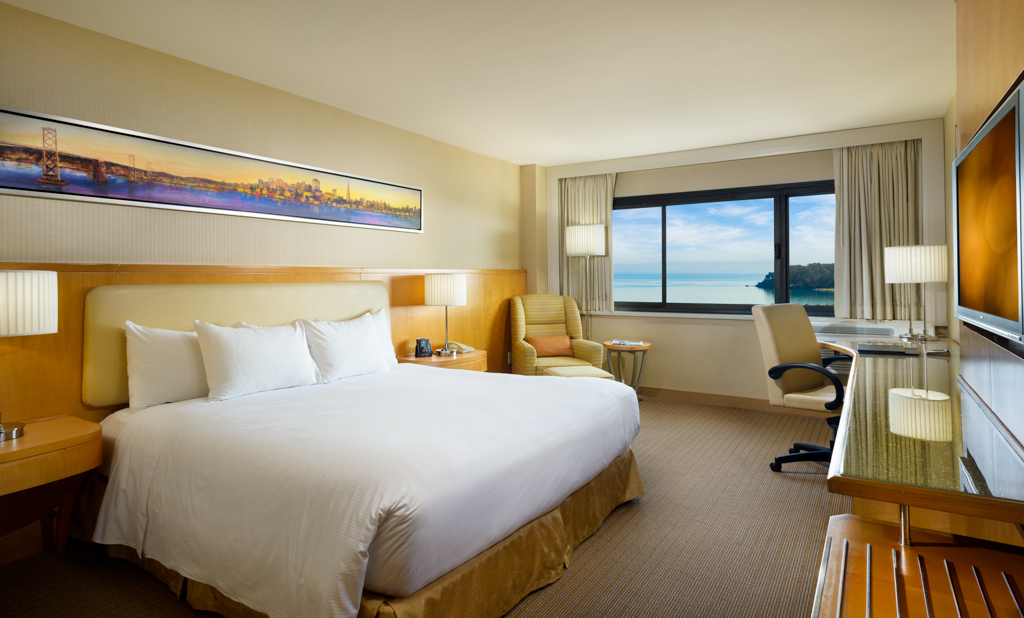
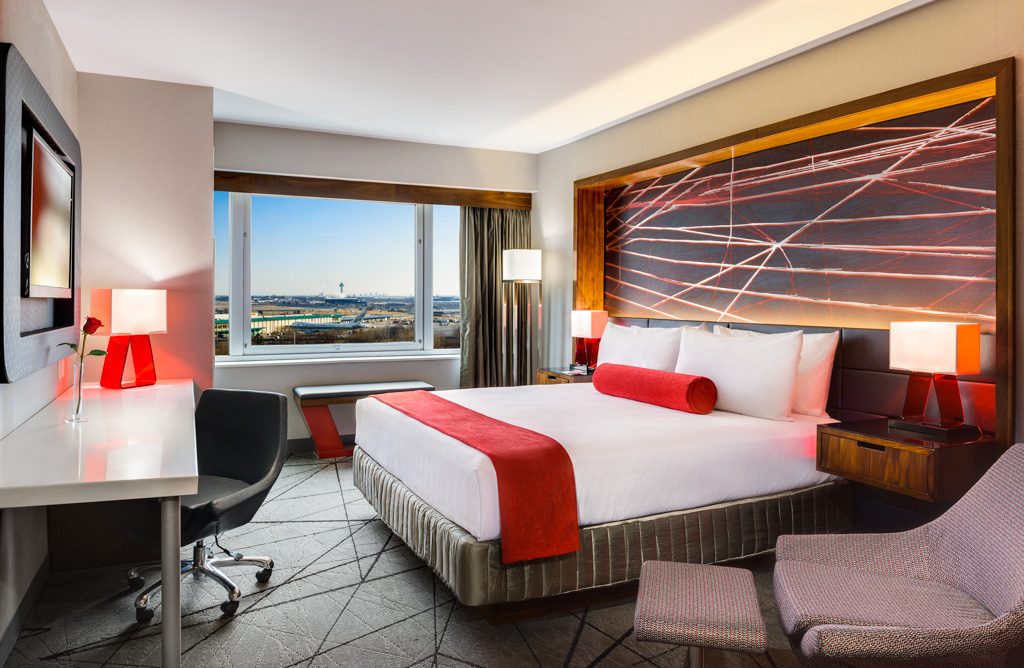
I’ve been shooting hotels pretty solidly for the last couple years, and along the way I’ve learned a lot from other photographers as well as things learnt by just practicing. Hotel photography can be challenging on a number of levels, and as you work through those challenges you grow pretty quickly. Above is an almost two hour video on my process for retouching one hotel room image.
Most of the hotel work I’ve been doing for the last two years has been at high occupancy hotels, where the dynamics of shooting can change on a dime. Sometimes with the sexier hotels, I get to work in the rooms whenever I want, but more often than not there is an emphasis on getting it done quickly. Now don’t get me wrong, the hotels want me to do a great job so they will work around whatever I need but at the same time, if their occupancy is high and they are blocking off 6, 7 or 8 rooms for me to shoot then it only makes us both look better to get them done before a guest checks in. Today, Trip Advisor is such a powerful tool, that keeping a guest waiting past check in for their room is not always a great idea. So with this in mind, at times I’m forced to work in less than ideal conditions.

Generally, the first day on site I go through and check the rooms and watch the light on the building so I can schedule eastern facing rooms for the afternoon, western facing rooms in the morning, and so on. This way I don’t have a ton of light pouring into the rooms, although that can sometimes look cool in the right space.
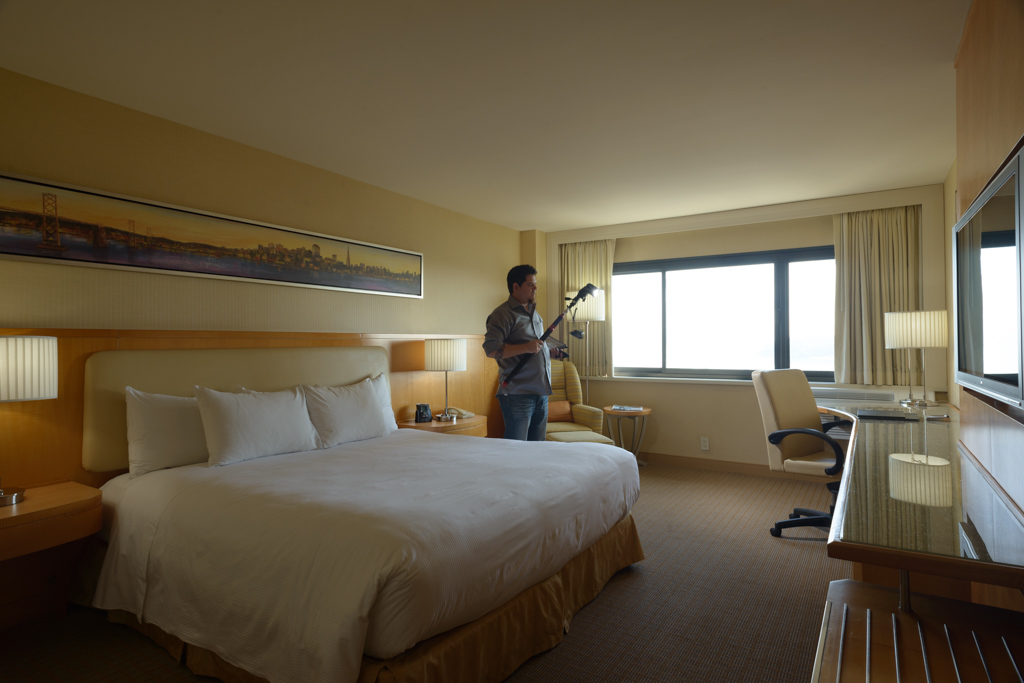
For lighting a hotel room, the same principles apply that Mike Kelley teaches on his tutorial, Where Art Meets Architecture. Depending on the space, I use a mix of hot lights and strobes. Often when I’m shooting a hotel I’m there to shoot a ton of other areas as well - not just the rooms. I usually stay a week or more, and shoot everything they have to offer - so efficiency is always a priority for me.
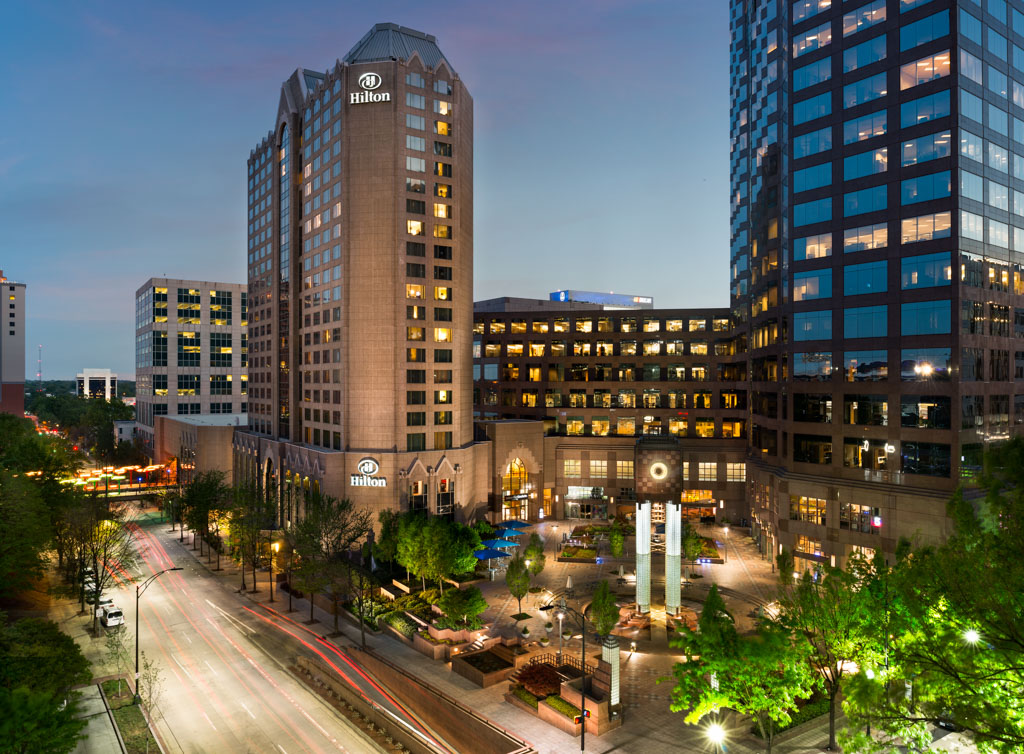
In the video above, I go over a lot of the same techniques that Mike uses but I've added a few other goodies. I go over things like how to use Frequency Separation to even out some lighting issues and stains on the carpet, and how to soften the shadows a bit on the bed. That’s right, you can use frequency separation on a ton of other things besides skin. I started using it on my headshots and portraits a long time ago, and then tried it out on a few hotel shots and was equally impressed with what it could do for building texture. I’ve used it to even out concrete, brick, carpet, upholstery and all kinds of other stuff. Some works better than others, but it’s a great trick to have in the arsenal of retouching techniques. In the exterior shot above I used Frequency Separation to even out the lighting on the brick between the two Hilton logo's. The exterior shot above was 3 1/2 hours worth of retouching with 50+ lighting and adjustment layers. You can see a 10 minute timelapse of the entire retouching process for the exterior shot here.
So if you dare, check out the video above, and also check out Mike Kelley’s tutorial as he does an awesome job of explaining lighting, composition, and all kinds of other fancy stuff.
One note on the video: on the final image that I delivered to the client, I warmed up the view out the window a little from the one that is on the video. As with most things…always wake up the next morning and give it a second look before you send it off.


Join the Fstoppers community for free
-
Post comments and join in the discussions
-
Browse the site ad-free
-
Share your work and get featured in the community
-
Compete in the photo contests for fun and prizes
30 Comments
Thanks for the tutorial Dylan! I want to ask if you ever experimented with the Liquify tool to correct warping issues with fabric (like the bottom corner issue of this bed)? I've found it works out in most cases without heavy handed cloning.
Thank you E Port! You know...i feel a bit stupid as I'm not sure that has ever occurred to me to try, good tip! Thank you! Always leaning new things ;-)
Glad I could help! Liquify can even be used on exteriors to straighten out crooked hedges, telephone poles, and such. It's an amazingly underutilized tool in this field, much like frequency separation.
Yeah I immediately thought of a bunch of uses. Very helpful!
Great article. Compared to the portrait work you do, does this type of retouching ever get a little dry or mind-numbing?
I find it more fun as you see an image really come to life over the process and every location is different.
Thank you Jason! I would say that compared to the portrait work it can at times be mind numbing, so too can the portrait retouching. What Austin says is true as well, it can also be a lot of fun. It's also fun and challenging to shoot, having to visualize the different elements to be shot and see the end result. I do enjoy shooting exterior shots and other area's other than rooms, just because they tend to allow more creativity.
After watching the whole video now I realize that the retouching for this particular work isn't entirely unlike retouching travel or landscape photos when you see your image "come to life" as Austin mentioned above. I'm at times using bracketed shots and manually masking in various parts similarly.
Perhaps some of the portrait type stuff gives a little quicker gratification because out of camera you may have a great expression/pose even before you get to the retouching.
Thanks again for sharing your process.
You are exactly right, I use similar techniques for my landscape work as well. My pleasure, I'm glad you enjoyed it!
Austin Burke - in 4 minutes NEW
Well I know what I'm watching tonight. Excited to see this as I started getting into architecture photography through mike Kelley's DVD. I still need more practice but I do feel like iI'm improving, its just a matter of finding locations to shoot so I can get more practice and trying to find gigs in this field. Also if you are ever in Florida for a shoot and I know someone who would love to assist you if you need any help.
*hint* its me.
Awesome Austin, yeah just keep doing it as much as possible, and it's actually a very real possibility that I'll be coming to Florida for a couple jobs next year. ;-)
For us RE/interiors/architecture nerds this is good stuff. To the commenters that think this is boring... the architecture folks would be bored doing a retouch on a face. ;-)
Awesome shots man. Thanks for the video, big help! (I'm 1.5 hrs into it). I've been shooting RE part time and wanting to break more into design/architecture type stuff so this is very helpful. Normally I do single shots with 3-5 flashes with STU and bounced. I've used the MK technique a few times before and got a decent result, but I think I wasn't doing my flash frames over a small enough area... I was trying to get it less than 6-8 frames and covering a larger area for some reason. And I never quite knew what to do to "finish" my photos an this helps a ton. Obviously the freq. separation technique is new, so I'll give that a shot.
The luminosity channel technique to boost contrast is new to me and looked pretty good, I'll definitely give that one a shot.
It's hard to tell, are you using a diffuser or stofen on your flash? And are you gelling to match the light bulbs? And can I ask what zoom setting you use on your flash? I can't decide whether I should go wide or keep it focused...
any reason you use the 20mm lens instead of a zoom when not using your PC-E lens?
one little tip; to apply adjustment layer to only one layer you can use a clipping mask... Option (alt on PC) and click on the line between the adjustment layer and the layer below. You will see a little arrow show up which tells you it is only affecting the 1 layer below. I use these all the time, and that way they don't get lost by floating all the way to the top of your stack.
http://www.gcflearnfree.org/photoshopbasics/10.3
Thank you for the kind words Mel! To your questions...I'm not using a diffuser on the flash in this particular shot, If I diffuse, I will use a shoot through umbrella or scrim, or softbox etc..The flash head I usually keep zoomed to 24 or 35mm, I think wider is generally better. The only other zoom I have is a 24-70, the 20mm is a prime, but most of the time I shoot at 24mm, 35mm, and 50mm, I do throw on the zoom from time to time when I want to hit 70mm as well. For these particular rooms I just went wider than I normally do. Thank you as well for the tip on adjustment layers! I swear I learn new stuff about PS everyday ;-)
almost forgot one...I didn't gel the flash for these shots, I do when needed, but as I had the camera's white balance set to daylight, and the light bulbs in the lamps were daylight, the flash pops looked good as is.
Do you usually use an action to do the layer mask reveal? If not, you should!
Thank you Kenneth for the tip! I'm a bit behind the curve on using actions, I know it would be a bit faster for the Layer mask reveal, I'll set one up, thank you!
Great video, always nice to pick up some new tips!
btw, to make a mask from a selection, instead of going Layer, Layer Mask, Reveal Selection, you can mask an area and then click the icon at the bottom of the layers panel that looks like a circle in a square beside the 'fx' icon to add a layer mask from the selection. I don't know if that is what Kenneth is talking about (I'm only part way through the video), but in the video I saw you doing it the longer (and tedious!) way.
Anyway, thanks for the video!
Thank you Levi! Yeah I know the button you are talking about, the only reason I was using the longer tedious way if for people who may not be familiar with the process at all.
Great tutorial Dylan! I am always learning from others workflow. Lots to learn from yours. Thanks for taking the time to make this one.
Thank you! So happy you enjoyed it! If you have any questions don't hesitate.
Great video! I have a great deal to learn about masking and such and have been wanting to learn this specific technique since I saw it in used in real estate photos months ago. This covered all the basics and some great details and I made quite a few notes in two hours. Thanks for putting this out there!
My pleasure Kurt! Glad you enjoyed it and if you have any questions feel free to reach out!
Hey Dylan,
nice one... As you may know I'm specialized in hotels & Hospitality photography.
check this trick I've discovered to make my life easier with mattresses :)
http://www.youtube.com/watch?v=GtiI5SPB0HA
Awesome trick!! I do something similar for pillows when needed, I bring out 4 pieces of rigid lightweight board and push it in the pillow case behind the pillow and it makes them stand up straight without major bends in the corners, and smooths out the fronts while giving the pillows a very puffed out feel. Awesome thank you for sharing!
Fstopper just a quick idea for you,
How about, if you can, put a way to "save" articles on a user account, to be able to see it later, i find myself on your website alot, and watched countless tutorials, articles that i would like to keep, to reference later, to remenber certain things, or to show others.
A favorites section, would be awesome, as i tend to loose track of those articles,
thanks for your time, and your amazing web site
Great video Dylan! Thanks. Now can we have a full length tutorial on one of your externals?
Thank you Ryan! I'll see what I can do about that!
Wonderful, thank you!
Dylan, some three years on I have a question. I'm trying to understand the process of randomly walking around the room popping the flash. What I'm struggling to work out is how you then remove yourself from the image after in PS Raw ... Maybe I'm being daft here but I can't get my head around the process.
Steve.
This is a very cool description of the new hotel, designed by Mike Kelley. I heard a lot about it and I was lucky enough to visit it a few days ago. All rooms of this hotel are already in public access on https://planetofhotels.com/en/usa/festus/3-star-hotels. It was there that I came across this offer. Rooms at the price of a different range and it pleases. If you finally arrived in San Diego, you must visit these apartments.