
There are many times in the automotive industry that when you're asked to shoot a car, you frequently cannot move the car either from where it is or far from where it's being stored due to its rarity, sometimes condition, and sometimes even questionable street-legality. This can definitely cause some problems when it comes to producing high-end images of the cars for a client. If they want only detail shots then you're good as you won't need to show much of the background to accomplish their goals. However, if they've got high hopes and want the car to be pictured anywhere except where it actually is you have to be a bit creative.
Composites
I'm sure everyone has seen them or at least heard about them. Composites are a fact of life in this day and age in the photography world. Whether it's a simple merging of a few different exposures blended together to make a single final photograph or a complete reconstruction of the environment, composites are in many situations the best way that you can create a final image.
Creating composites is definitely a learned skill, and as you'll see from some of the photos in this article, you have to practice in order to become good at. But it is also a very marketable skill, especially if where you live is not as picturesque as some other places. Is it a crutch that you should rely on for every job? Absolutely not, however, it's a good tool to keep in your bag. Now, this is all leading up to one of my current clients and good friends here in Houston that I do a lot of work for, Premier Detailing. The owner Jonathan Arrecis is one of the best detailers I know and specializes in rare and exotic cars of all varieties.
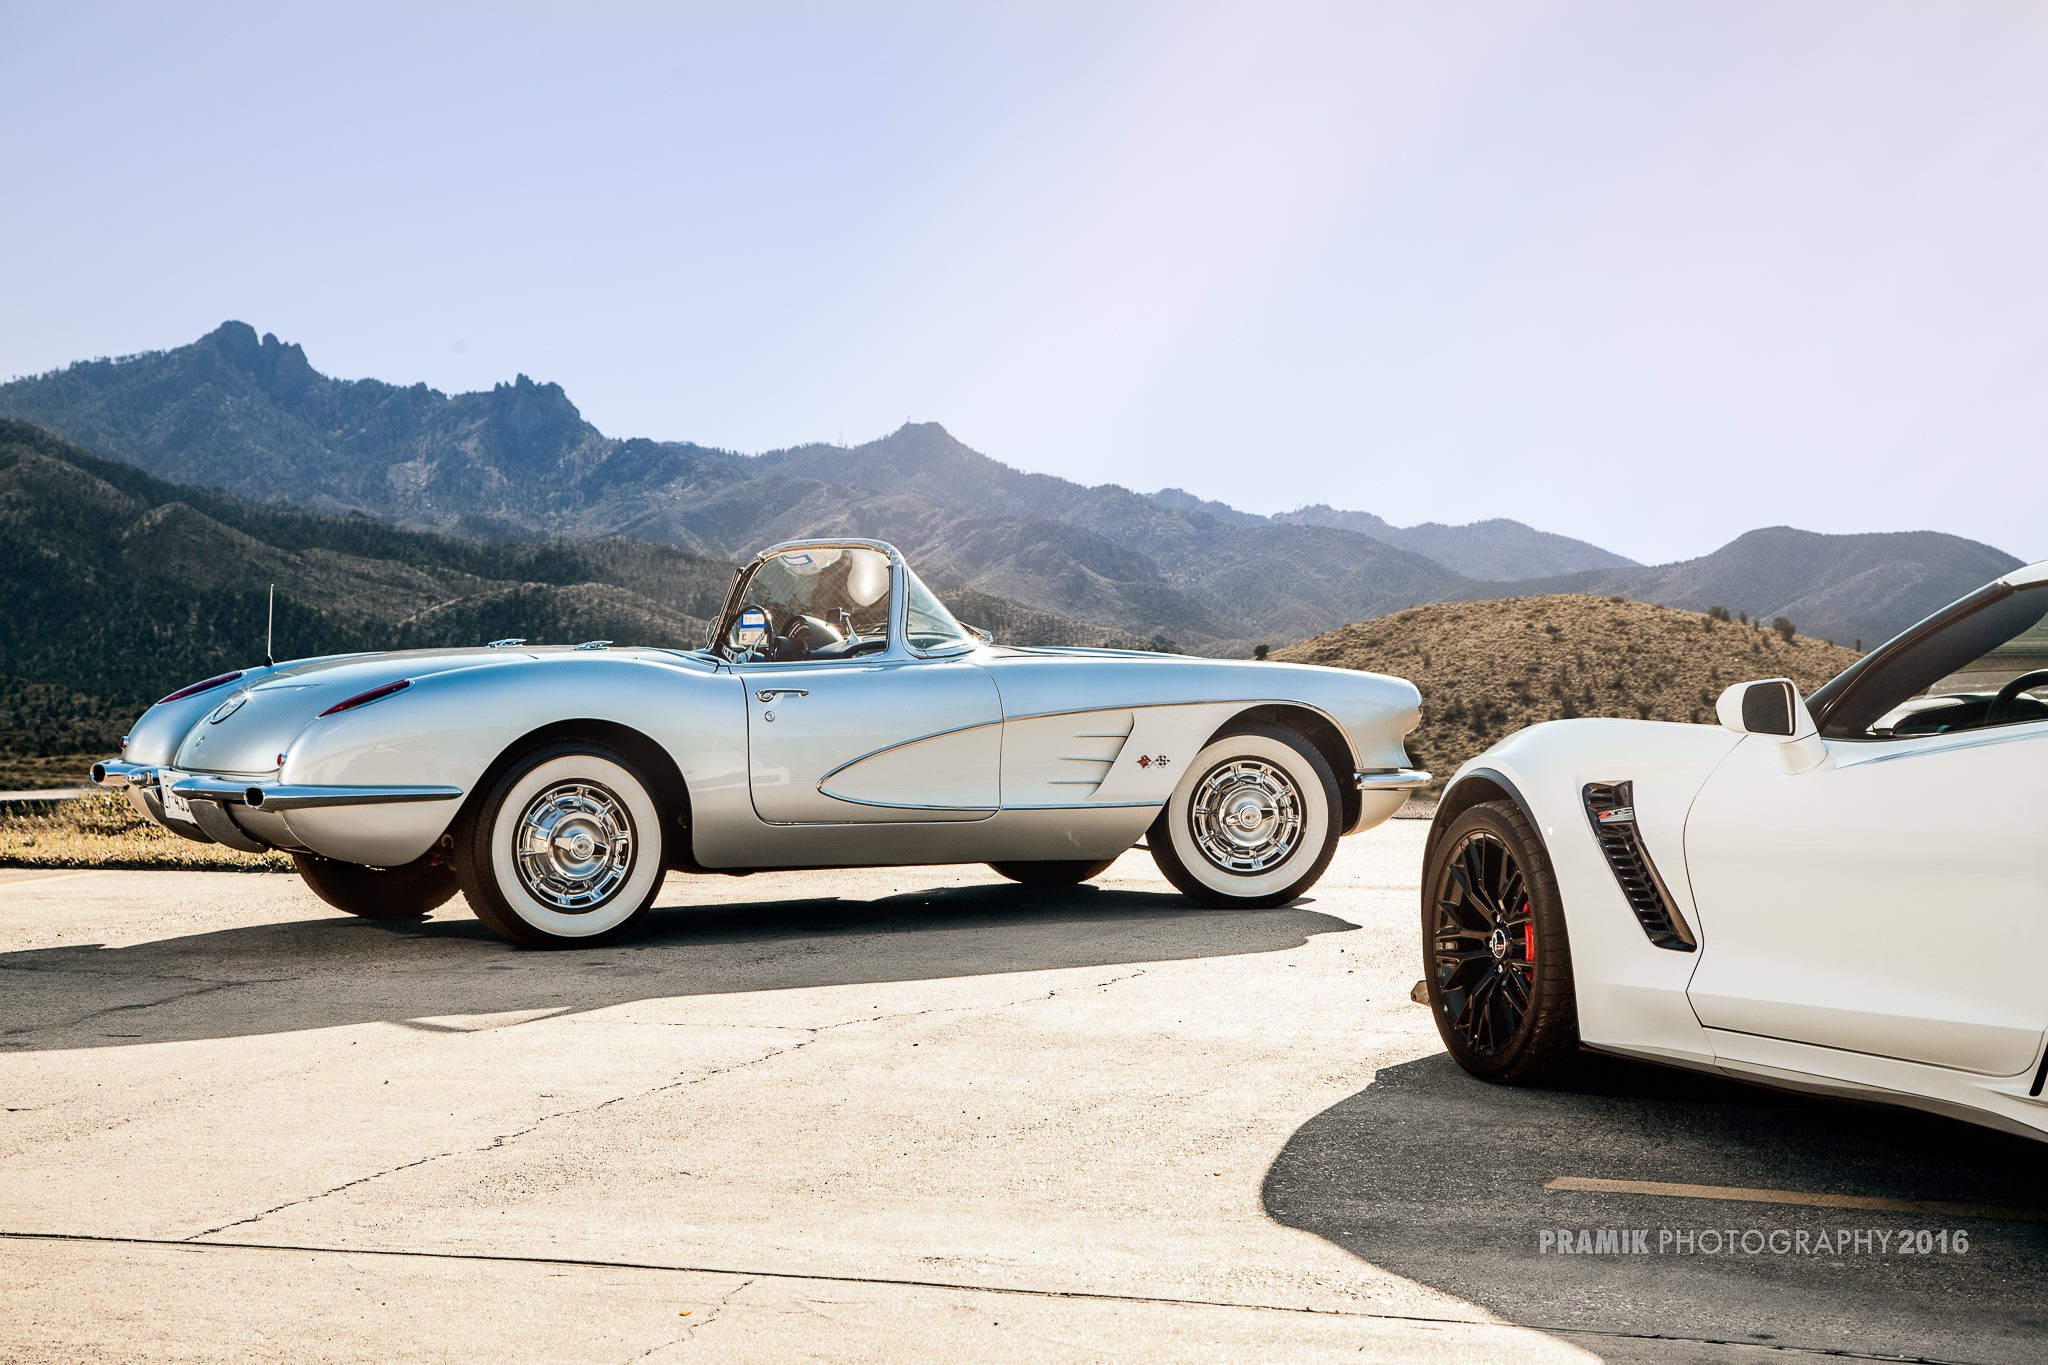
The image above is a great example of the kinds of projects that I am fortunate enough to be able to work on for my client. The challenge though was a perfect example of not being able to bring the cars to an ideal location, and instead, having to improvise in a dingy parking lot in front of a badly landscaped commercial center. Now this project was not exceedingly difficult; it was time-consuming — but not difficult. It was a simple merging of several different exposures and hits with a flash, and then adding in the new background and skewing and resizing it till the horizon looked about right for the photo.
The Project
What is this all leading up to? Well, Arrecis called me a few months back and told me about a car he was going to detail that the owner absolutely wanted to get some photos of, but with a catch. It wasn't just any car, it was a white McLaren 650s with every bit of carbon trim you could select to get on the car, with a very specific license plate: "STRMTRP." So a white and black super car, with a Star Wars themed plate. I could guess what the idea was, and I was right. A few months pass and I've been prepping some assets and ideas for the car and the day arrives. I pack up my gear and head to Arrecis' shop, do my usual multiple exposure work, and pack up and get ready for all the post work that's about to happen.
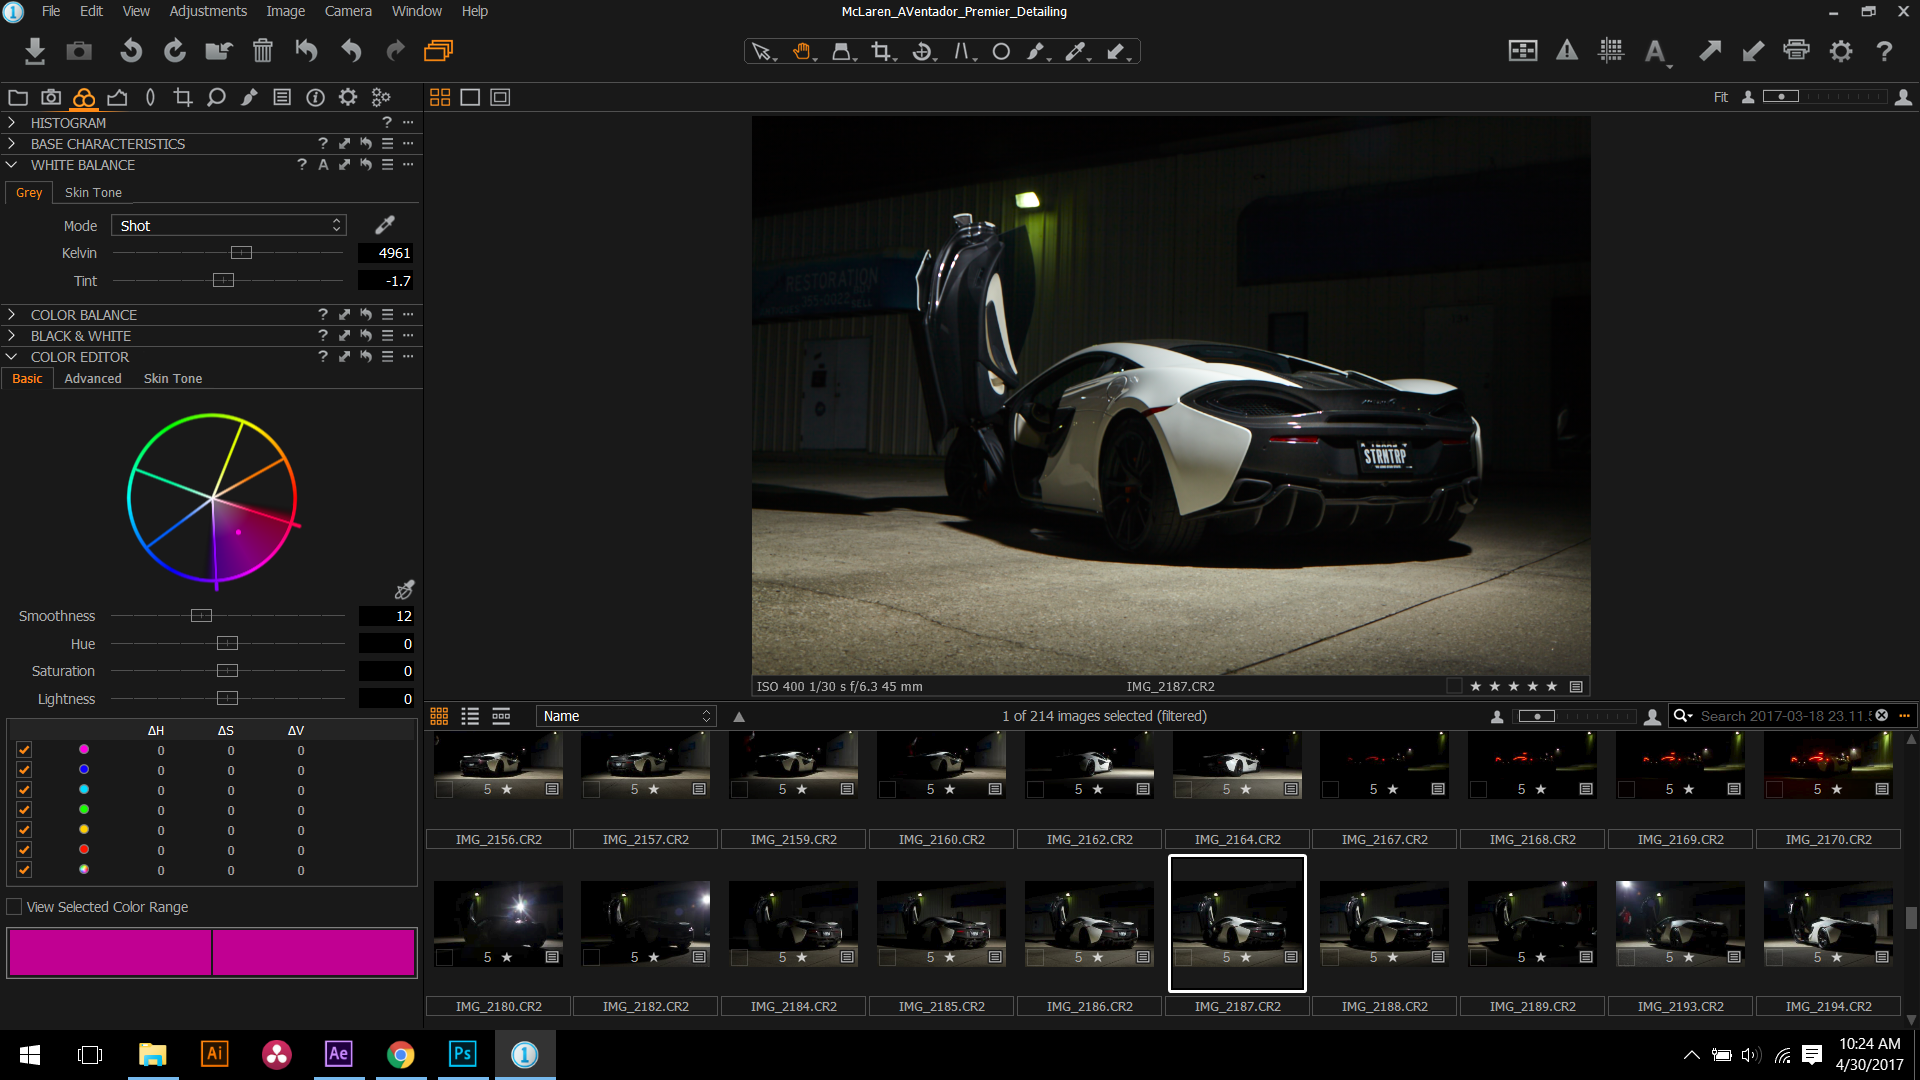
Naturally, sorting and organizing your photos is where it starts but this obviously is only a fraction of the work to come. But it's important to take note of the focal length, and in some cases the aperture, of each shot (which if you're shooting on just about any modern camera, is readily available in your editing software).
Next, you bring the photos into Photoshop or your photo editing software and stack and align your images. Usually, I do this through the File>Automate>Photo Merge feature in Photoshop but if you're stacking too many images or too many large files it can lock up, so you'll just have to suck it up and align them all manually. Now for this next step, it's a more in-depth process to really merge all the layers together to make a final exposure blend to get the look you're going for.
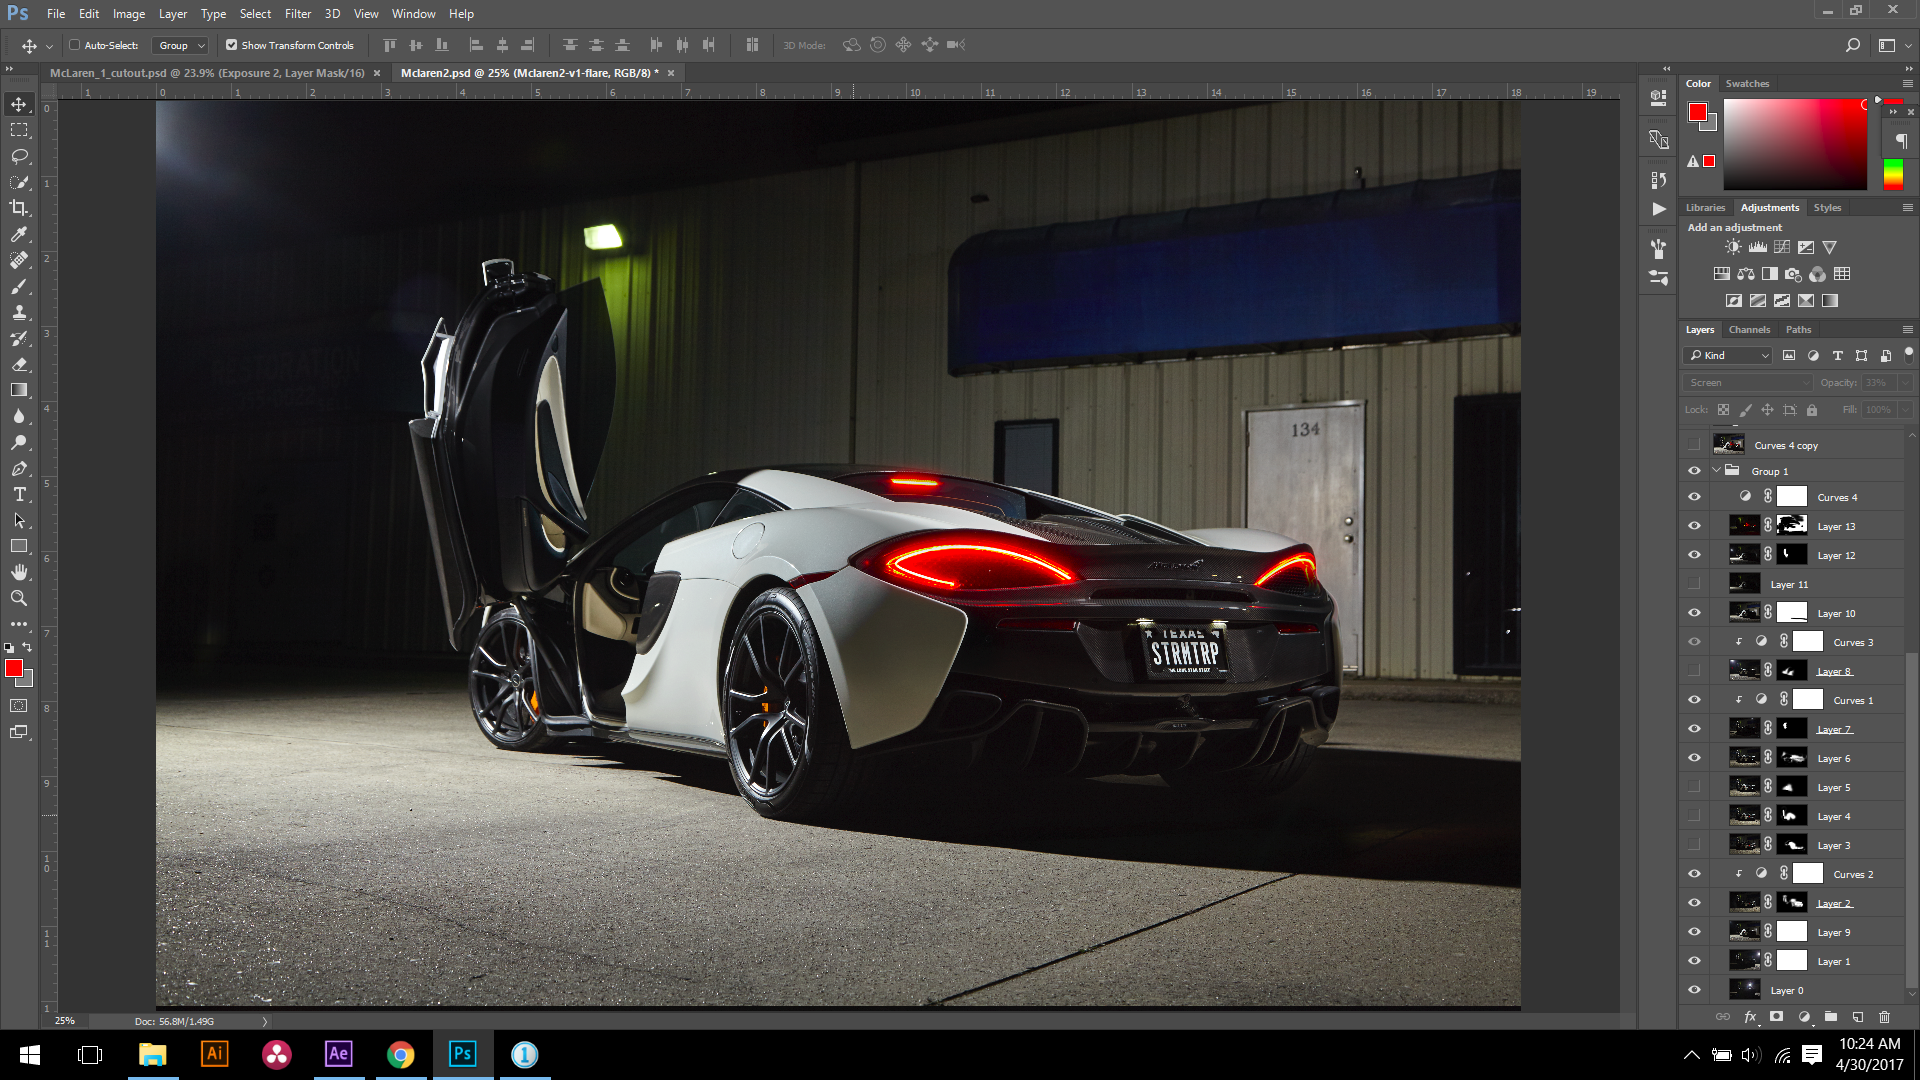
This is a good point to pause and take a few notes as well as export a JPEG of your photo as it stands now. A few things to take notice of right now though are things like primary light direction, any secondary light sources, shadows, and any other things that could have an influence on the scene that you're about to build.
From here, take the selected image into After Effects and create a new composition using the dimensions of the photograph you're using. From here on for how I did this project, you will need a plugin for After Effects made by Video Copilot called Element 3D. This is a very easy to use and basic 3D animation engine that works effectively inside for Motion Design, VFX, and a myriad of other possibilities should you choose to use it. For this project, I'm pushing it and the processing power of my computer to build an entirely out-of-this-world environment to place the McLaren in.
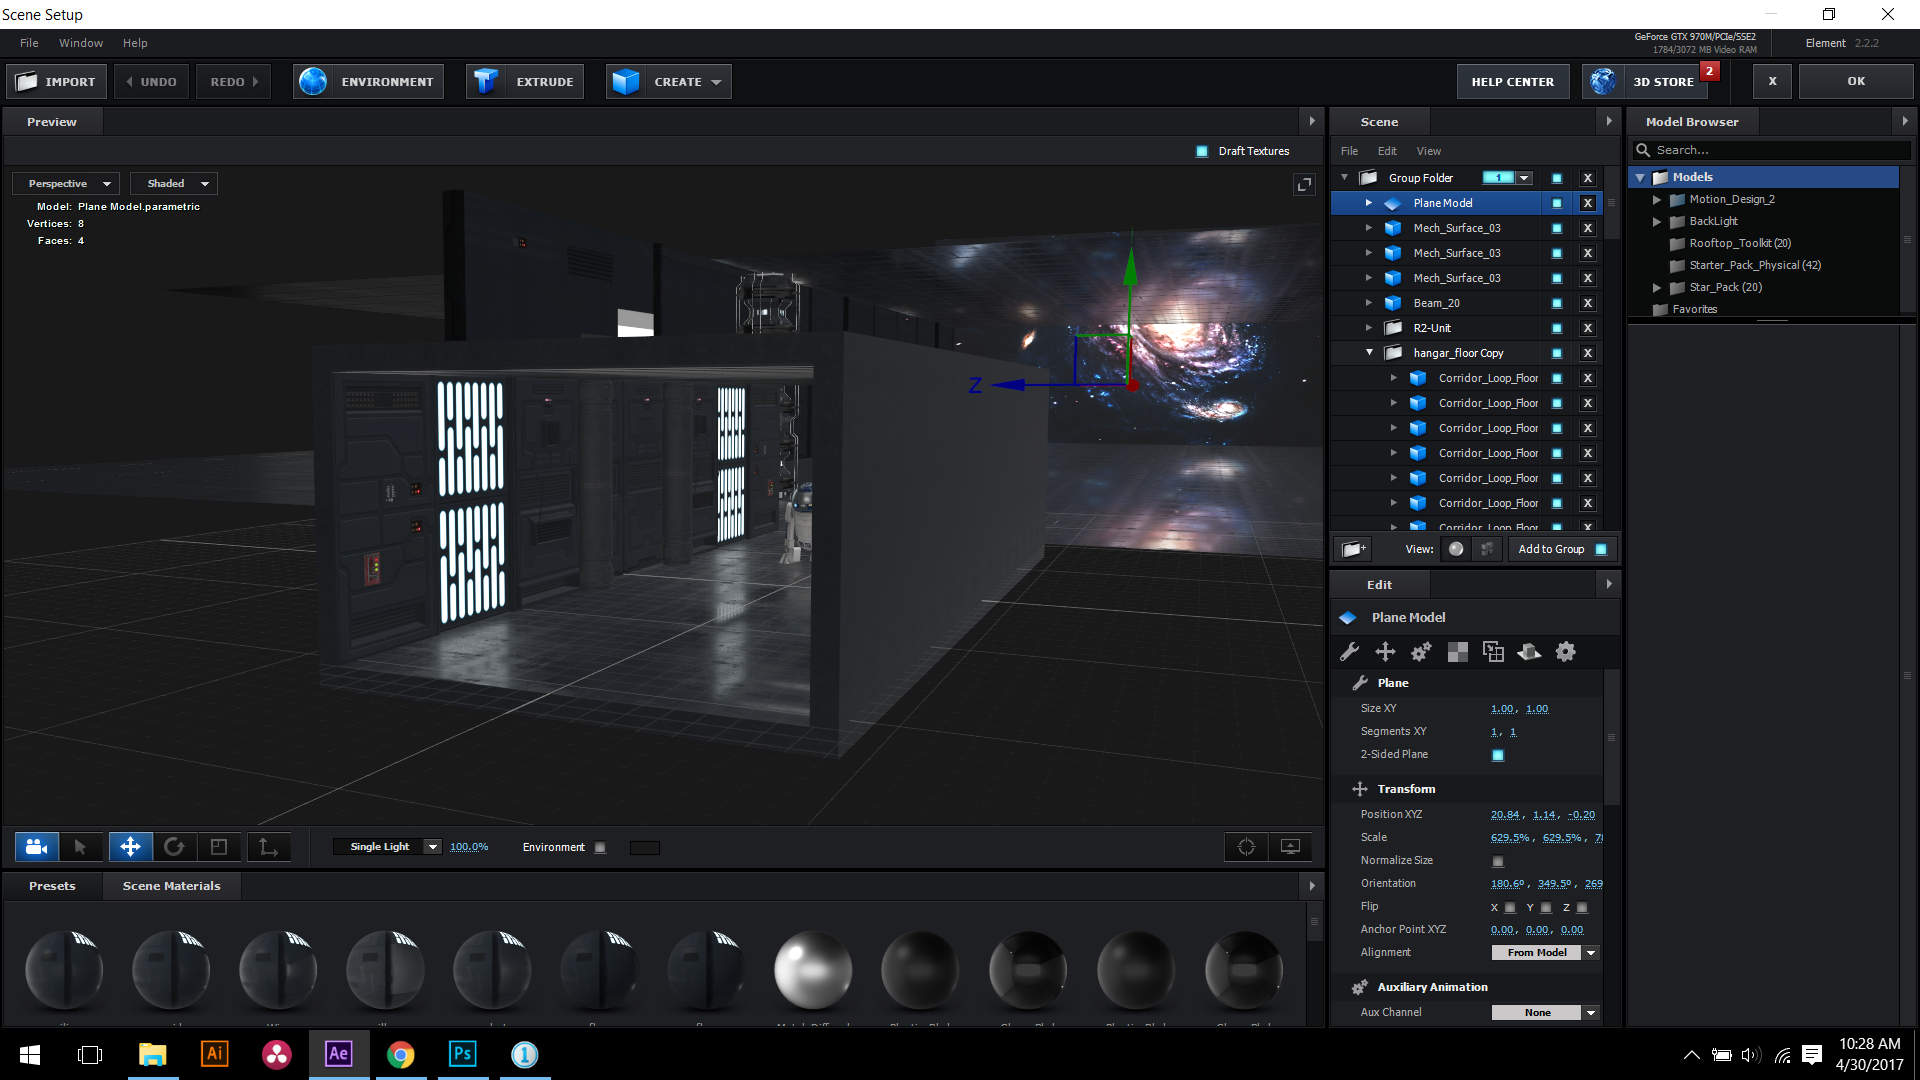
This is where having a good idea of what you want to do before you go into the builder will simplify your process and make it a much more linear build instead of floundering around trying to figure out what you want to do. For me, I knew I wanted to have the McLaren appear to be in some sort of hangar looking out into space with a few notable things from the Star Wars franchise to help sell the idea.
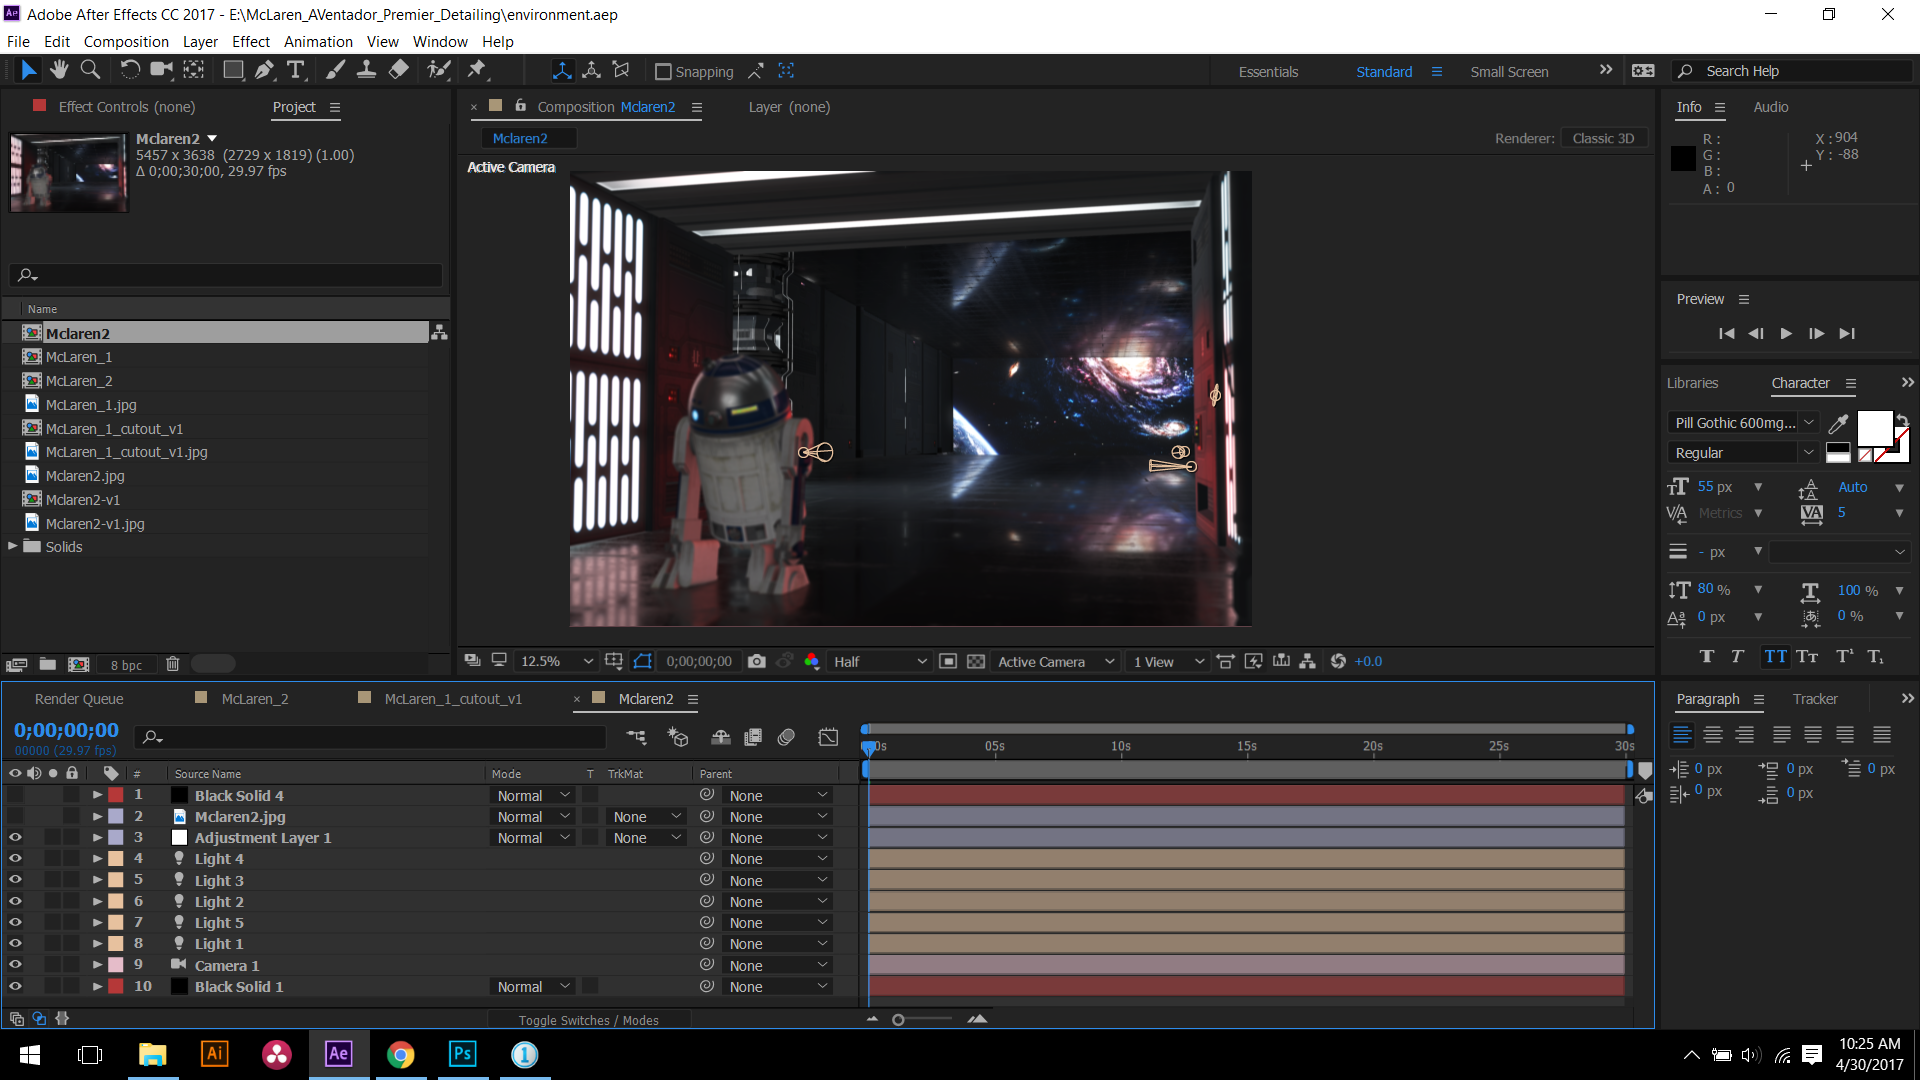
When you get it to this point it's important to note where your light directions and other additional light sources were because you will need to add in additional simulated lights to help sell the effect. In this instance I have added in a very soft gentle fill light on the back of R2-D2, a red spot to hit the right side wall and bounce back to hit the opposite wall and rim R2-D2 in order to simulate the brake lights of the McLaren, and then a few other assorted lights to help fill the ambient space and give enough light to make some details on the environment visible. From here the final scene is exported from After Effects as a PSD layer and the final assembly and correction and grade is underway.
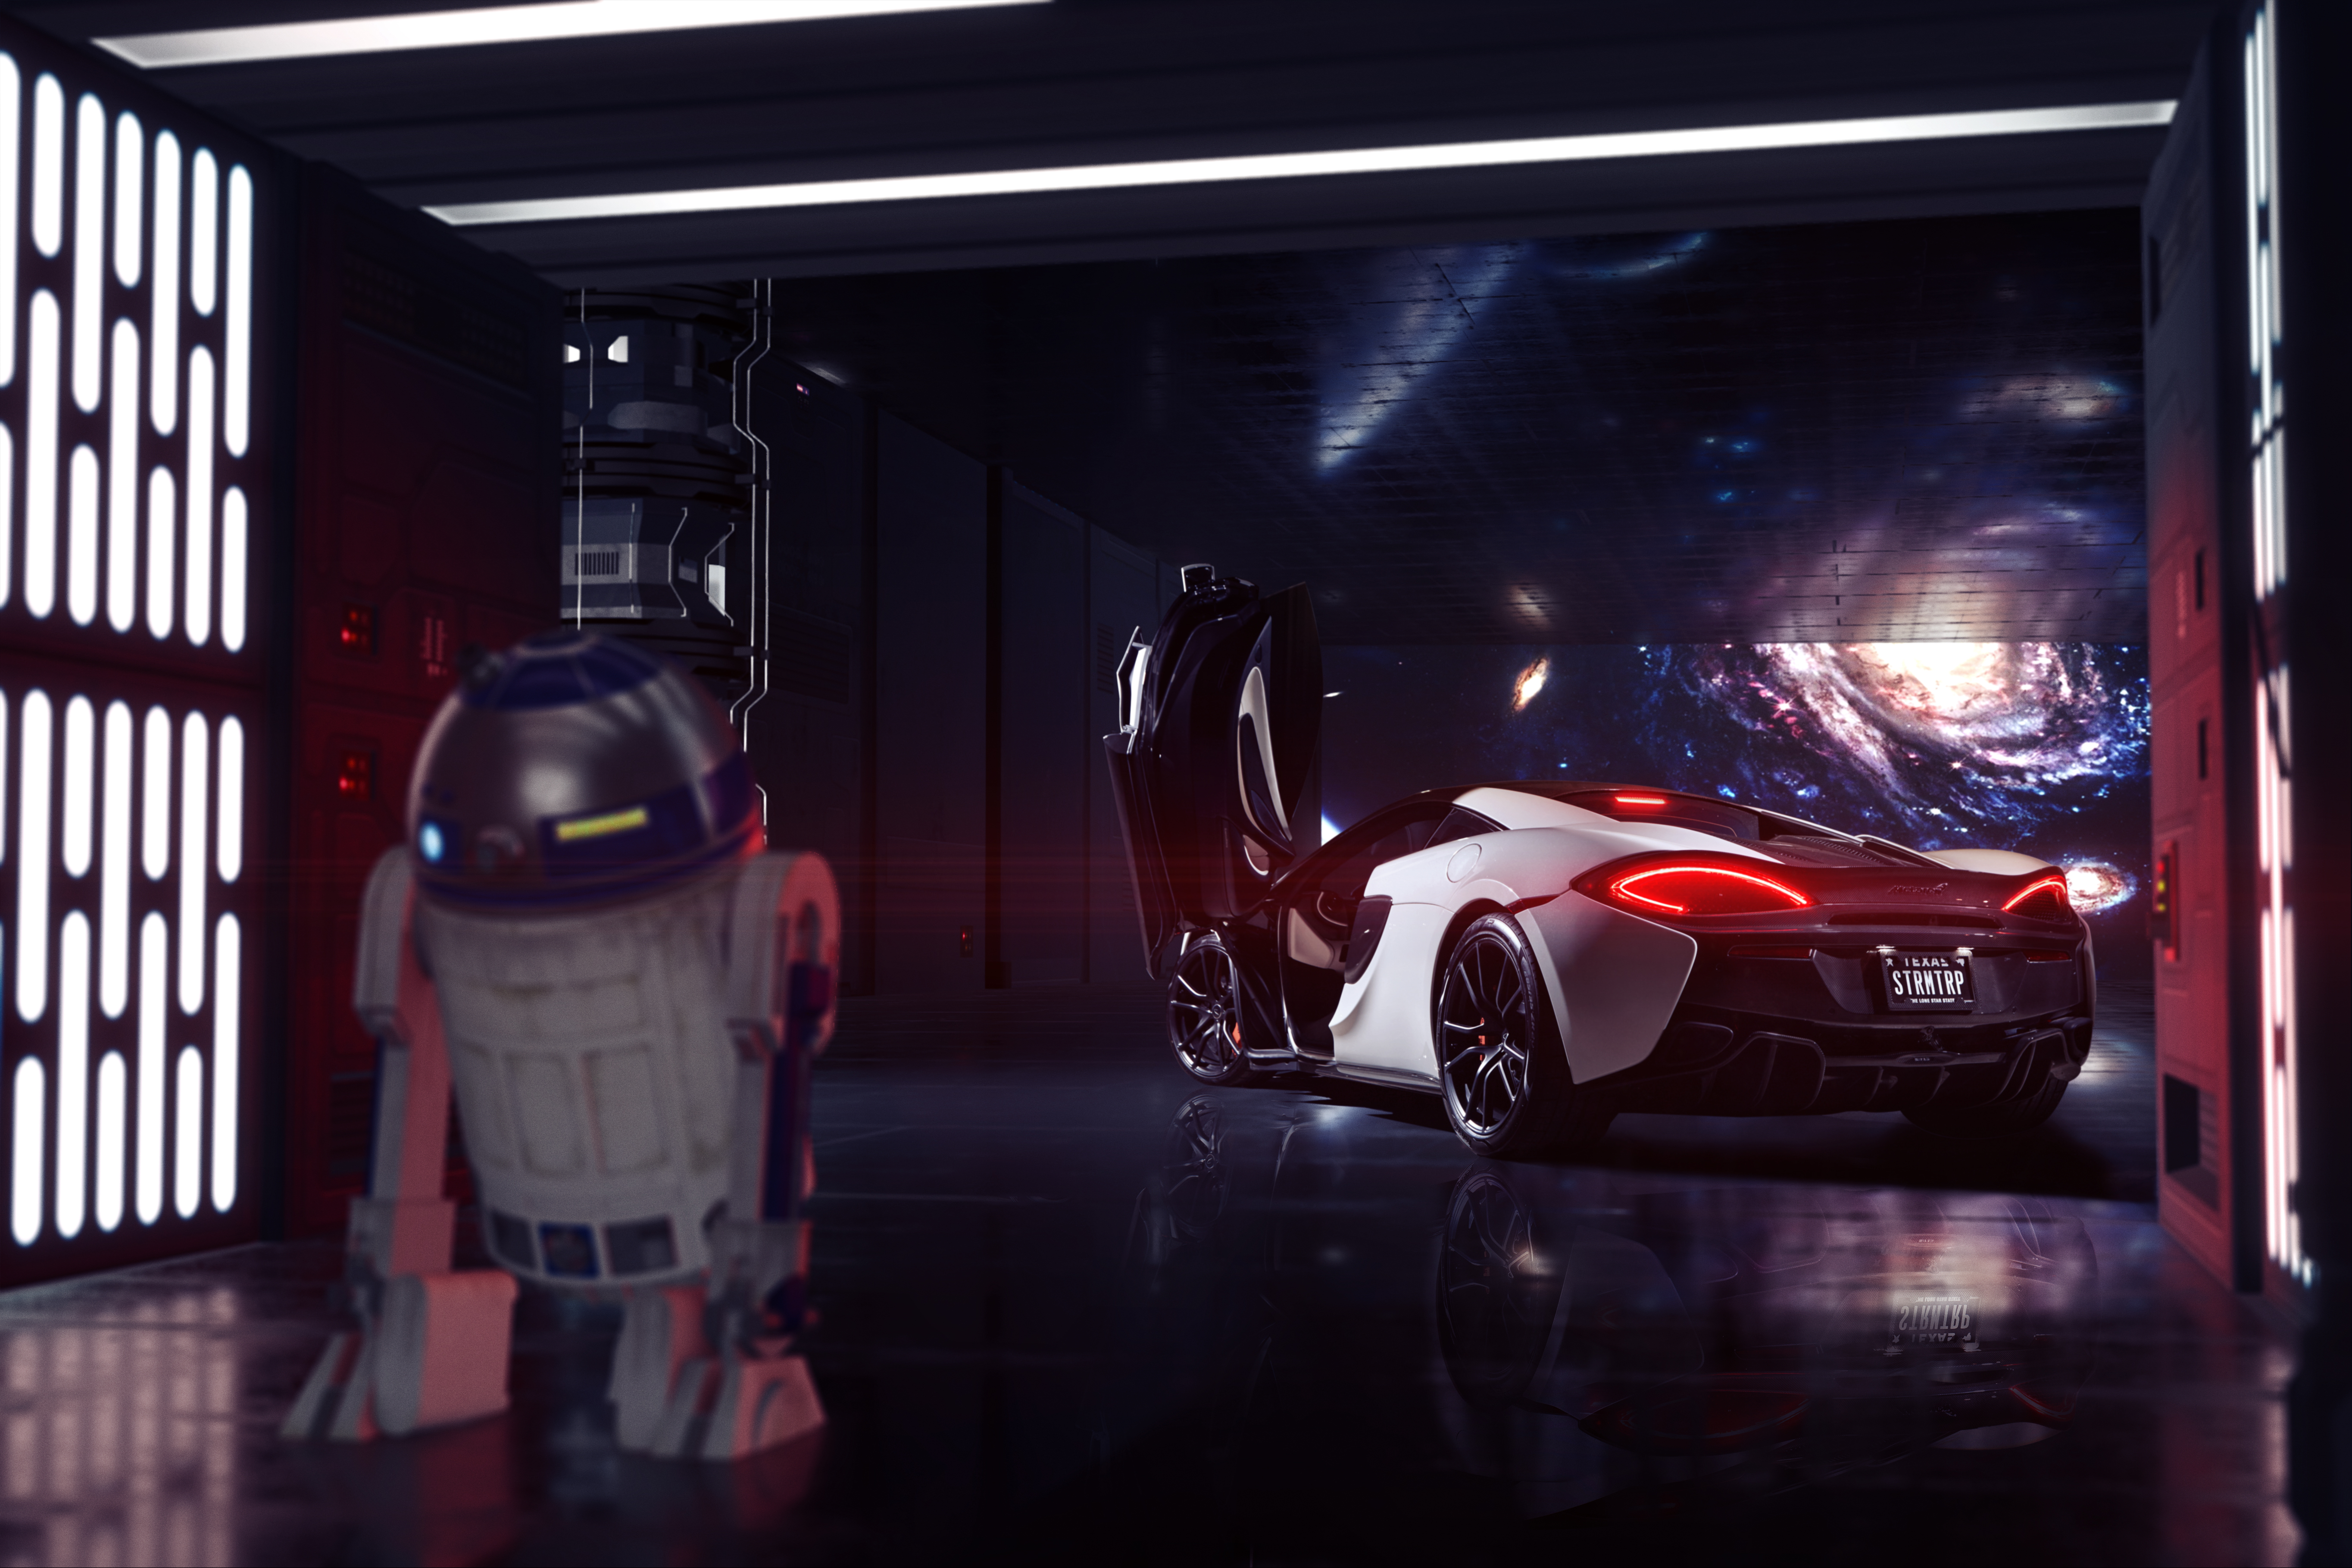
After a final adjustment phase, including simulating a reflection of the car in the floor, some lens flaring, and some overall coloring and shadow work, the final image is completed. At this point, some people would argue that this is no longer photography, but more digital art. They're not wrong, but they're not completely correct either, and in the end, the client was thrilled with the photos and did not expect such an in-depth approach. This kind of project is why it's important to take the time while you can to do personal projects and experiment with new and different techniques and don't be afraid to think outside the box and be ambitious.
In all this may have been a quick glazing over some of the more in-depth details of this entire process, and if anyone would like me to do an article in the future that delves a little deeper into the process as a whole, let me know in the comments and I'll get to work.


Join the Fstoppers community for free
-
Post comments and join in the discussions
-
Browse the site ad-free
-
Share your work and get featured in the community
-
Compete in the photo contests for fun and prizes
14 Comments
My personal opinion aside...good work.
This is where photography is headed regardless of how much it might offend some of us. The commercial design world has been using CGI for catalogues etc. for awhile now and it's only going to become more prevalent.
I don't think that photography will be completely phased out but CGI is definitely becoming very prominent in much of the industry. If it were up to me I would prefer to shoot the cars in ideal situations and locations all the time, but sometimes you just have to make do.
Thanks for reading though!
That's awesome. I'd love to be able to do that.
Just takes some practice!
lol i have to bring up the obvious, and something i try to pay attention to when compositing. In both of the photos with a floor reflection, you have to be aware that a reflection will reflect what's above it for the most part. So, the underside of the car, and definitely not the roof line of the car
just a comment.
Haha no you're absolutely correct. But as I didn't have a solid reference photo of the underside and in theory it would be relatively dark and probably not visible anyways. But to the casual observer/consumer, they won't catch on to that ;)
lol you're probably right, and by no means don't let that comment take away from the rest of the amazingness of the photos!!
Yea, usually i end up with dark texture under mine to try and get something similar to reality. It is what it is
otherwise, hell of a workflow!
Haha Thank You!
Would love to see a more in-depth workflow!
Absolutely! :D I can absolutely get started on that, may be just what I need to do to do some screen recording showing the entire process.
Cool work!! I love car photography, i love mix up photography and CGI and i'm a Star Wars geek, so i definitely love this article. I love to see some more detail and process. Just a question: did you rendered the final composition in AE or with other rendere engine? thank you!
Final composition of the background by itself was done in AE, the final export of everything all together was from Photoshop.
Awesome, would like to know more about the PS to AE to PS roundtrip and how AE was used. DId you extract bits from video or download objects into AE. Look forward to reading more!!
Hey there! I can definitely do a more in depth overview of the entire process! But in this instance I would put the car's exposure together in photoshop, export a jpg to After Effects so that I could get the perspective right and 3d environment built, and then once that was done, export a frame as a PSD file to bring back to Photoshop to finish up the composite!