
One photography technique I've always been interested in learning is how to photograph ink in water. The resulting images are beautiful on their own, but having a library of ink clouds and paint explosions for use in composite work is also super valuable. In this video tutorial, I'll show you some of the best tips and tricks I've learned capturing ink in my own studio.
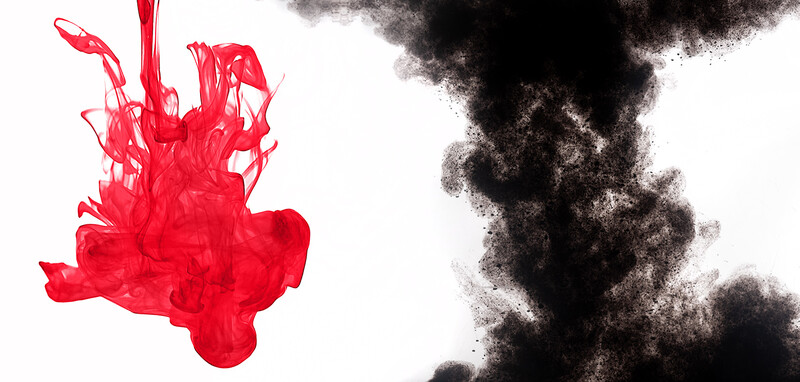
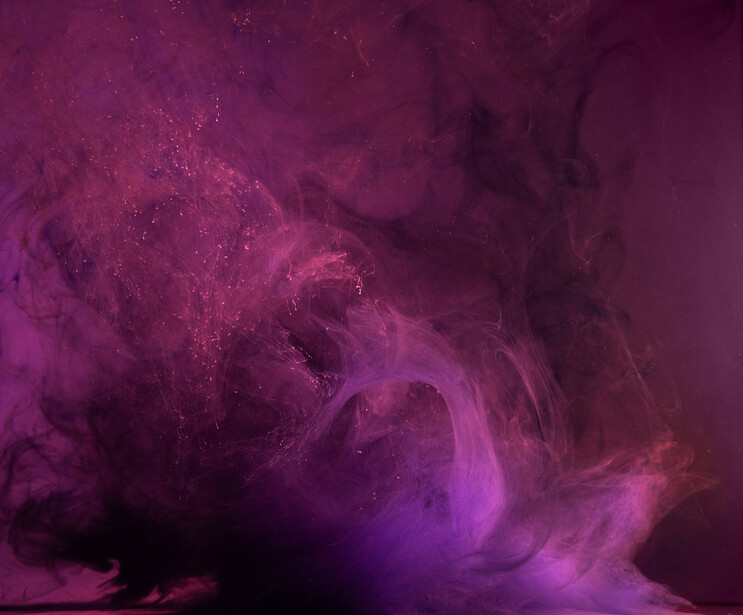
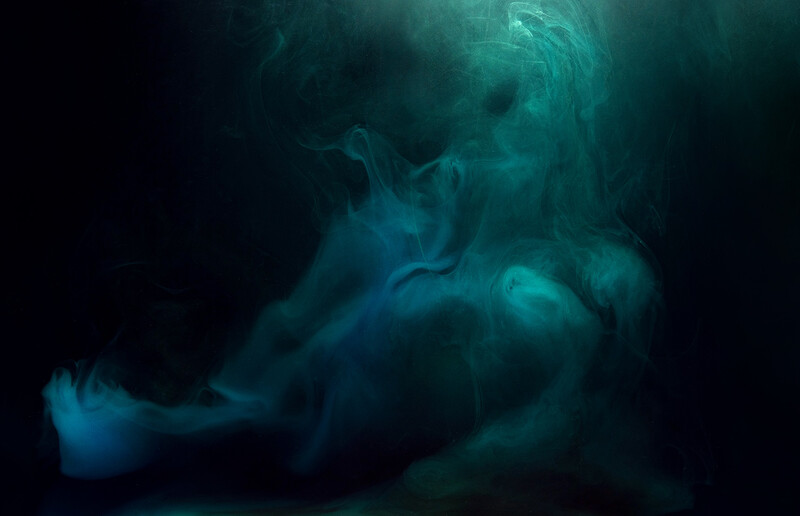
The dreamy and surreal textures created by ink dissolving into water are unlike anything else. When you drip ink or paint into the water, you never know if you will experience a slow ballooning effect or something that looks more like sinister tentacles spreading throughout. The density of the ink you use, the way the colors are introduced into the water, the temperature, and the currents or movement are all variables that will determine what happens the few seconds after the medium hits the water.
The Colors
First, let's talk about the types of material you can use to color your water and how the resulting images will look. The first material you will want to experiment with is Liquitex Acrylic Ink. This dense ink is great if you want to capture the classic cumulus cloud look that billows out like a soft piece of cotton. This ink is definitely the most expensive of the bunch, but the results will be thick, dense, and vibrant.
The next option is using normal craft store Acrylic Paint. It's impossible to know the density of every type of paint, so you will need to experiment with your paint before you start photographing it. The best technique I found was to mix a teaspoon of paint with a teaspoon or tablespoon of water to get the correct density. If the paint is too think, it will not expand in water and will plummet to the bottom of the tank. If it is too thin, it will dissolve quickly with little variety in density of color. You will also find that paint that isn't mixed well can show lumps or particles in the resulting image, so make sure you mix it thoroughly. If you are using or mixing paint that doesn't come in a container with a nozzle, I found that buying a few 3ml Pipettes and Condiment Squeeze Bottles will make your life a lot easier when it comes to injecting or dripping the paint into your water tank.

The most obvious dye to use for this technique is food coloring or Rit clothing ink dye. Both of these materials can be found at most grocery stores and are a good starting point if you want to test your overall setup and lighting. The food coloring will look similar to the acrylic inks mentioned above, but they usually thin out much quicker and have a much more transparent look compared to the acrylic ink. To keep with the cloud analogy, food coloring often looks like cirrus clouds found high in the atmosphere. I've found that they are also a little less dense, which causes them to be more buoyant in water. You can experiment with dissolving a little salt or sugar in with your mixtures, but beware, a little goes a long way. The clothing dye that I tried using created a very powdery effect that almost looks like exploding color powder, similar to what you'd see at a color run. It's a cool effect for sure, but it may not be entirely what you are looking to capture.
The Tank
The next thing you are going to need to purchase is a good tank. Your goal here is to have a tank that can hold enough water, with enough width and depth to allow you to photograph the ink clearly as it dissolves. At first, I bought a large 10 Gallon Aquarium, which I thought would be the ultimate tank for this kind of photography, but I quickly realized 10 gallons of water gets pretty difficult to carry when you need to pour it out. I then picked up a Two Gallon Aquarium that worked much better but was still pretty large if capturing the initial plumes of ink is all you are setting out to photograph. I will say that a glass tank is better than an acrylic tank because the glass tank won't show scratches or fog up if cleaning materials scuff up the walls.
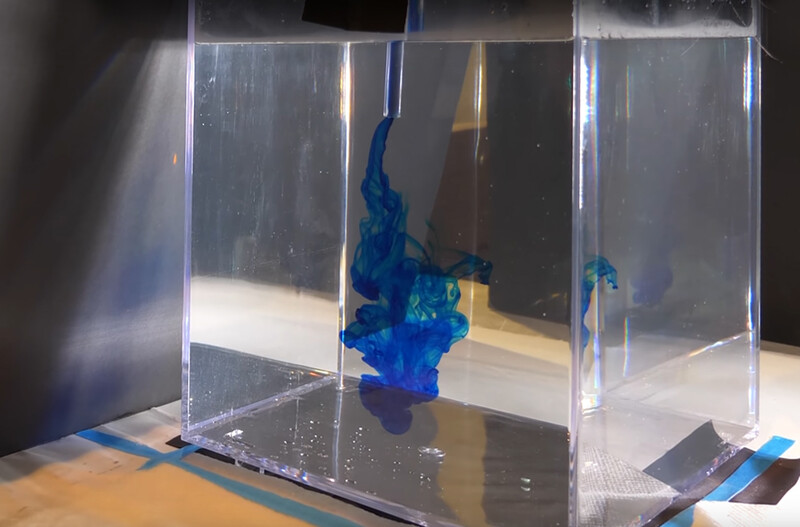
If you want to get this system streamlined even more, you could probably build a tank with a drain at the bottom that quickly empties the colored water and a refill hose to make the process even faster.
The Gear
The nice thing about this type of photography is you don't need any specialized camera gear to get good results. For my shoot, I wound up using the Tamron 24-70mm G2 lens mounted to a Nikon D850 DSLR Camera and mounted my entire camera to a Manfrotto Tripod to stabilize the whole thing. I thought using a macro lens would be even better, but I found that the depth of field was so small, which caused most of my image to be out of focus. No matter how well you pre-focus and drip your ink, you will probably have much of the ink plumes fall outside of the in-focus plane, which will make the majority of your image blurry. Therefore, I found it best to place my camera further away from the glass, zoom in, and create a large depth of field consisting of several inches instead of several centimeters.
In order to light up the background and the ink, you can use either constant lights like my favorite RGB color LED panels, or you can use flash. Flash is going to allow you to freeze the action of the dissolving ink much better, which will ultimately result in sharper images with more clarity. Without getting too technical, it will also benefit you to use flashes with a faster flash duration since the ink does dissolve pretty quickly. For my setup, I placed one Profoto B10 Strobe on my background, and another one pointed down on my tank using a Smith Victor Tabletop Lightstand. Your light modifier will affect the overall highlights and shadows, so you will want to experiment with those, but for me, I liked the look of a Profoto Reflector Dish fitted with a 20-degree grid from the Profoto Spot Grid set. Again, any flash system will work, and if you can get enough light output when shooting with a smaller aperture, you might find that small speedlights actually give you an even faster flash duration.
The Final Results
Once you have everything set up and you've done a few test runs in a smaller glass or shallow Tupperware, it's time to crank out a bunch of experiments. You can definitely perform each run by yourself, but having an assistant fire the camera or pour the ink will make your life a lot easier. Also, play around with shooting against both white and black backgrounds for different effects. You will be tempted to focus most on the initial drops of ink, but try to keep shooting as different inks mix together, because often you will find some interesting frames when the tank fills with different dyes and inks. It also helps to open your images on your computer after each session to make sure you aren't overlooking anything like clarity, sharpness, color density, or water bubbles.
It's going to be unlikely that you capture a perfect frame that doesn't need some retouching. For this particular photoshoot, I used ACDSee's Photo Studio Professional 2020 to not only adjust my raw files, but I was also able to clean up all the bubbles, debris, and light leaks in my favorite images. This software is pretty powerful, and if you are looking for an alternative to expensive programs that require you to pay a subscription each month, Photo Studio Professional 2020 could be a great alternative for you. For a free trial of this software, you can download it here and give it a test drive.


Join the Fstoppers community for free
-
Post comments and join in the discussions
-
Browse the site ad-free
-
Share your work and get featured in the community
-
Compete in the photo contests for fun and prizes
3 Comments
That was cool! The first photo looks whimsical and almost nebula like. Lots of Easter eggs in that image. The blue photo looks interesting as well; out of context, it could even appear as a more sophisticated form of smoke.
Quick tip: if you use a small tank, it is really easy to create unpleasant "mini waves". Try to go BIG if you can, or be extremely gentle
Interesting article but a couple of small points. 1. If you are shooting digital why would anyone experiment before they start shooting? Why take a chance of missing a good shot because you think you should experiment?
2. Using a macro lens doesn't change the depth of field vs. a non-macro lens. I assume you actually meant you tried getting tighter shots by getting in closer and that DOF was too shallow.